

How We Generate Production SwiftUI from Figma Using AI Skill at Halodoc
At Halodoc, AI isn't something we experiment with on the side. It's becoming central to how we build every day. From cutting repetitive engineering work to shipping features faster, it's quietly reshaping how our mobile team operates.
One of the most impactful shifts we've made recently: generating production-ready SwiftUI code directly from Figma designs. We did this by building a FigmaToSwiftUI Skill — a structured, reusable task script that any AI coding agent can follow — layered on top of Figma MCP (Model Context Protocol) and Code Connect.
This post walks through exactly how we did it: the traditional process and why it was slow, what the Skill does, how each piece fits together, and what it changed for the team.
Traditional Development Process
The traditional Figma-to-code process is straightforward. You open the Figma file, analyse the screen, and identify the components. You split those components, develop each one, and then combine them into a single page.
But on an average-complexity screen, this takes approximately four hours. If you're building a product with around 6 screens, that's roughly 3 days just to convert designs into code. The question we started asking was: Can we automate this UI development using AI?
Before You Build This: Two Things You Need First
This workflow is built on top of two foundations. If either is missing, the workflow doesn't hold up.
1. A Design System
A Design System is a principle, a shared standard for how your product looks and behaves. It applied consistently across your entire application. On iOS, that means a shared Swift module where every button, card, text style, and input is defined once and reused everywhere rather than reimplemented feature by feature.
Why this matters for AI code generation: The AI needs to generate code that fits your codebase. That means it needs to know which component to use for every Figma element and how to call it in Swift. Without a Design System, there's nothing concrete to map to, and you'll get Apple's raw SwiftUI primitives that may not match your product standards.
If your team doesn't have a Design System yet, that's the prerequisite to build first. A minimal Design System for this workflow needs:
- A set of components covering the UI patterns you commonly build (buttons, text, cards, inputs, navigation)
- Clear Swift APIs for each component (parameters, types, defaults)
- A token library for spacing, colour, and typography values
2. Figma Code Connect
Figma Code Connect is a tool that creates explicit mappings between Figma components and their real code implementations. When the AI reads your Figma design via MCP, Code Connect surfaces the actual Swift API for each component.
Without Code Connect, the AI sees a Figma component named Button/Primary and has to infer what that means in Swift. With Code Connect, it knows it maps to DSButtonView(label:, style: .primary, action:) with the correct parameter names and types.
Setting up Code Connect for your Design System components is a significant upfront investment. Every time a Design System component API changes (new parameters, renamed variants, deprecated props), the corresponding Code Connect file must be updated.
The Full Chain — How Each Piece Connects
Here's the complete system and how the pieces fit together:
Figma MCP is the live connection to Figma's API. The Skill reads design data directly — no screenshots, no copy-paste — so it always has the current state of the design.
Code Connect is the translation layer. It resolves Figma components to their Swift APIs. This is where Card/Default becomes YourCardComponent(content:) with the right signature.
The Skill File is a sequence of actions, not an architecture document. It defines, step by step, what the AI agent does: which Figma node to read, what to confirm with the engineer before writing code, which files to create, and what to verify before finishing. Think of it as a reusable task script — tool-agnostic, so it works with any agent that supports MCP and custom context files.
AGENTS.md is your repo's context file. It tells the agent which architecture your project uses, where files live, which build commands to run, and what your token namespace is called. This is separate from the Skill File — the Skill File is generic and works across repos. Each repo brings its own context file with its own specifics.
Each layer handles a distinct concern. They compose into a workflow that's repeatable by any engineer on the team.
Setup — Step by Step
Step 1: Choose and Install Your AI Coding Agent
The Skill works with any AI tool that supports MCP connections and custom context/instruction files. Pick whichever your team is already comfortable with, then verify it can connect to MCP servers.
Note: The MCP connection, Code Connect and Skill File approaches are tool-agnostic. The concepts here are generic enough to work with any AI tool.
Step 2: Get Your Figma Access Token
- Open Figma → click your profile icon → Settings
- Scroll to Personal access tokens
- Click Generate new token — name it something like
mcp-local - Copy the token as you'll only see it once
Step 3: Connect Figma MCP
Figma MCP is a server that lets your AI agent talk directly to the Figma API — reading component trees, layout data, design tokens, and Code Connect mappings in real time. Configure it in your agent's MCP settings using your Figma access token.
Step 4: Map Your Design System with Code Connect
This is the step that makes AI output match your actual codebase.
For each Design System component, create a Code Connect file that maps the Figma component to its Swift API. Here's a generic example you can adapt:
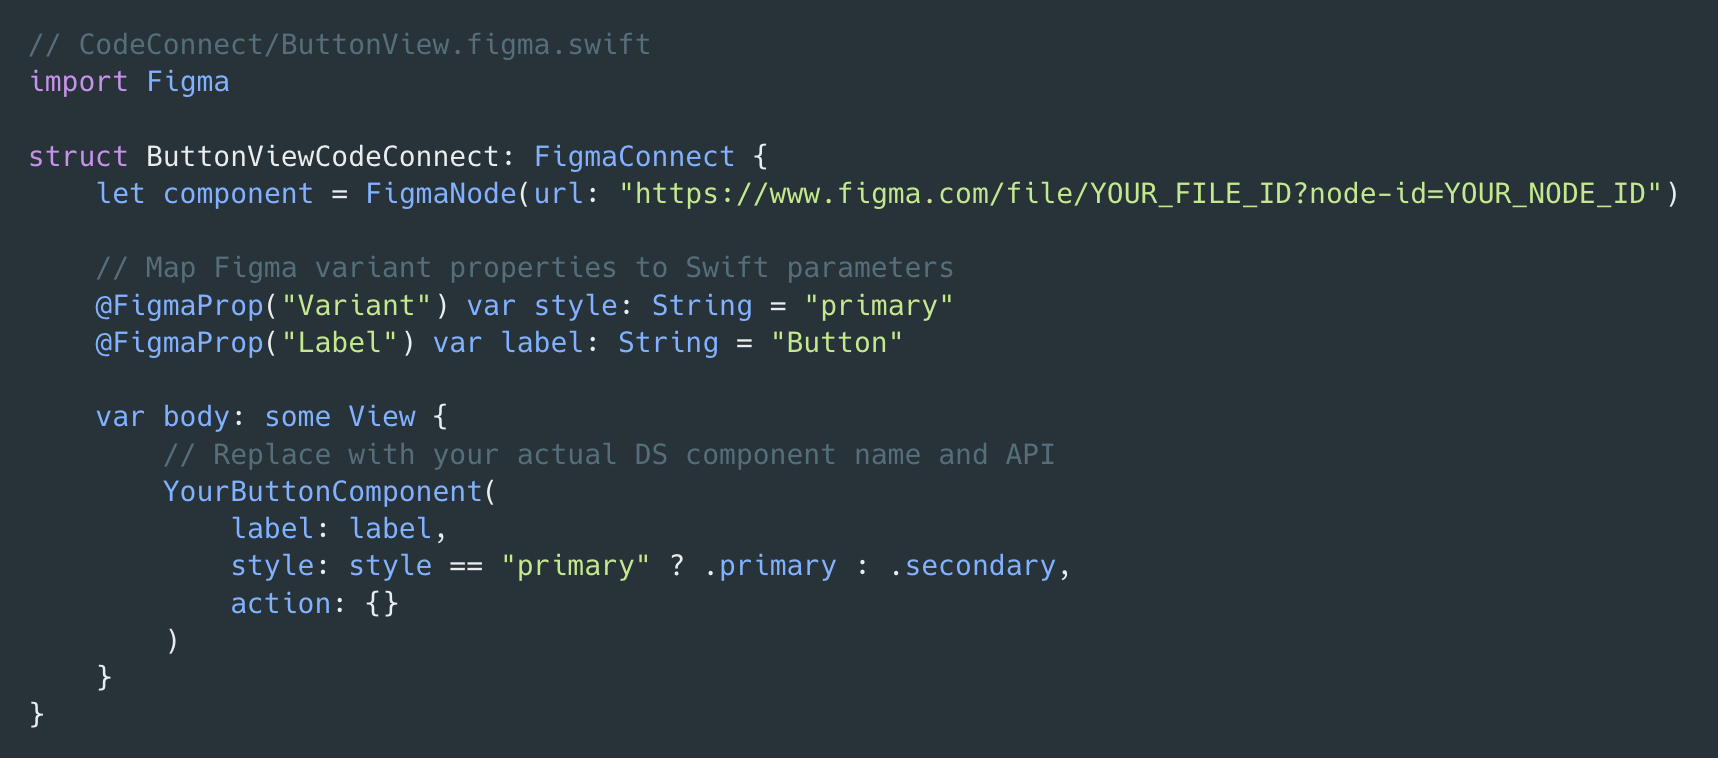
Do this for every component in your Design System that appears in Figma. Once published, Code Connect surfaces these Swift signatures automatically whenever the AI reads a Figma design via MCP.
Step 5: Create the Skill File
The Skill File is a markdown file that defines the sequence of actions the AI follows when converting a Figma design. It's not a description of your architecture. The Skill File is a task script: here's what to read, here's what to confirm with the engineer, here's what to generate, here's what to verify.
We've published our full Skill File on GitHub. You can use it directly as a starting point:
halodoc-tech/halodoc-ai: FigmaToSwiftUI Skill
To use it, copy the Skill File into your repo (a skills/ or .ai/ directory works well). The Skill references a references/DS_AGENTS.md file — that's where your design system's component catalogue, token namespace, and localisation paths go. The README in the repo walks through how to fill it in.
Step 6 — Run It
Open your AI coding agent in your project directory and invoke the Skill with a Figma URL:

The Skill will:
- Connect to Figma MCP and fetch the design for that node
- Map every Figma component to a Design System equivalent (using Code Connect data)
- Present the mapping table and wait for your confirmation
- Generate View.swift and ViewModel.swift
- Run your build tool and linter, fix violations
Review the mapping table carefully before approving. Catching a wrong mapping here is much faster than correcting the generated code.
What Each Section of the Skill Is Doing
The Skill has seven steps, a pre-flight check, and an arguments block. Each one exists for a specific reason. Here's what's happening inside each section and why it's there.
Arguments — Figma URL, target path, and screen name
Before the AI does anything, it asks for three things: the Figma URL with the node ID, the folder path where the files should go, and optionally a screen name (it infers this from Figma if you skip it). The node ID is the critical one. It tells the AI exactly which frame to read — not the whole page, not the root file, just that specific screen or section. Without this, the AI reads too much and the token cost climbs fast.
Pre-flight — Project setup check
Before fetching anything from Figma, the Skill checks that two files exist in your repo. The first is references/DS_AGENTS.md — your design system's component catalogue, token conventions, and localization paths. This is a blocking check: if it's not there, the Skill stops and tells you exactly what to fill in before it can continue. The second is AGENTS.md — a non-blocking check. If it's missing, the Skill continues but flags that it will need to ask for the localization file path manually during generation.
This pre-flight exists because the Skill can't map Figma components to DS components without knowing what DS components exist. DS_AGENTS.md is the source of truth for that.
Step 1 — Fetch design context
The AI calls Figma MCP with the node ID and reads the full design context for that frame: layout direction, component instance names, spacing and padding values, color hex values, typography, and interactive states. This is a live read — always the current state of the design, not a cached export.
Two flags are also detected here and carried forward through the rest of the Skill: contains_images (any node has an image fill) and contains_animations (any layer name contains "lottie", "animation", "anim", or similar). These gates determine whether Steps 3b and 3c run at all.
Step 2 — Fetch component definitions and map to DS
The AI calls Code Connect to get the mapped Swift APIs for Figma components, then maps every component in priority order: Code Connect mapped first, then DS Organism, DS Molecule, DS Atom, and finally a hard stop if nothing matches. This priority order matters — it means the AI always reaches for the highest-level DS component available before composing from primitives.
The AI then builds the mapping table — every Figma layer on the left, the DS component in the middle, the exact Swift call on the right — and stops. It shows you this table and waits for your confirmation before writing a single line of code. This pause is intentional. Catching a wrong mapping here takes 60 seconds. Finding it after the code is generated takes much longer.
Step 2b — DS variant gap check
For every mapped component, the Skill compares the Figma variant properties (like style: "ghost" or size: "large") against the actual public API documented in DS_AGENTS.md. If a Figma property has no matching case or parameter in the SDK, the Skill stops and lists every gap in a single message before proceeding. It doesn't guess, it doesn't pick the closest match silently — it surfaces the gap and asks what to do. This is what prevents generated code from looking right but calling an API that doesn't exist.
Step 3 — Handle missing DS equivalents
If a Figma component has no DS match at any tier, the Skill names it clearly and asks the engineer to choose: compose it from DS primitives with an inline gap comment, add a TODO placeholder, or register it as a new known custom component in DS_AGENTS.md. No code is written until that decision is made.
Step 3b — Handle images (runs only if contains_images is true)
Before prompting, the Skill searches your repo for existing assets in any sibling .xcassets directories. It then lists every image in the design and asks how each one should be loaded: local asset by name, remote URL with async loading, or reuse of an asset it already found in the codebase. All images are resolved in a single back-and-forth, not one at a time.
Step 3c — Handle animations (runs only if contains_animations is true)
If the design contains a Lottie animation or animated layer, the Skill stops and asks for the JSON file name, then generates the correct LottieView call with .looping() by default.
Step 4 — Output mapping table and wait for confirmation
The complete component mapping table is presented one final time before any Swift code is written. This is the last checkpoint before generation starts.
Step 5 — Translate AutoLayout to SwiftUI
Figma's AutoLayout properties are converted to SwiftUI layout containers using a consistent mapping: vertical stack to VStack, horizontal to HStack, wrap to LazyVGrid and overlap to ZStack. Spacing and padding values always come from your DS token namespace — never hardcoded pixel values.
Step 6 — Generate code
Two files are created: ScreenNameView.swift with layout and component calls only, and ScreenNameViewModel.swift with all state, actions, and dependencies. Before writing, the Skill checks whether either file already exists and asks before overwriting.
Step 6b — Add localisation keys
For every user-facing string in the generated view, the Skill looks up the correct localisation file path from AGENTS.md, adds the key and its primary and secondary language values to the right Localizable.strings files, and uses .localized in the generated code. No raw strings in views. If AGENTS.md doesn't have the module listed, it asks for the path before writing any keys.
Step 7 — Print completion summary
After all files are written, the Skill prints a structured summary: which files were created, how many localisation keys were added and where, and the exact next steps — run SwiftLint, wire the ViewModel into your DI container, register the navigation route. Nothing is left implicit.
What This Changed for the Team
To make the numbers concrete, here's a real example: the New Product screen in the Halodoc Health Store. It has three distinct sections — a horizontal scrollable "Best Selling" product carousel with product cards (image, name, unit, price range, discount badge, and an Add button), a "Discover New Product" category grid with icon tiles, and an "Unlock Exclusive Offers" banner at the bottom. It's a mid-complexity screen — not trivial, but the kind that shows up in most sprints.
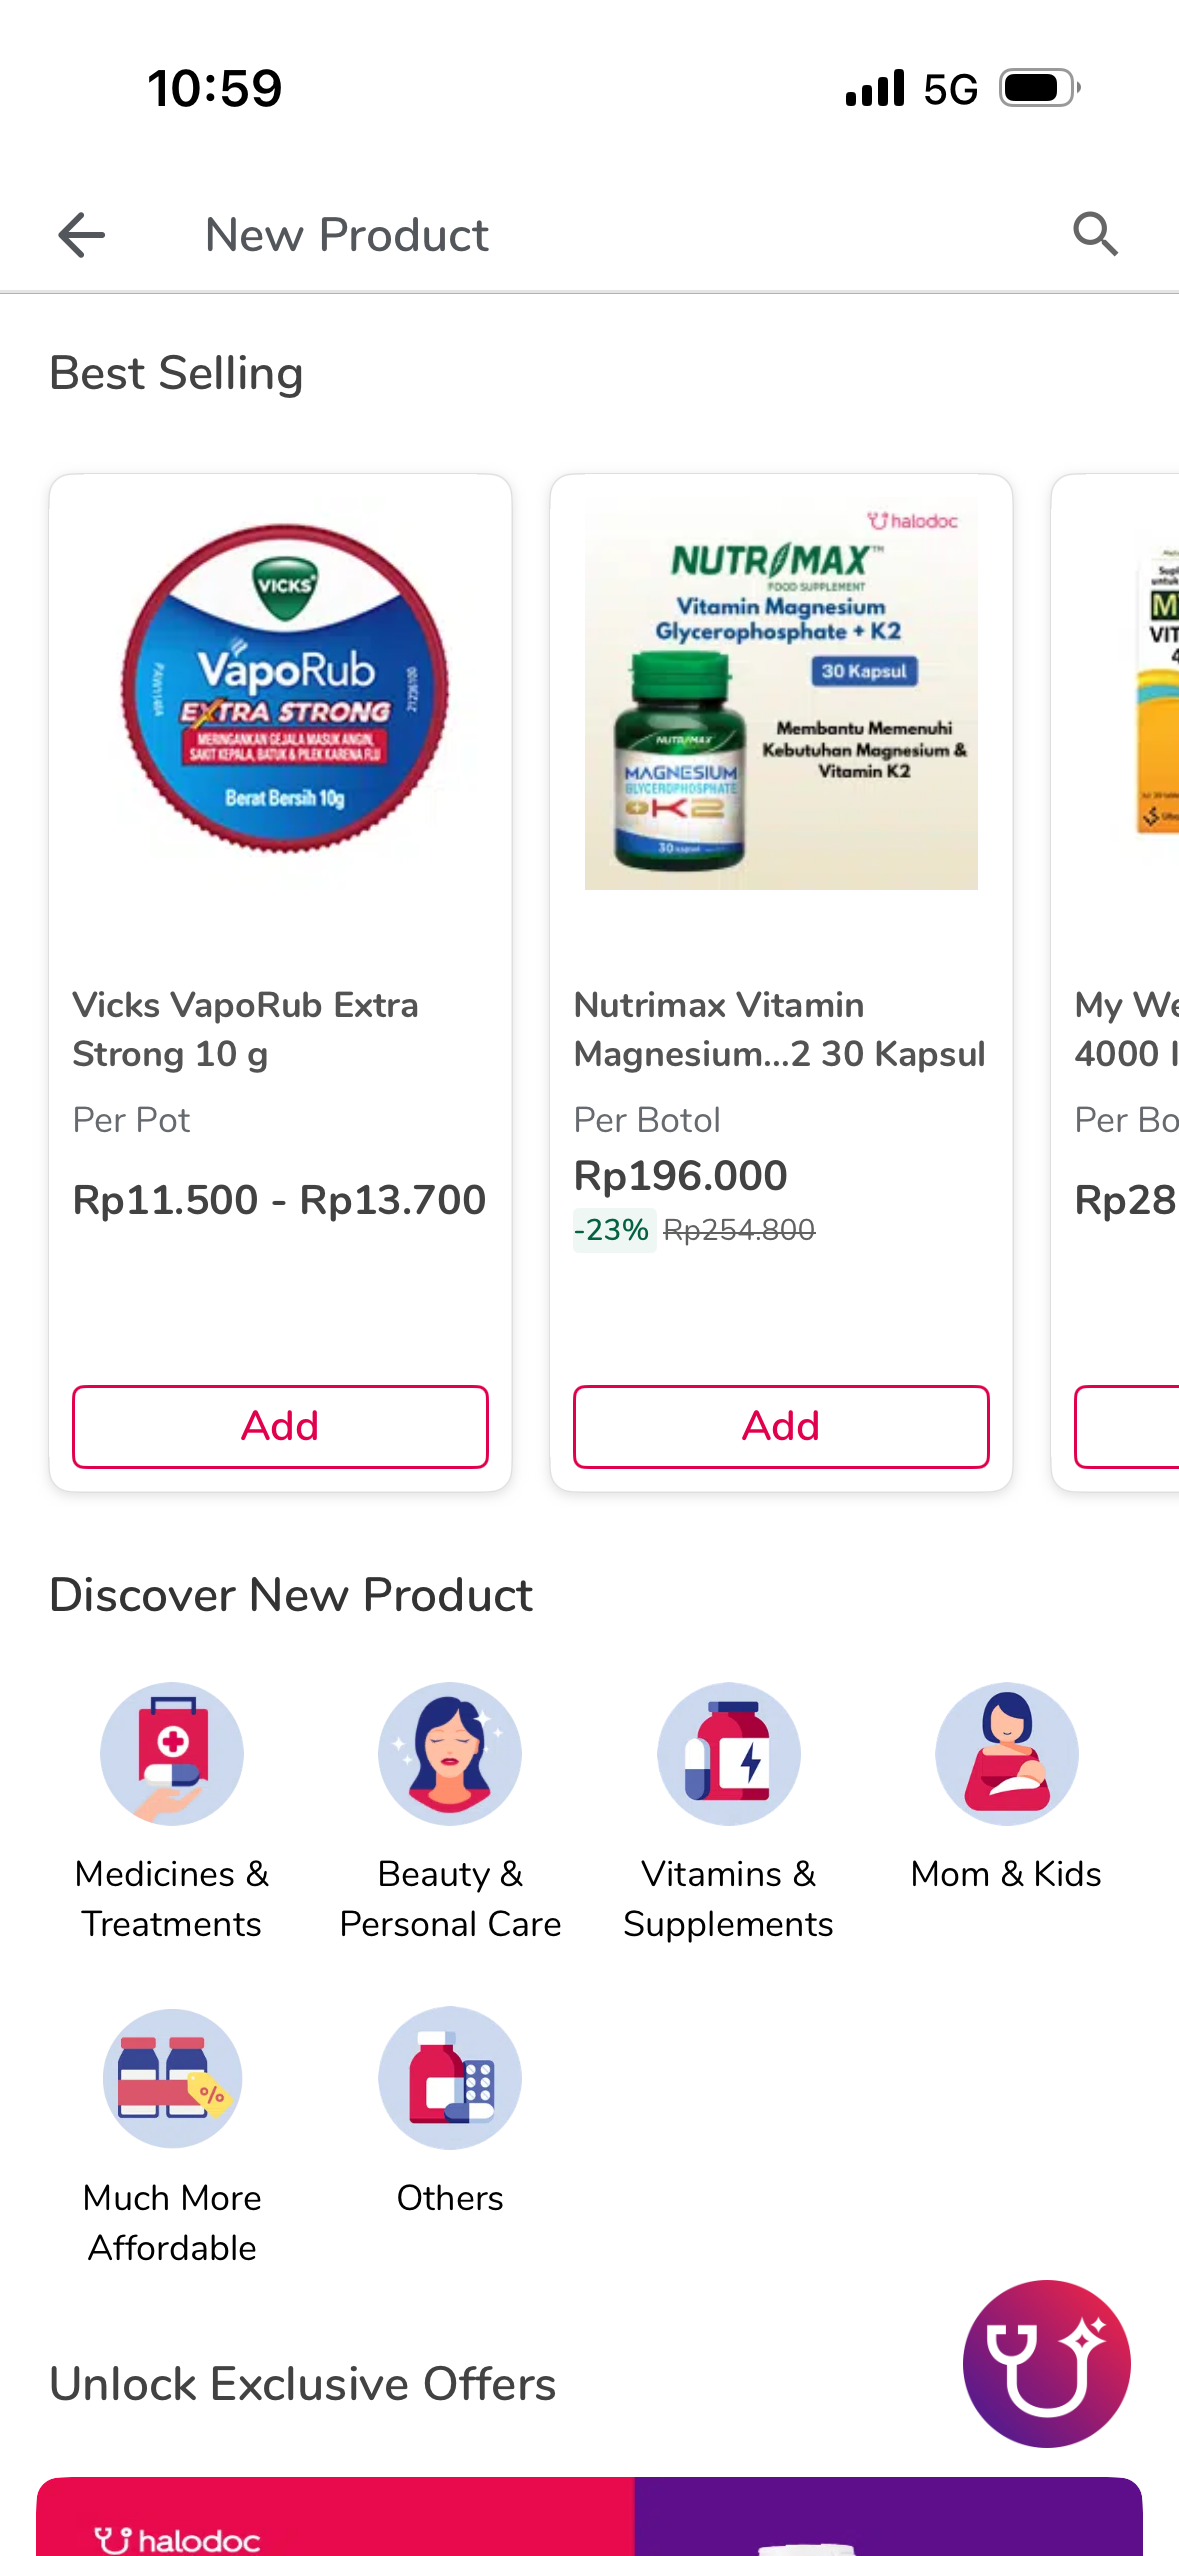
Before this workflow, that screen took one engineer roughly six hours end to end: inspecting the Figma layers, figuring out which DS component maps to the product card, the category tile, and the banner, looking up the right token names for spacing and colour, wiring localisation keys, and getting through SwiftLint.
With the Skill, the same screen takes 30–45 minutes. The MCP call reads the full component tree, Code Connect resolves the product card and category tile to their DS equivalents, the mapping table gets confirmed in one pass, and the View and ViewModel come out with tokens applied, localisation keys written into Localizable.strings, and SwiftLint passing.
The $0.13 per screen figure is from this kind of screen — around 10k tokens for the Figma MCP call and ~34k for AI processing.
Features ship faster, experimentation becomes cheap, and the UI stays consistent no matter who built which screen. The repeated mechanical work is handled. What's left is the work engineers actually want to be doing.
Challenges and What We're Working On
Let's talk about where the workflow still has gaps now
- Image assets are still manual. The Skill generates code that references the correct asset names, but exporting those images from Figma and placing them into
.xcassetsis a step engineers still do by hand. It's a known cost — typically 5–10 minutes depending on the number of assets — and it doesn't block the code generation itself.
Workaround: Run the Skill first to get all the code with asset name references in place, then do the Figma asset export as a separate step at the end. We're working on automating this so it becomes zero-touch.
- Localisation depends on AGENTS.md being complete. The Skill writes real localisation keys into your
Localizable.stringsfiles — not placeholders. But to find the right file path, it looks up the target module inAGENT.md. If a module isn't listed, it stops and asks before writing any keys.
Workaround: Add new modules to AGENT.md before running the Skill for them. It's a small maintenance habit, but it's what keeps this step fully automatic.
- Screen complexity routing is manual. Simple screens — a header, a list, a CTA — go through the full live MCP call with no issues. Complex screens (deeply nested layouts, many component variants, dynamic lists, mixed scroll directions) can get unwieldy: the MCP call pulls more data, the mapping table gets long, and generation sometimes needs a second pass.
Workaround: Split complex screens into sections and generate each one separately, or pre-extract the Figma spec as structured text and feed it in directly instead of making a live MCP call. Both approaches work. We'd like the Skill to classify screen complexity automatically from the Figma node data and route accordingly, without the engineer having to decide upfront.
Summary
The setup takes about 30–45 minutes: connect Figma MCP, map your DS components with Code Connect, drop in the Skill File, and set up your project context file with your repo's specifics.
Once that's in place, any engineer on the team — and any AI coding agent that supports MCP — can go from a Figma URL to reviewed SwiftUI: correct DS components, proper token usage, all three UI states scaffolded, accessibility handled, without manually looking up a single token name or component API.
On a well-scoped screen, the Skill gets you to roughly 80–90% completion. The DS component mapping is accurate because it comes from Code Connect, not guesswork. The remaining 10–20% is image assets placed into xcassets, localisation keys wired up, and complex screens that need a second pass.
The Skill is open-source and available on GitHub: halodoc-tech/halodoc-ai: FigmaToSwiftUI.
References
- Figma Code Connect documentation
- Figma Design System resources
- Figma's blog on design systems
- Halodoc AI Skills — FigmaToSwiftUI (GitHub)
- Simplifying iOS Apps Design with Design Tokens
- Analysis of SwiftUI with Design Token Adoption at Halodoc
- Let’s Componentise Our Android Apps Using Design Tokens
- Using Design Tokens for Providing Consistent User Experiences
About Halodoc
Halodoc is the number one all-around healthcare application in Indonesia. Our mission is to simplify and deliver quality healthcare across Indonesia, from Sabang to Merauke.
Since 2016, Halodoc has been improving health literacy in Indonesia by providing user-friendly healthcare communication, education, and information (KIE). In parallel, our ecosystem has expanded to offer a range of services that facilitate convenient access to healthcare, starting with Homecare by Halodoc as a preventive care feature that allows users to conduct health tests privately and securely from the comfort of their homes; My Insurance, which allows users to access the benefits of cashless outpatient services more seamlessly; Chat with Doctor, which allows users to consult with over 20,000 licensed physicians via chat, video or voice call; and Health Store features that allow users to purchase medicines, supplements and various health products from our network of over 4,900 trusted partner pharmacies. To deliver holistic health solutions in a fully digital way, Halodoc offers Digital Clinic services, including Haloskin, a trusted dermatology care platform guided by experienced dermatologists.
We are proud to be trusted by global and regional investors, including the Bill & Melinda Gates Foundation, Singtel, UOB Ventures, Allianz, GoJek, Astra, Temasek, and many more. With over USD 100 million raised to date, including our recent Series D, our team is committed to building the best personalised healthcare solutions — and we remain steadfast in our journey to simplify healthcare for all Indonesians.