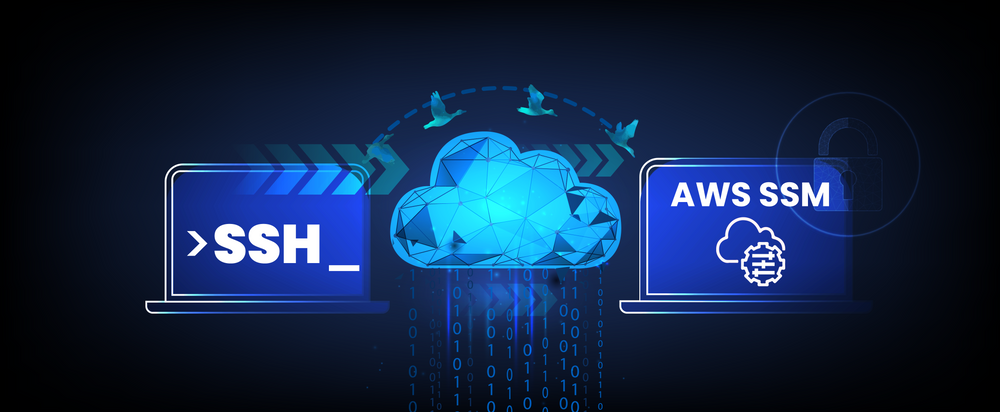
AWS Systems Manager Session Manager Implementation
At Halodoc, we take security very seriously. We also run a security bounty program. We audit our systems regularly.
This blog talks about one security measure that we took by implementing SSM.
Session Manager Overview:
Session Manager is a fully managed resource by AWS that allows you to manage, access and troubleshoot Amazon Elastic Compute Cloud (EC2) instances. SSM provides you the Secure instance management without need to open inbound ports, or manage SSH key.
Why is Managing SSH is so challenging?
- It is very difficult to monitor SSH usage.
- Managing SSH keys is very difficult. If we lose a SSH key or if gets stolen, then we have to go through lots of challenges and processes to recover it.
- We have to open SSH inbound port to allow to connect.
- To provide access to a private network from an external network, we need to run a bastion host.
Why SSM?
AWS Systems Manager Session Manager allows us to manage Amazon Elastic Compute Cloud (Amazon EC2) instances through an interactive one-click browser-based shell or through the AWS CLI. It provides secure and auditable edge device and instance management without needing to open inbound ports, maintain bastion hosts, or manage SSH keys. It is supported for Windows Server, Linux and macOS managed nodes. It helps us to improve Infrastructure security, and data protection. Also provides strong monitoring and logging features.
Benefits of using SSM:
- Extremely simple steps to connect to EC2 via the AWS console.
- Monitor login activity of users.
- We can control the duration for which a session is active.
- View the commands run by the operator.
- Restrict root access privileges.
- We can provide customised permission for the users logging into the machine.
- Centralised access Control using IAM policies.
- No need to open the inbound port in the security group.
How SSM Works: (Behind the scenes)
- Users are authenticated through the IAM role.
- After Successful authentication, the user gets access to the instance via the AWS console.
- An Agent running on the EC2 instance connects to the SSM endpoint and executes the command inside the EC2 instance.
- All actions performed via SSM are logged to the cloud trail.

Requirements:
- SSM Agent needs to be installed on each EC2 instance.
- IAM Role
- Local system setup
Implementation:
- Installing SSM agent:
- For Implementing SSM on any EC2 instance, we need to install the SSM agent on the EC2 instance.
- In most cases, the SSM agent is preinstalled on AMIs provided by AWS. Using the below command we can check if SSM is installed in the instance or not.
| Operating system | Command to check SSM Agent status | Command to start SSM Agent |
|---|---|---|
| Amazon Linux | sudo status amazon-ssm-agent | sudo start amazon-ssm-agent |
| Amazon Linux 2 | sudo systemctl status amazon-ssm-agent | sudo systemctl start amazon-ssm-agent |
| Ubuntu Server 16.04 64-bit instances (deb package installation | sudo systemctl status amazon-ssm-agent | sudo systemctl start amazon-ssm-agent |
| Windows Server (Run in PowerShell) | Get-Service AmazonSSMAgent | Start-Service AmazonSSMAgent |
- Now, once the SSM is installed and running on the system, we need to create IAM Role which can be attached to the EC2 instance.
2. Creating IAM Role for SSM:
- Create a Role "SSM-Role" and attach the following AWS managed policies to it.
| Role Name | Role ARN |
|---|---|
| AmazonEC2RoleforSSM | arn:aws:iam::aws:policy/service-role/AmazonEC2RoleforSSM |
| AmazonSSMManagedInstanceCore | arn:aws:iam::aws:policy/AmazonSSMManagedInstanceCore |
- Since we want to display our logs on cloud watch, so create one custom policy and attach it to the "SSM Role".
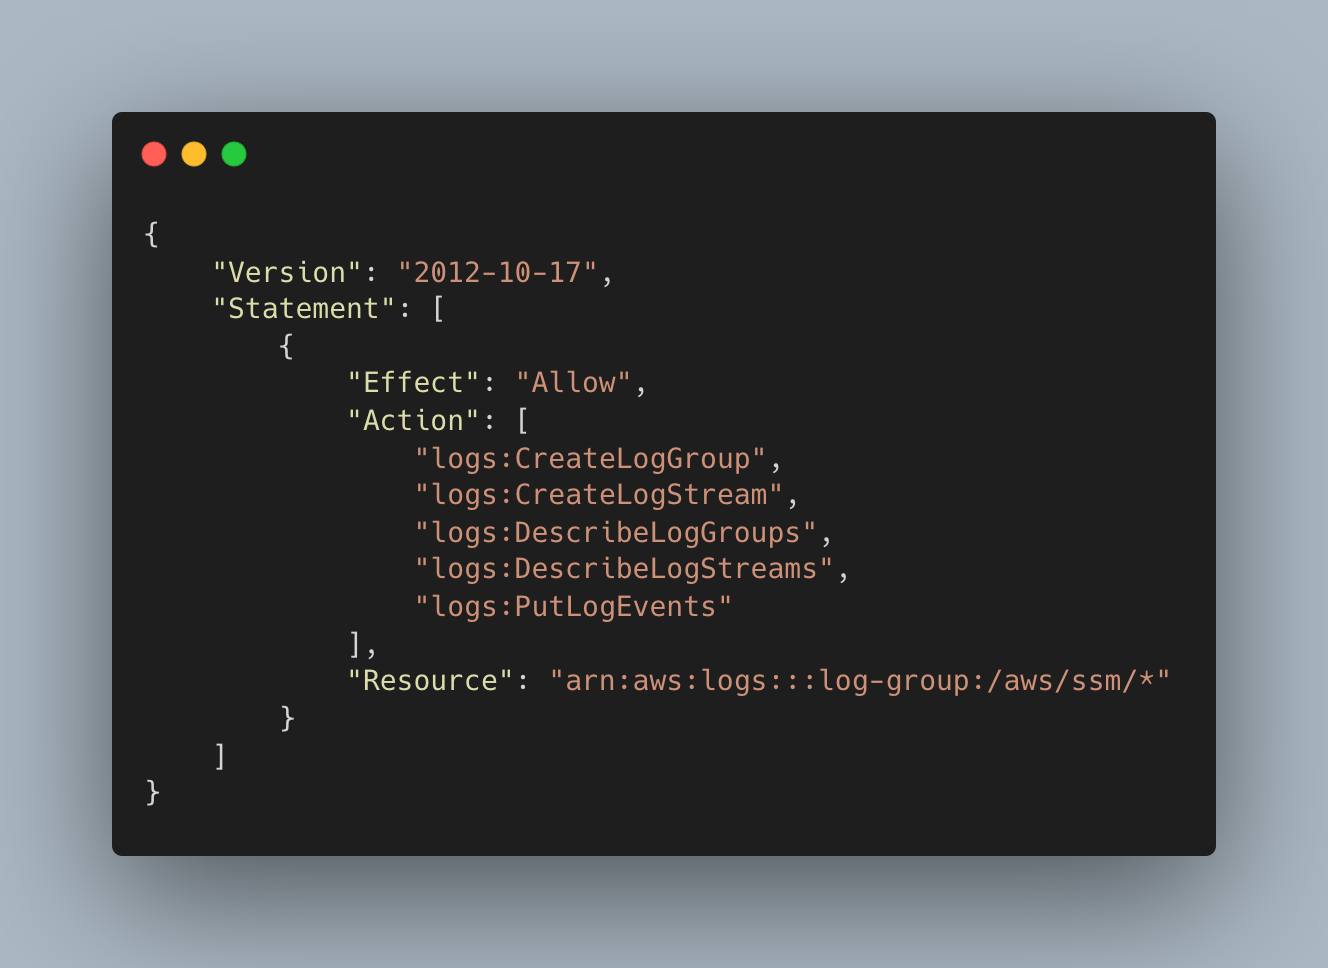
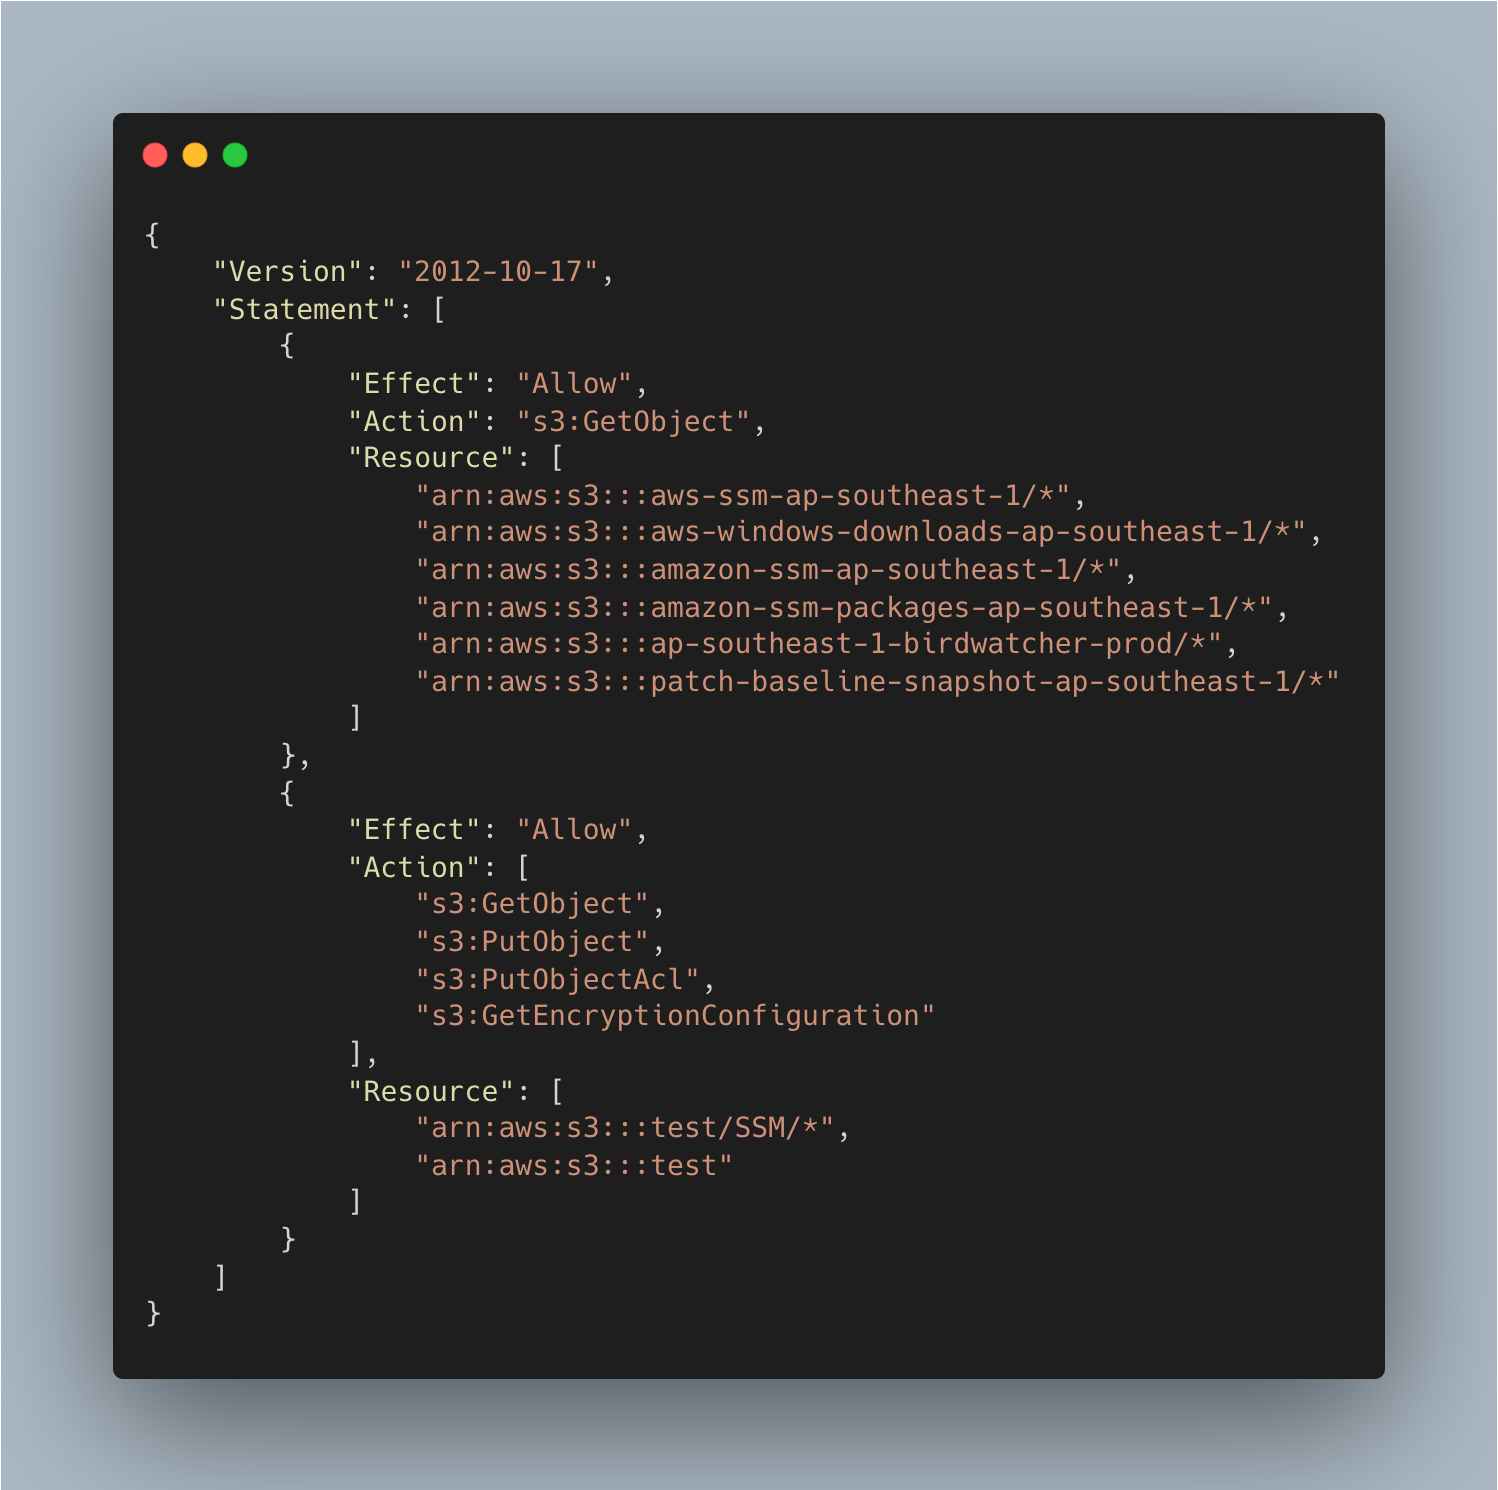
- If you wish to store logs in the S3 bucket then create one more custom policy and attach it to the "SSM Role".
3. Now "SSM Role" can be attached to the EC2 instances on which we want to implement the SSM.
Below are the steps to attach the IAM role to an EC2 instance.
- Open the Amazon EC2 console.
- In the navigation pane, choose Instances.
- Select the instance, choose Actions, Security, and Modify IAM role.
- Select the IAM role to attach to your instance, and choose Save.
4. Now, "SSM Role" is successfully attached to the EC2 instance.
Role creation for users:
- In order to allow users to connect with SSM via SSO,
we need to create roles, and using tags we are going to permit users to connect with specific instances only. - below mention role will perform the tag-based filtering allowing only those instance that contains the tag "TAGName": "Instance-tag".
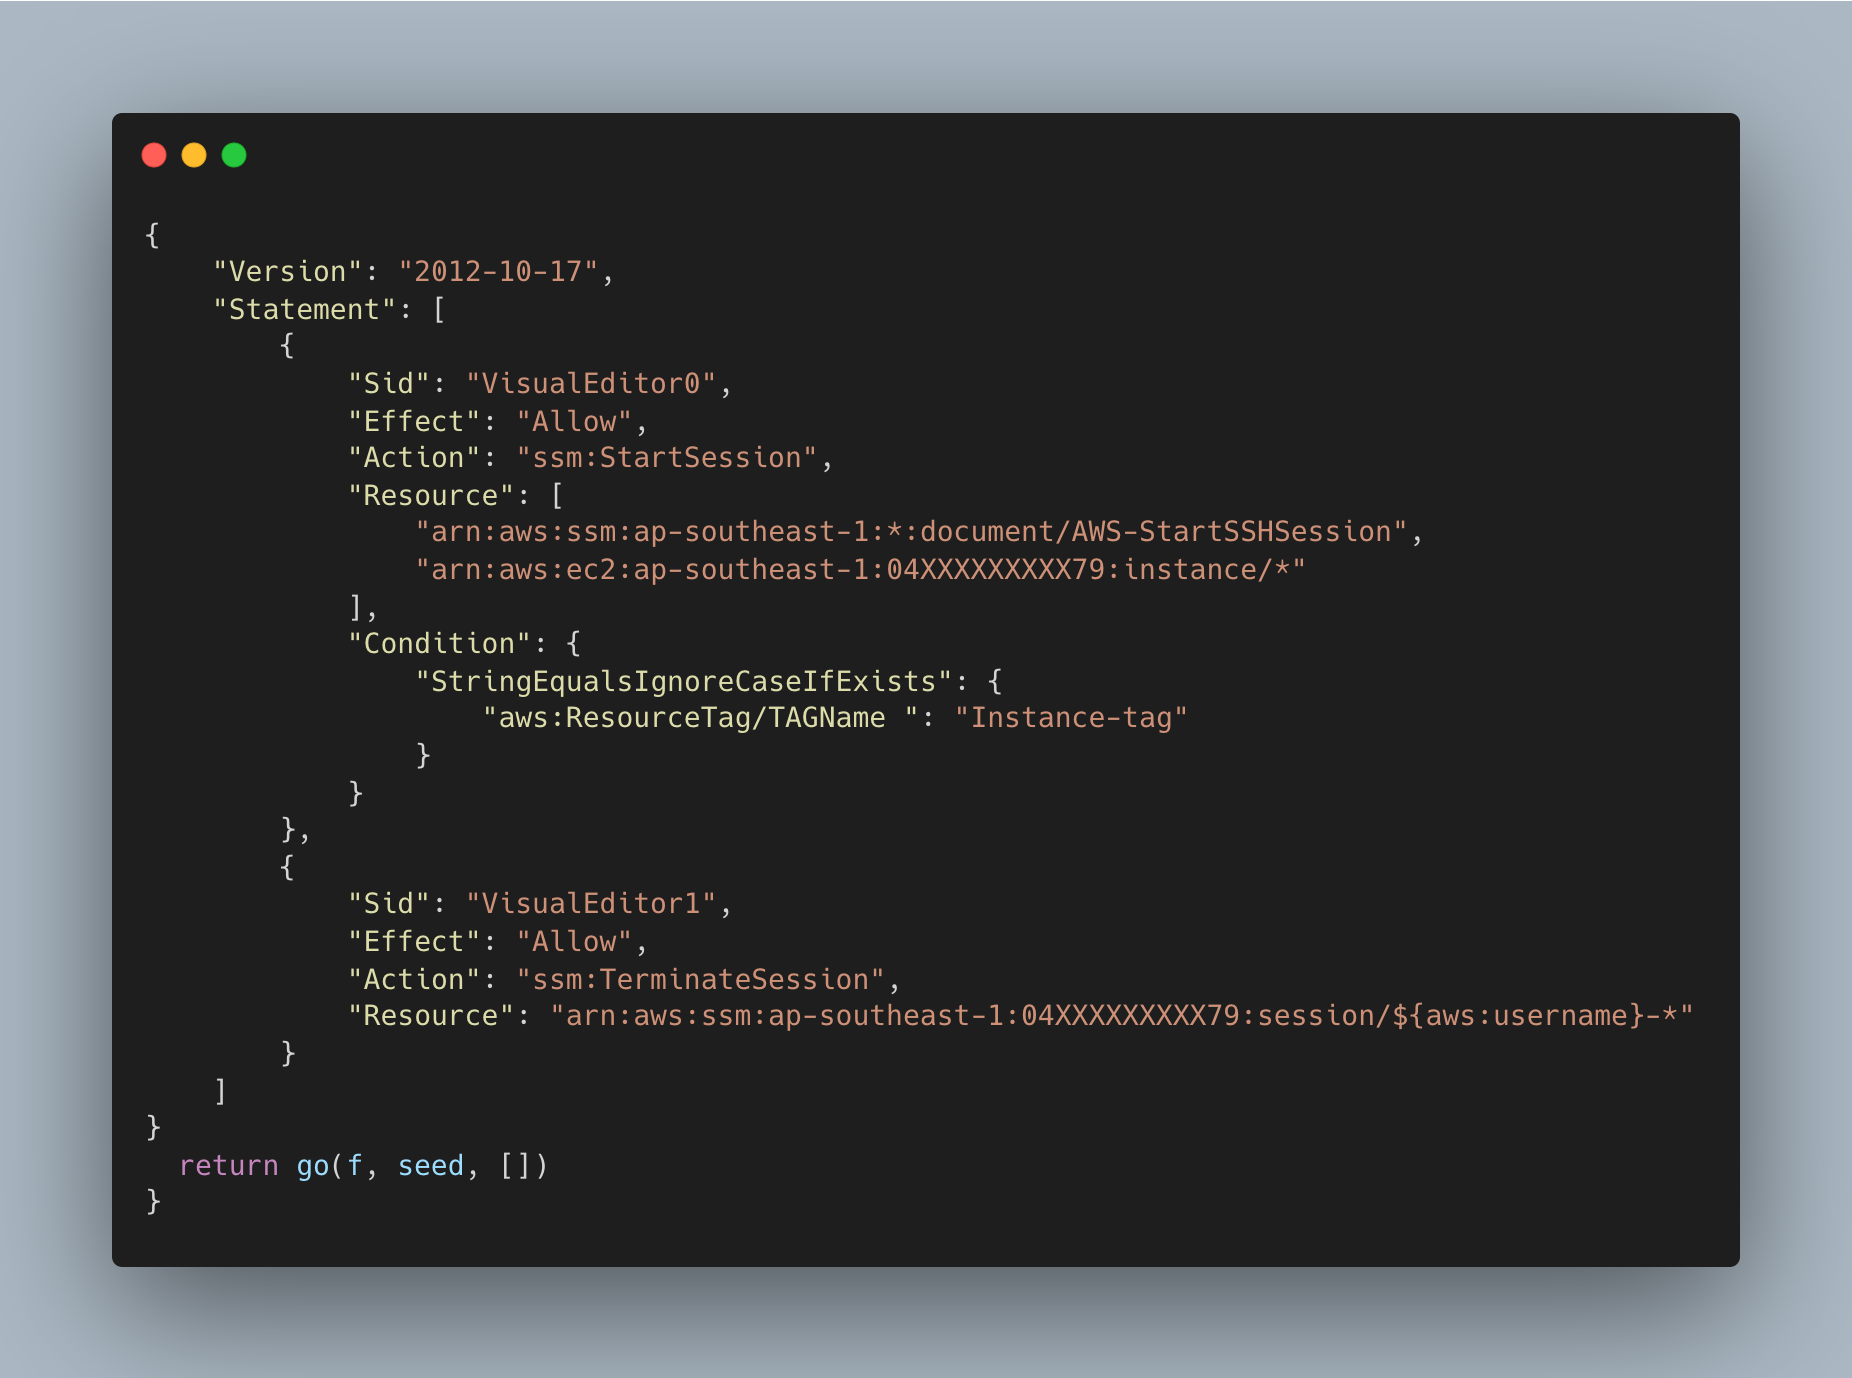
This role now can be attached to the users who require access to instances using SSM.
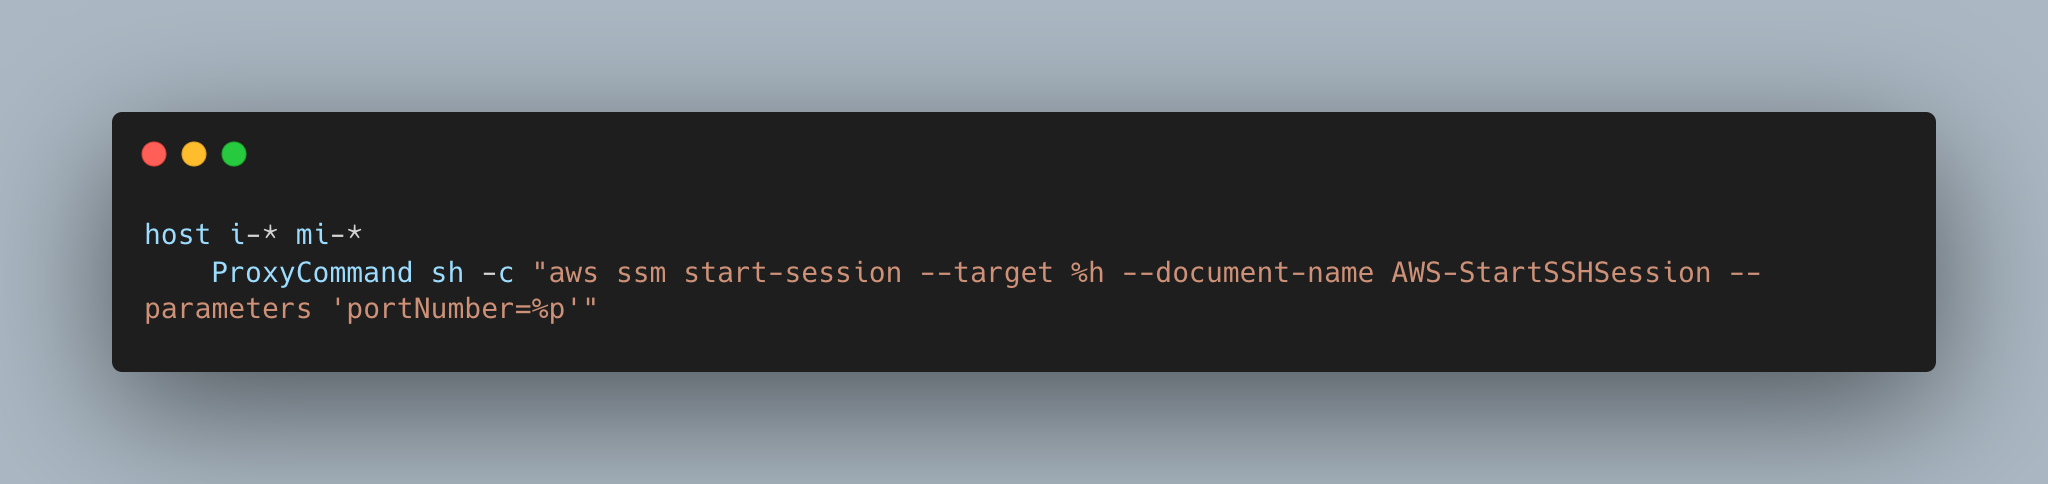
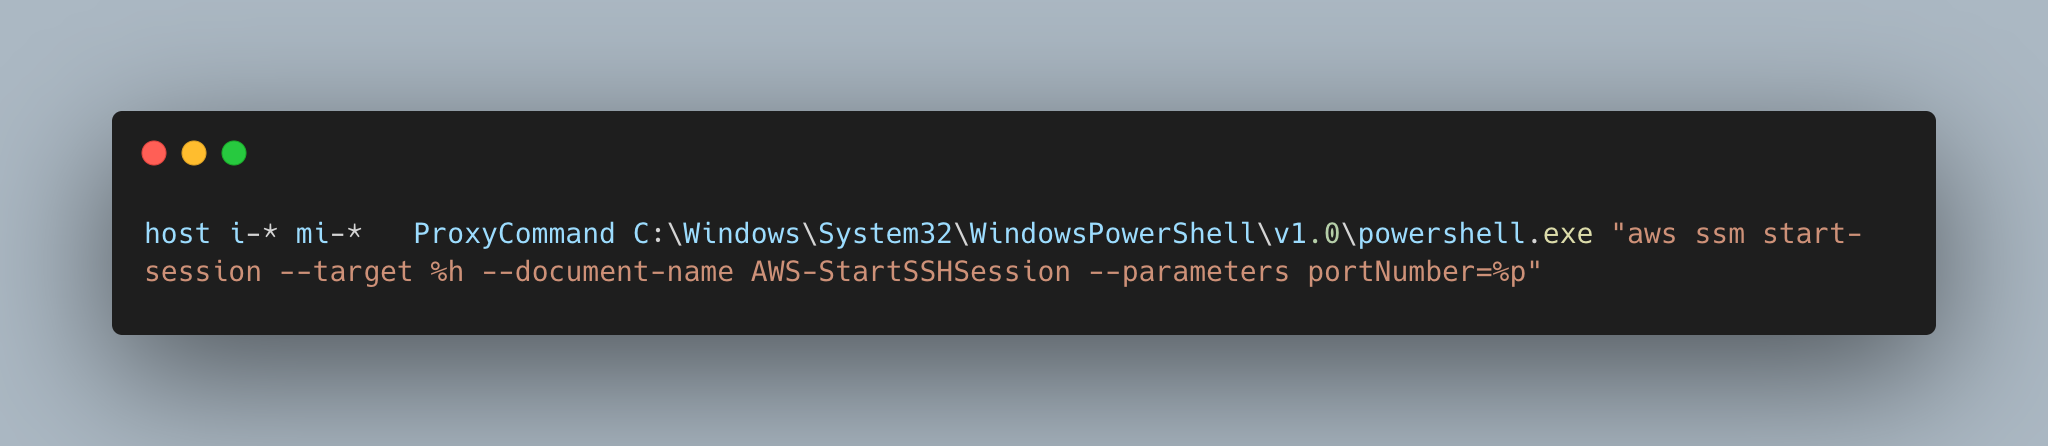
Local Setup:
- In order to connect with the EC2 instance via SSM, we need to configure our local system. below mentioned configuration needs to be stored in the "./ssh/config" file.
- For Mac/Linux System:
- For Windows System:
Let's Login to instance using SSM:
There are 2 ways to connect with EC2 instances.
- Using CLI:
- Wait, Before connecting to CLI, Do you have your SSH-Key and UserName?
We will require SSH key "user-key.pem" and Username "Dummy-User" for connecting to the EC2 instance. - Key and Username can be taken from the AWS Admin. Also we will require Instance ID, for connecting with EC2 instances.
- Also, Don't forget to give 400 Permission to your key. use below command for permission.
"chmod 400 user-key.pem" - Export the AWS credentials from SSO and configure it to the terminal.
- Make sure to configure AWS Access Key Id, AWS Secret access key, AWS session token in the terminal. - We are all set to connect with EC2 instance using SSM via CLI.
Use this command and start your session.
"ssh -i <user-key.pem> Dummy-User@<instance - id>" - Now, behind the scenes, the first request will go the the AWS SSO and it will check if you have the right credentials or not. If you successfully authenticate then only the next request will go to the server and key based authentication will take place at server level.
hurry.... We are successfully connected to EC2 instances, using SSM.
2. Using GUI:
- Login to AWS account.
- Go to EC2 Dashboard.
- Now, Select the Instance, which you want to connect.

- Click on the Connect. It will take you to the "Connect to Instance" screen.
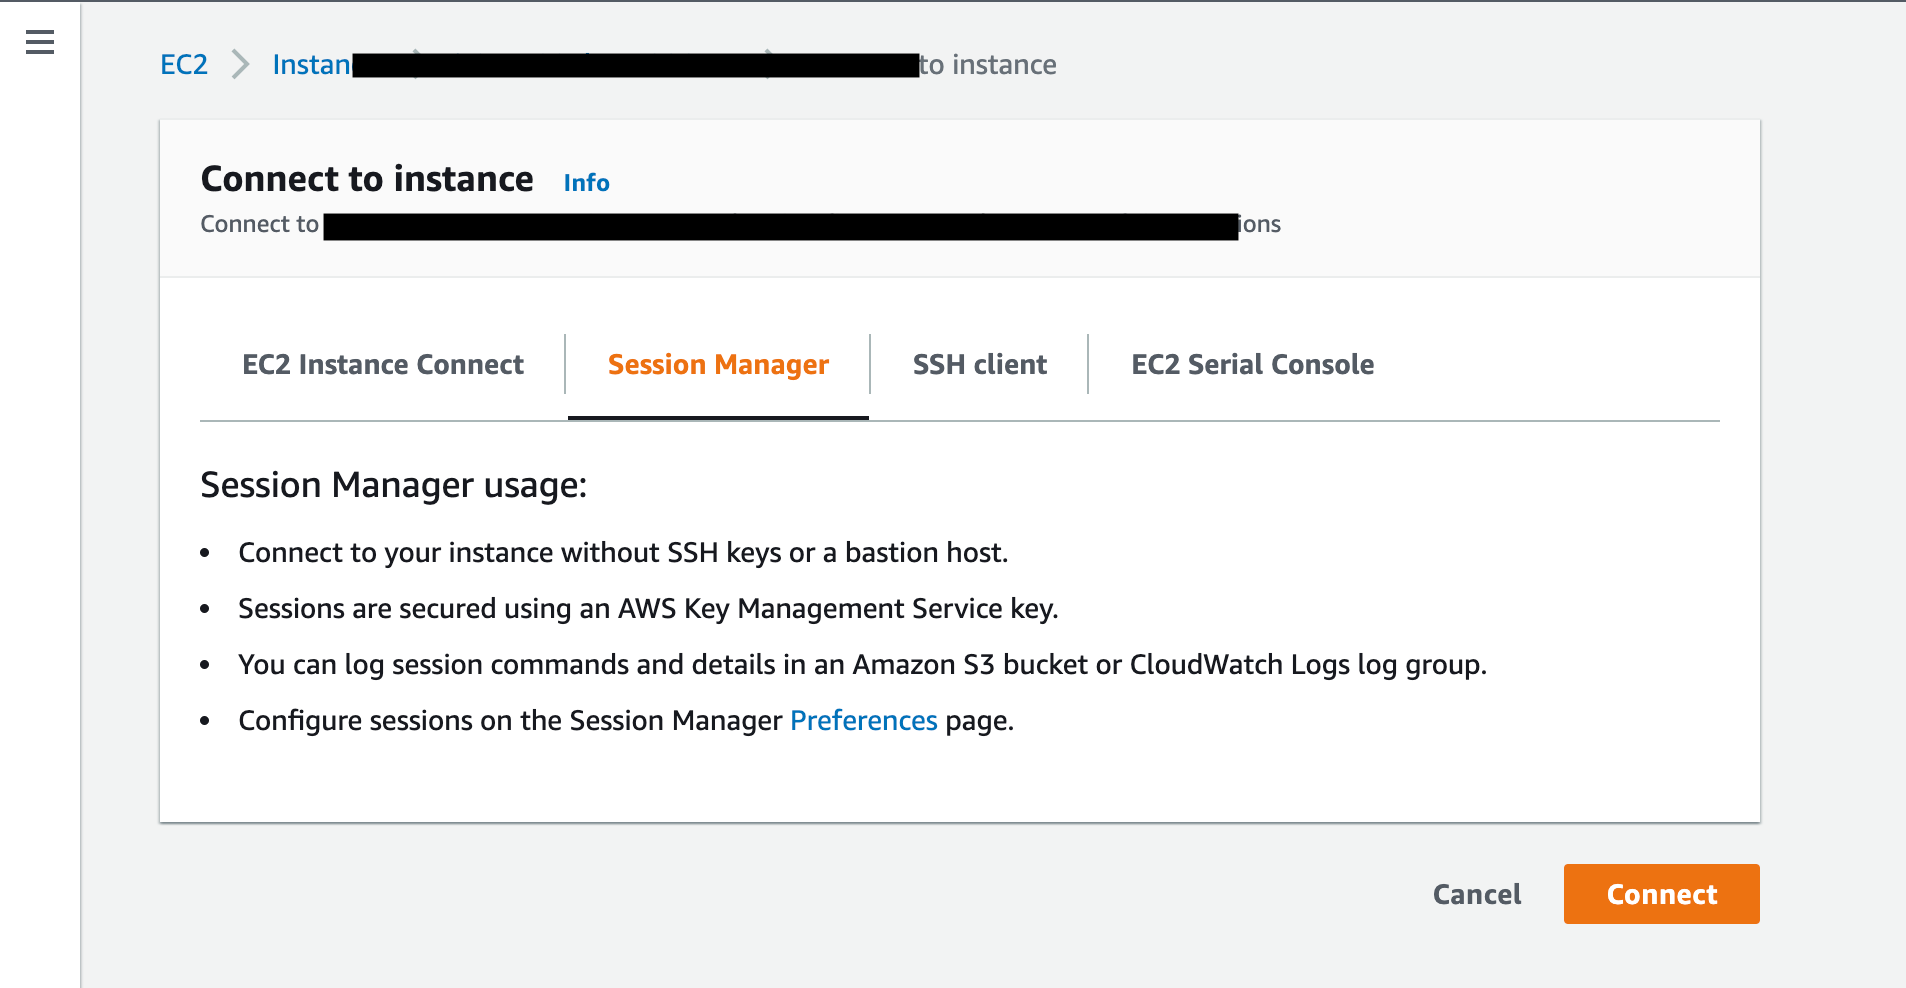
- Select Session manager and Click on Connect.
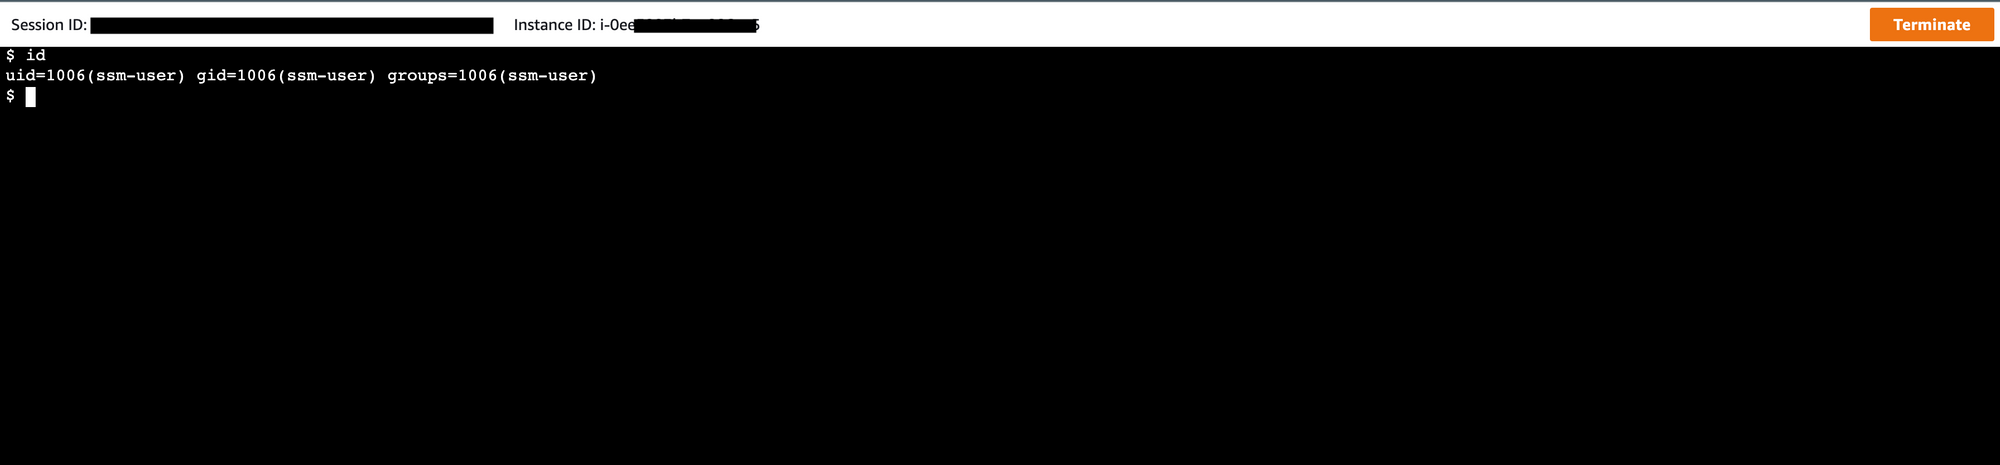
- Now, You will start the SSM session and login into the instance using "ssm-user".
- Note: "ssm-user" has root privilege, make sure to remove the root access from the "ssm-user" based on the your use case.
Logs and Session:
- All the activities performed using SSM can be monitored under the AWS Systems Manager > Session Manager.
- We can perform the following using session manager:
- Start Session
- Terminate Session
- Can view the history about sessions
- We can set the preferences like terminating session in X minutes, Idle Session timeout, Send session logs to CloudWatch.
Removing SSH port from the Security Group:
- SSH requires one inbound port to be open, But in SSM we don't need to open any port for Connection.
- To remove port:
- Login to AWS Account
- Select the EC2 instance and Select the instance.
- Go to Security Group and Remove the open SSH port entry.
Decommission the Bastion Host:
- We can decommission the bastion host, whose purpose is to provide access to a private network from an external network. SSM Don't require any bastion host.
Conclusion:
In Halodoc we have implemented SSM to EC2 instances after a thorough POC on the same. It has been proven beneficial for us because of security reasons and improved our management of user activity. Our journey to build and implement newer and powerful technology continues to develop a strong infrastructure.
Join us
Scalability, reliability, and maintainability are the three pillars that govern what we build at Halodoc Tech. We are actively looking for engineers at all levels and if solving hard problems with challenging requirements is your forte, please reach out to us with your resumé at careers.india@halodoc.com.
About Halodoc
Halodoc is the number 1 all around Healthcare application in Indonesia. Our mission is to simplify and bring quality healthcare across Indonesia, from Sabang to Merauke. We connect 20,000+ doctors with patients in need through our Tele-consultation service. We partner with 3500+ pharmacies in 100+ cities to bring medicine to your doorstep. We've also partnered with Indonesia's largest lab provider to provide lab home services, and to top it off we have recently launched a premium appointment service that partners with 500+ hospitals that allow patients to book a doctor appointment inside our application. We are extremely fortunate to be trusted by our investors, such as the Bill & Melinda Gates Foundation, Singtel, UOB Ventures, Allianz, GoJek, Astra, Temasek and many more. We recently closed our Series C round and In total have raised around USD$180 million for our mission. Our team works tirelessly to make sure that we create the best healthcare solution personalised for all of our patient's needs, and are continuously on a path to simplify healthcare for Indonesia.