
Elevating User Experience and Efficiency with Angular Advanced Routing Techniques
At Halodoc, we use Angular as our web application framework to build dynamic web applications. As with other modern web application frameworks, routing is a crucial aspect. Angular provides a robust and flexible routing system that allows developers to implement complex navigation and security logic. In this blog, we will dive into advanced routing techniques in Angular, focusing on guards, resolvers, and lazy-loaded route modules. These concepts will help in building scalable, efficient, and secure Angular applications.
Angular Routing Fundamentals
Before delving into advanced routing techniques, let's understand the basics of Angular routing first. Angular's Router module allows developers to create a structured navigation flow, making it possible to display different components based on the current URL
Routes
In Angular, routes are at the heart of the routing system. They define the paths within your application, and each path is associated with a specific component. Routes are configured using the RouterModule, which provides a set of route definitions as an array of Route objects.
A typical route configuration might look like this:
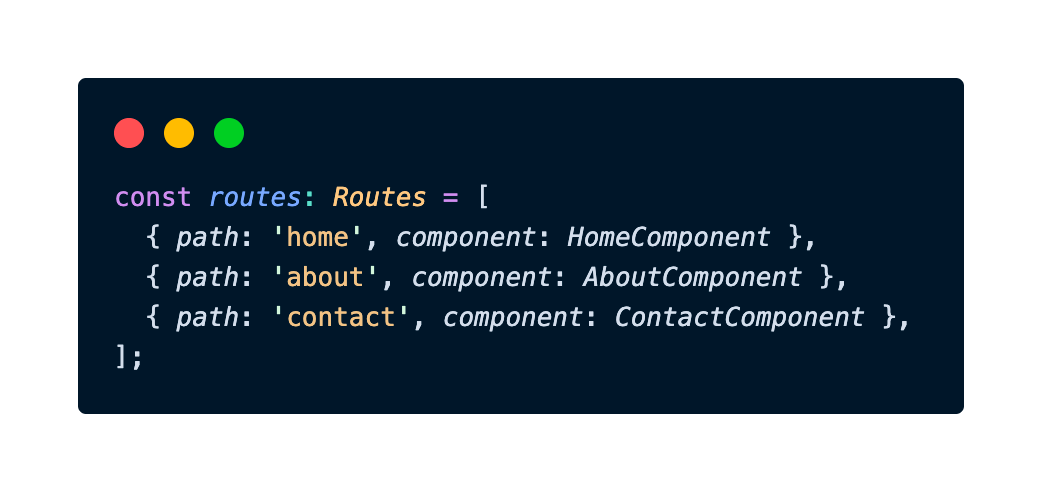
In this configuration, when the URL matches 'home', the HomeComponent will be displayed, and the AboutComponent and ContactComponent will be displayed respectively. The RouterModule also allows us to define a default route, which is displayed when the URL doesn't match any of the defined routes. In our case here, let's say that 'home' is the default route. We can define it like this:
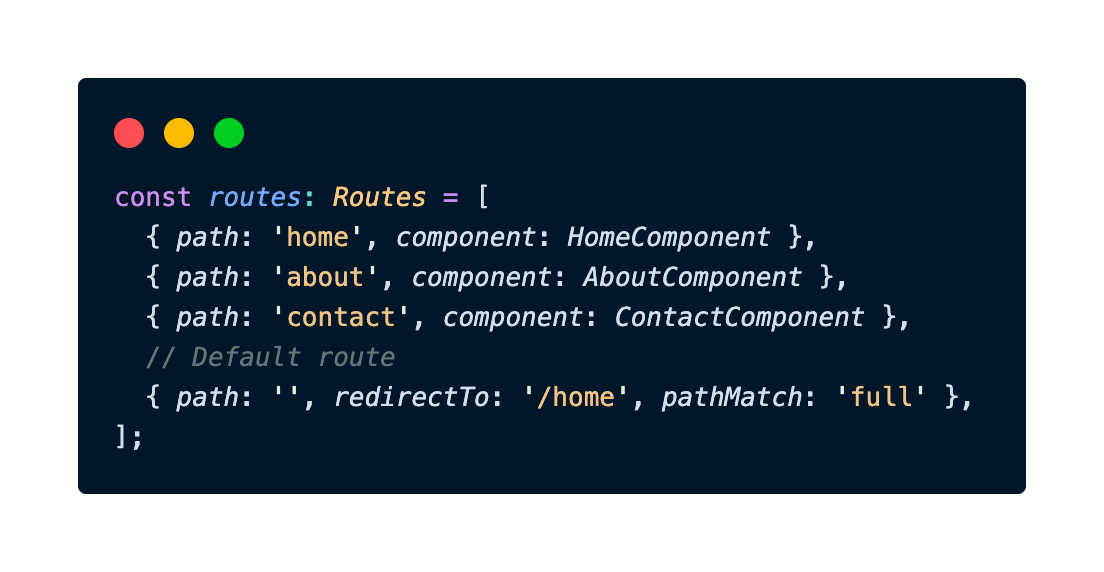
First, the value of path should be an empty string, then we use the redirectTo property to define 'home' as our default route. The pathMatch: 'full' property ensures that the whole path is considered when determining if the route should be redirected. This way, whenever users access a URL route that is not defined in the above, they will be redirected to the default path, which is the 'home' route.
Dynamic Routing and Route Parameters
Dynamic routing in Angular refers to the ability to configure and navigate routes based on dynamic data or runtime conditions. Unlike static routing, where route configurations are predefined in the application code, dynamic routing allows for more flexibility by determining routes dynamically during runtime.
Route parameters are one of the key concepts in applying dynamic routing. Route parameters are placeholders in the route path that can be filled with dynamic values. These parameters are often used to pass data between components or to identify a specific resource.
In our route configuration, we can define route parameters by using a colon (:) followed by the parameter name. One easy example of this is a route configuration for the path of a user profile page
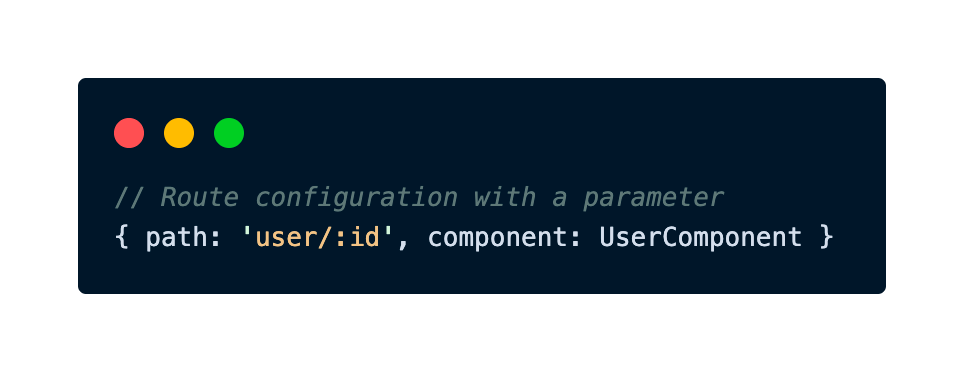
In this example, :id is a route parameter, and it represents a dynamic value that can be different for each user.
To access route parameters within a component, we can use the ActivatedRoute service, which provides information about the currently activated route, including its parameters:
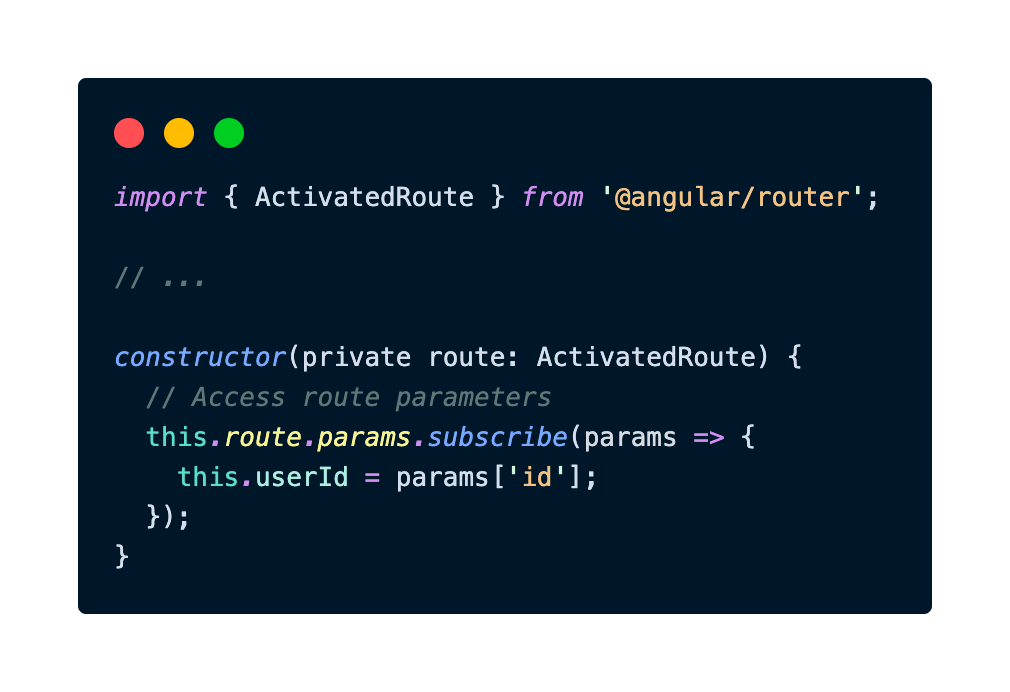
In this example, the userId property will contain the value of the id parameter for the currently activated route.
One implementation example of this dynamic routing is our article pages on the Halodoc website. For these article pages, we are using slugs for our route parameter instead of an ID. We are generating our article slugs based on the title of the article. For example, for an article with the title "Tips to Improve Your Health", the slug will be tips-to-improve-your-health. Slugs are important for several reasons:
- SEO: Search engines use slugs to understand the content of a page and to index it correctly. A well-written slug can help a page rank higher in search results.
- User experience: Slugs should be human-readable and easy to understand. This makes it easier for users to find the content they are looking for and to remember URLs.
- Accessibility: Slugs can make URLs more accessible to people with disabilities, such as those who use screen readers.
Let's take a look at the route configuration for this implementation:
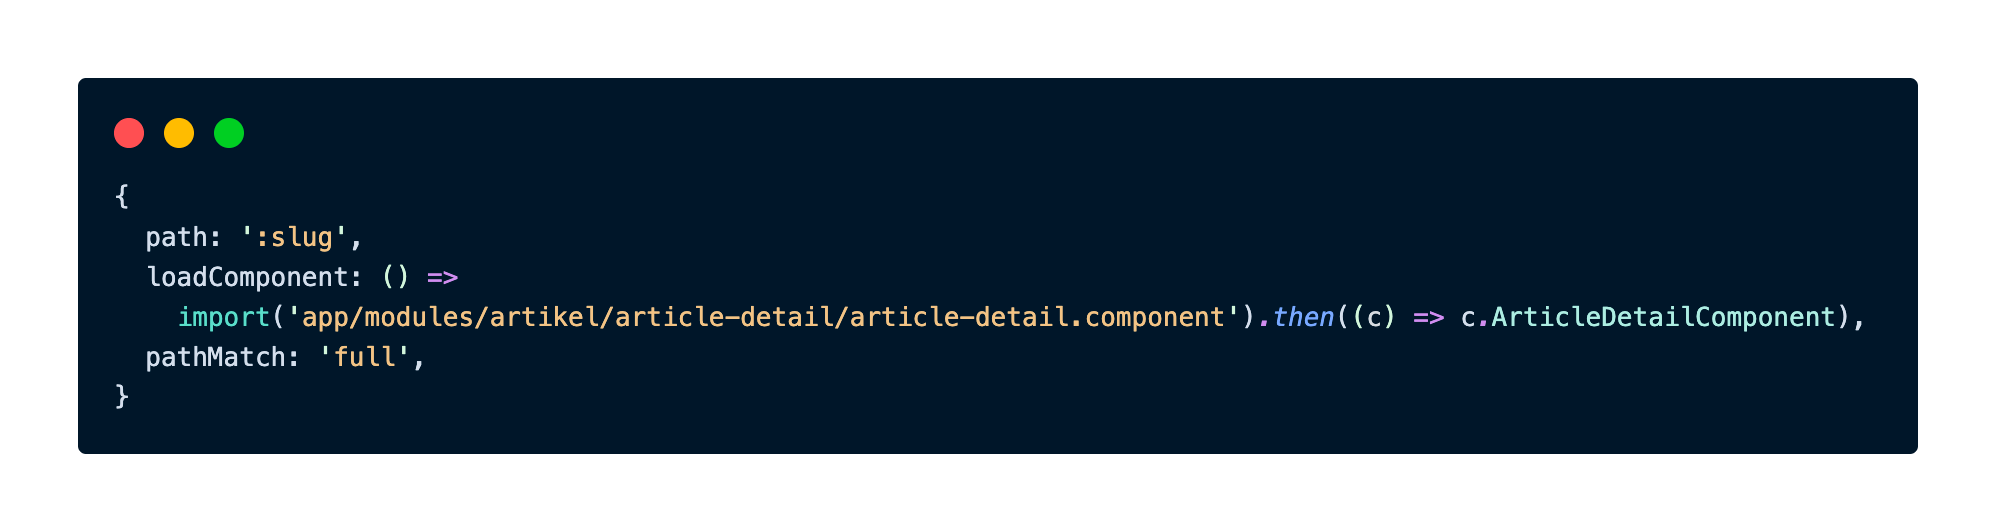
From this snippet, we can see that :slug is the route parameter, which represents a dynamic and unique value for each article. This slug parameter will then be accessible to the ArticleDetailComponent.
Child Routes and Router Outlet
Child routes are routes that are defined within the configuration of a parent route. This creates a hierarchical relationship where the child routes are nested under the parent route. This nesting is reflective of the application's structure, where certain views or components are logically grouped under a larger feature or section.
To set up child routes, we define them within the children property of a parent route. This property is an array of route configurations specific to the child routes. Each child route is defined similarly to the configuration of the main routes.
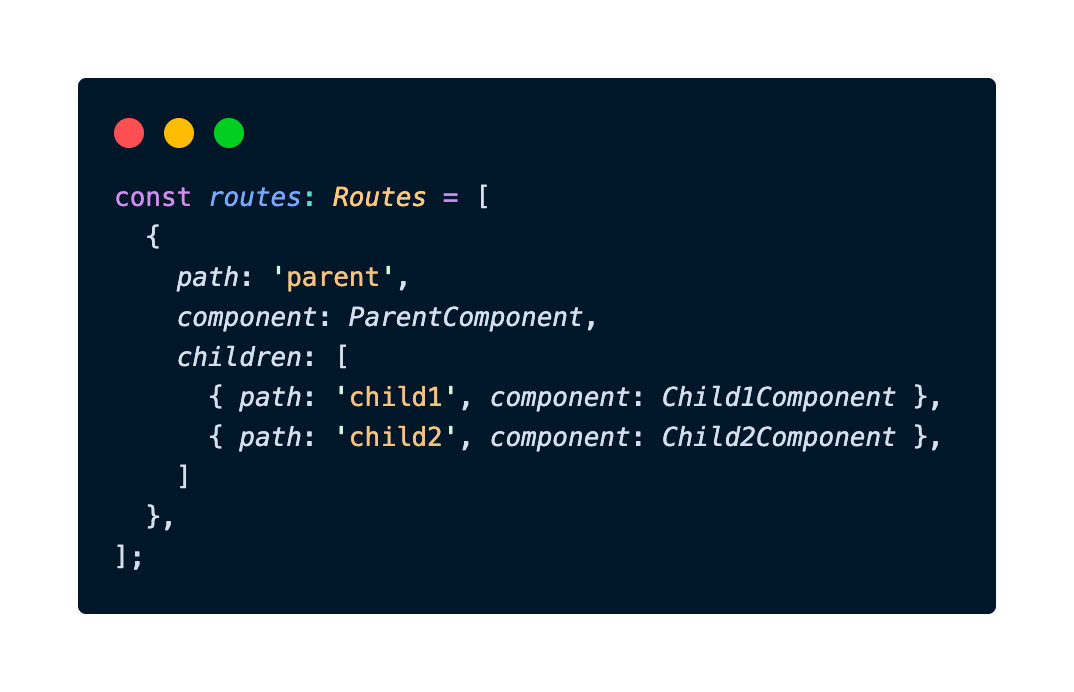
In this example, navigating to /parent will render the ParentComponent, while navigating to /parent/child1 will render the Child1Component.
To render child routes, we need to place a router-outlet element within the template of the parent component. This outlet acts as a placeholder where the content of the child routes will be dynamically loaded.
Here's an example of how we 'wrap' the router-outlet element inside the ParentComponent
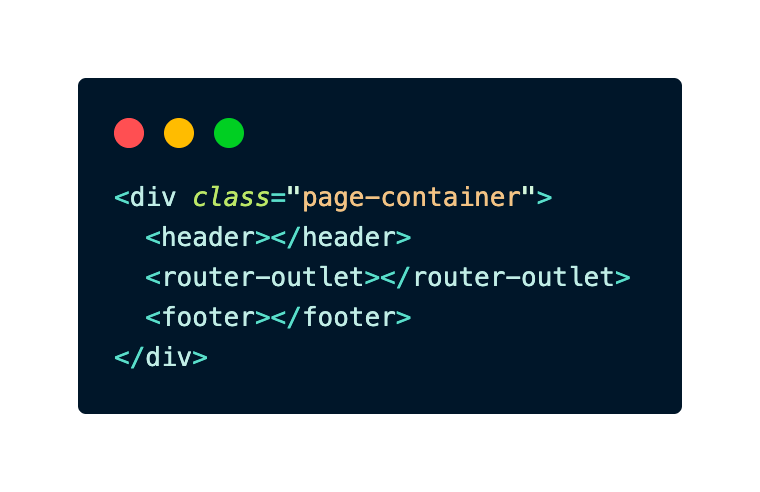
The child components associated with the current URL will be rendered within this router-outlet, inside the div component, and in-between the header and footer component.
Router Configuration
The Angular routing system is configured using the RouterModule and its forRoot or forChild methods. The forRoot method is used to configure the root-level router module in the main application module. This method should only be used once throughout the application and should be called in the imports array of the AppModule (or any feature module that represents the root of the application).
As for the forChild method, it is used in the feature modules. It's important to maintain a clean separation between our main application routing and feature module routing since it enhances the organization of our codebase, and also the modularity and scalability of our web applications.
The configuration typically includes the routes array, as well as optional settings like initial navigation and URL serialization. It should look like this:
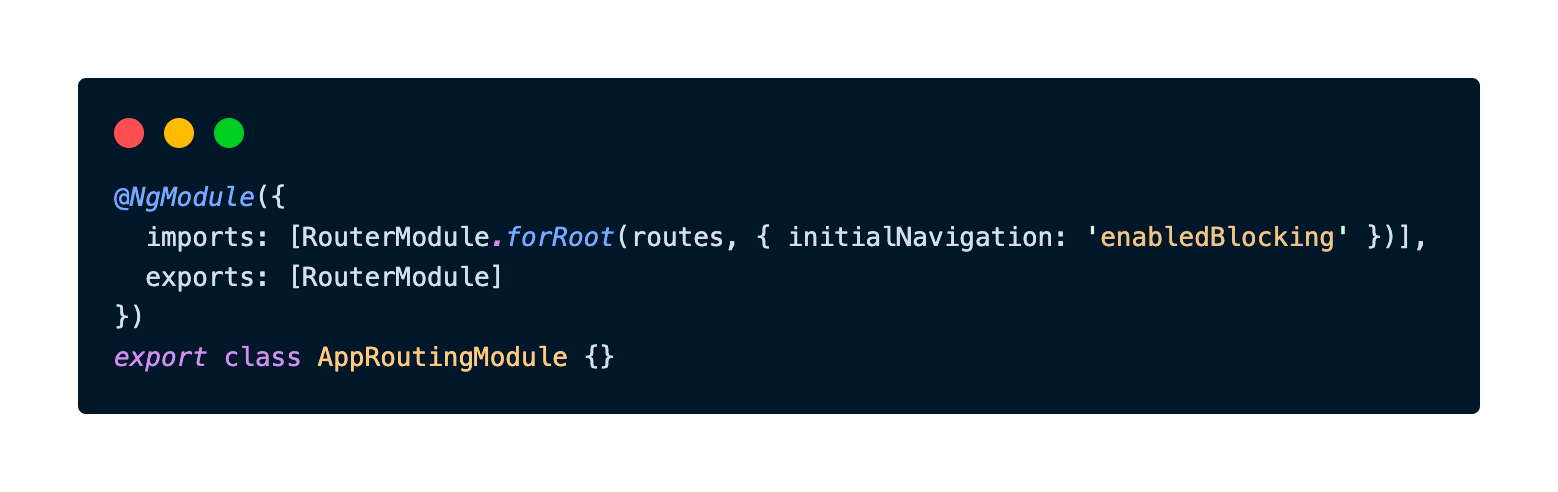
The initialNavigation: 'enabledBlocking' setting ensures that the initial navigation event is triggered before the root component is created. The bootstrap is blocked until the initial navigation is complete. This value is required for web applications with server-side rendering (SSR).
After understanding these fundamental concepts, we can move on to more advanced routing techniques, which we will explore in the next section.
This blog will focus on three advanced routing techniques, which are route guards, route resolvers, and lazy-loaded route modules.
Route Guards
Route guards are designed to provide fine-grained control over navigation, enabling us to enforce access permissions, validate user input, and trigger specific actions before or after routing. Angular offers several types of route guards, each serving a distinct purpose:
1. CanActivate Guard
The CanActivate guard is used to determine whether a user is allowed to activate a route. It's a crucial tool for implementing authentication and authorization logic.
When a user attempts to access a route, the CanActivate guard is invoked. The guard can check various conditions, such as whether the user is authenticated, has the necessary roles, or meets any other criteria. Depending on the outcome of the check, the guard can allow or block access to the route.
The CanActivate guard is particularly useful for restricting access to specific parts of your application based on user privileges. For example, you can use it to prevent unauthenticated users from accessing protected routes or to restrict certain routes to administrators.
2. CanDeactivate Guard
The CanDeactivate guard comes into play when a user attempts to leave a route, for instance, by navigating to a different page. This guard can be used to ensure users don't lose unsaved changes in forms or to confirm actions that might have significant consequences, such as leaving a checkout process. The prompt may come in the form of confirmation dialogs or other checks.
The CanDeactivate guard enhances the user experience by providing safeguards against unintended navigation actions that could lead to data loss or other undesirable outcomes.
3. CanLoad Guard
The CanLoad guard serves a unique purpose by preventing the lazy loading of feature modules until specific conditions are met. This guard determines whether a feature module should be loaded when a route associated with that module is accessed.
In the case of the CanActivate guard, it can prevent unauthorized users from accessing the route, but the module is still being downloaded. But in the case of CanLoad guard, it prevents the module from being downloaded entirely, hence preventing unauthorized users from seeing the source code of the module.
Route Guards Implementation at Halodoc
At Halodoc, we are committed to building web applications that are secure and reliable. We believe that route guards are one of the fundamental concepts that we can apply to our projects to achieve this.
We will take a look at the example of route guard implementation on the Halodoc website. The code snippet below is the route configuration for one of the pages on the Halodoc website, which is the janji-medis route.

From the above code snippet, we can see that for the janji-medis route, we are using the canLoad guard, which uses a guard service called AuthenticationGuard. This service will return a boolean observable, which determines whether the route can be both accessed and lazy-loaded.
Now we take a look inside the AuthenticationGuard service:
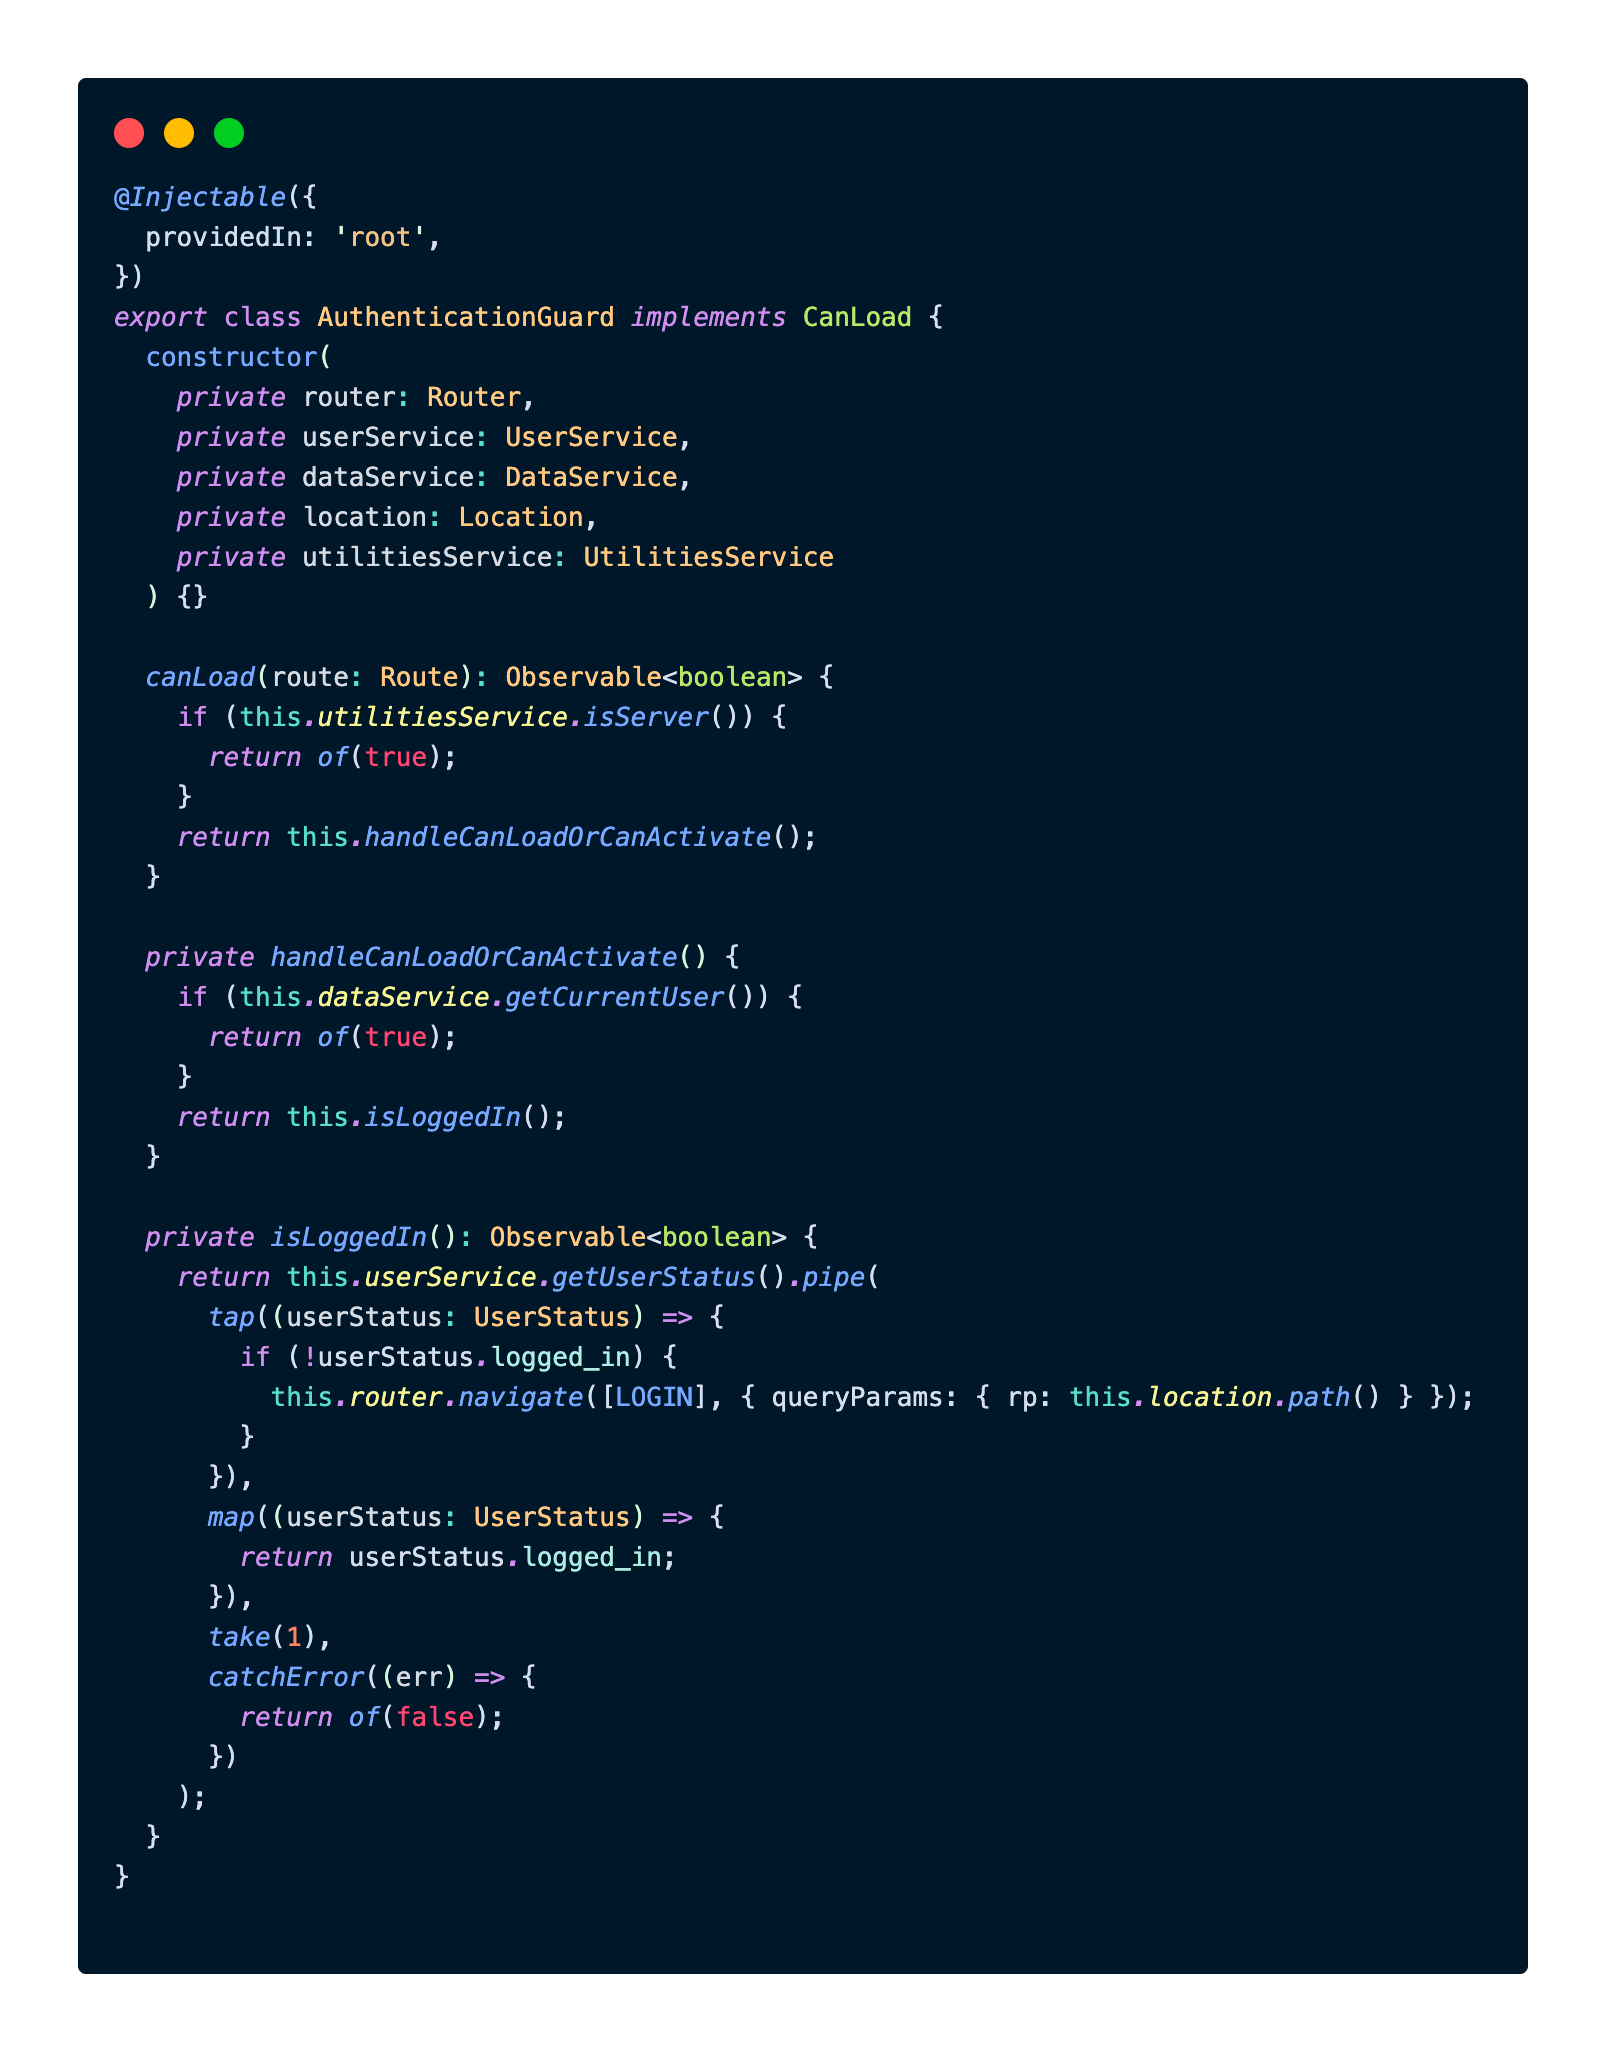
From the code above, we can see that the AuthenticationGuard class implements the CanLoad interface since we are using it on a CanLoad guard. This class has one main method, which is the canLoad method.
In the canLoad method, first, we are checking whether the invocation of this method happens on the server or client-side since our Halodoc website is enabled with Server Side Rendering (SSR) capabilities. Whenever the invocation happens in the server, it will always return an observable boolean of true. If not, then another check will happen in the handleCanLoadOrCanActivate private method. In this method, we are checking the currently logged-in user data from the user's session. If the user data cannot be found, then another check will happen in the isLoggedIn private method, where we will make an API call to our user service. If the user is not found or not logged in, we will force the user's browser to redirect to the login page. Otherwise, the user can access and load the page.
This implementation enhanced the user experience by reducing initial load time, while also increasing the security of the web application itself.
Another example that we can provide is the implementation of CanDeactivate guard in one of our internal portal web apps. We implement this guard on a page that requires our users to fill in a form. This guard will warn our users when they want to go to other pages intentionally or unintentionally when they have filled out the form but have not submitted it.
Let's take a look at the route configuration for this example:
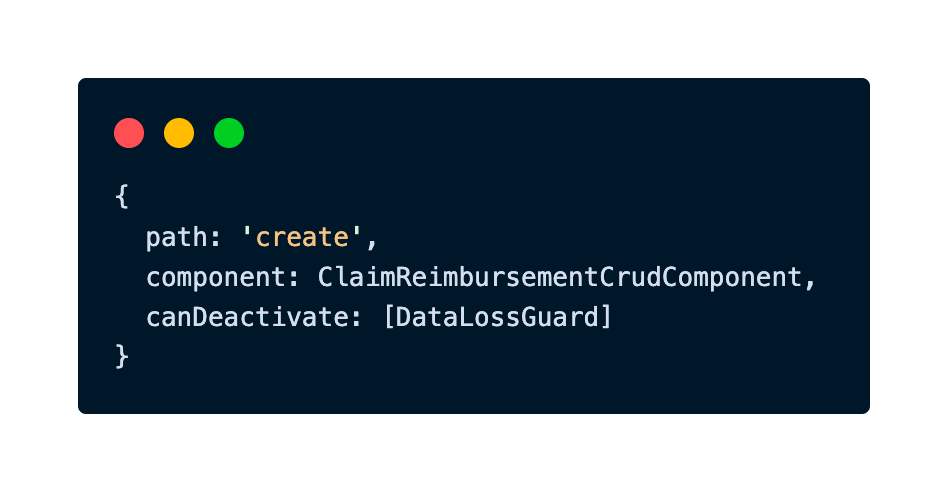
We can see here that we implement the CanDeactivate guard for our create path, where the value is a service called DataLossGuard.
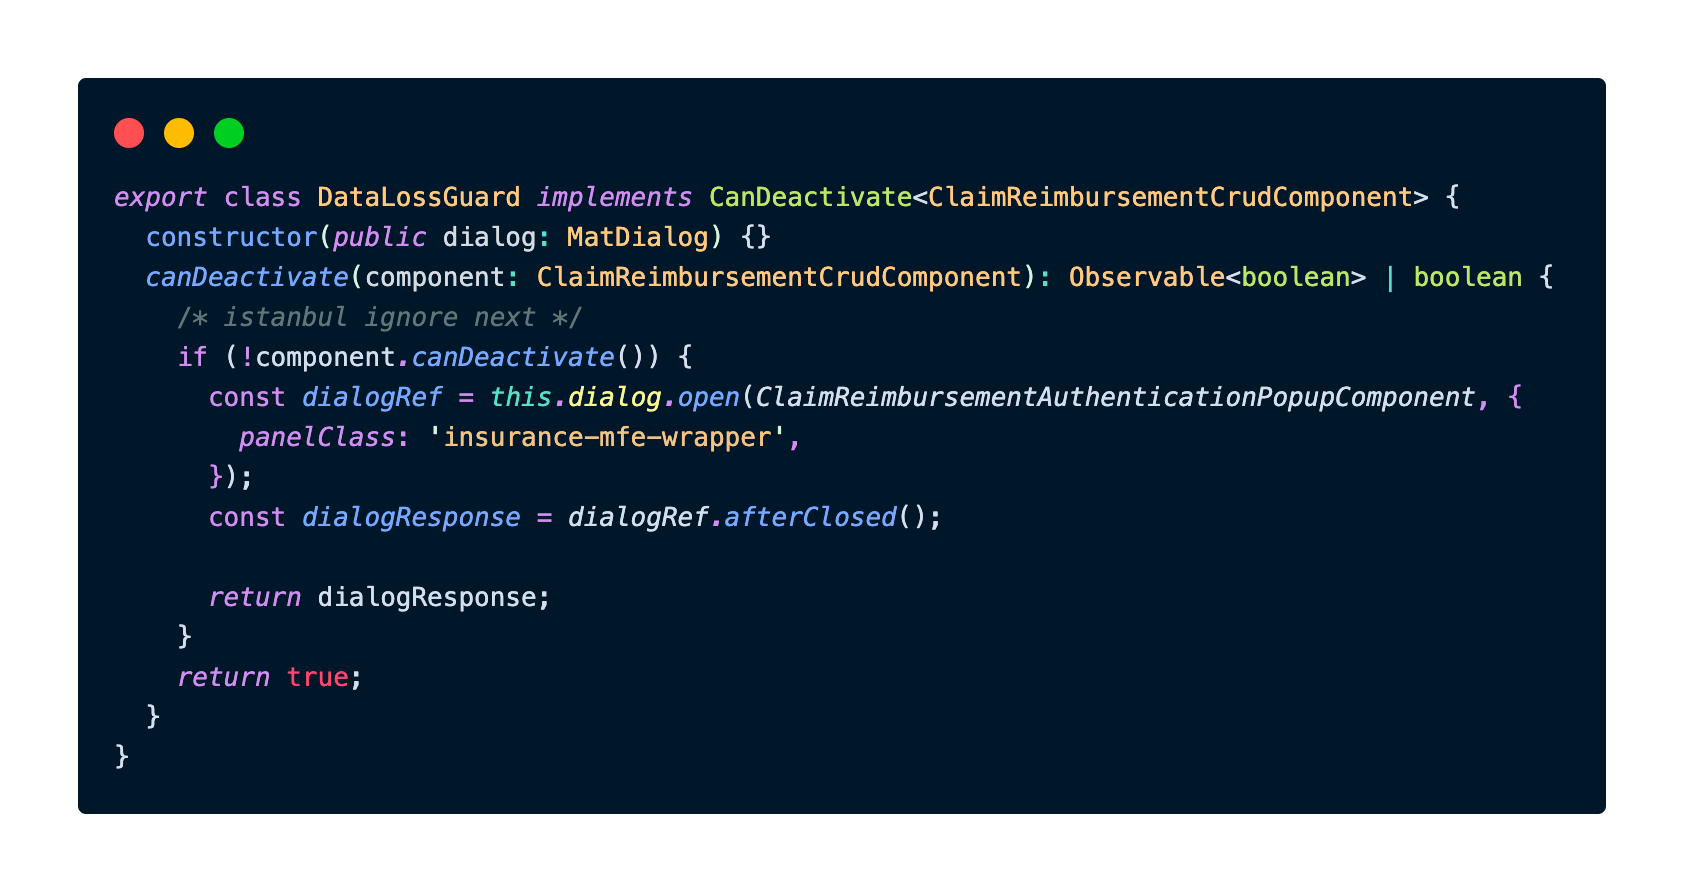
The DataLossGuard implements the CanDeactivate interface. Inside it is a method called canDeactivate, with the assigned component on the route as its parameter, which will be called when a user makes an action to change the route. This method will return a boolean that will determine whether a user can leave the page or not. The ClaimReimbursementCrudComponent itself has a method called canDeactivate which also returns a boolean. If component.canDeactivate() returns false, then a dialog will pop up which prompts the user that the data inputted will be lost if they proceed to go to another page. The user's response to the dialog will determine whether the page navigation will stop or go through.
Let's now take a look at a snippet of the canDeactivate method from the ClaimReimbursementCrudComponent:
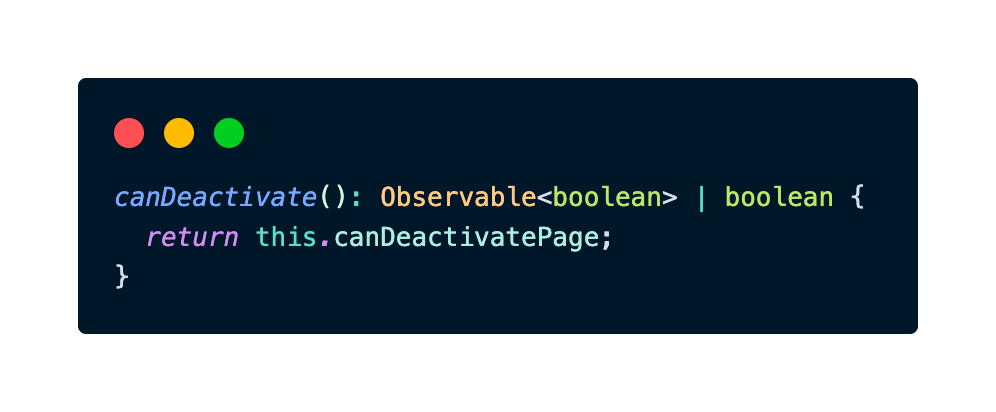
ClaimReimbursementCrudComponentWe can see from the above snippet, the canDeactivate method returns the property canDeactivatePage. We change the value of this property based on the stage of the form input process at which the user is currently.
Ultimately, this will certainly increase the user experience of the web app, since the user's data will not be lost instantly when changing the route of the web app.
Route Resolver
Route resolvers are another great tool in Angular's routing system that allows you to fetch data asynchronously before a route is activated. This pre-loading of data ensures that the necessary information is available when a component is initialized. Route resolvers are particularly useful for improving the user experience and data consistency within your application.
The primary purpose of route resolvers is to resolve data dependencies before a route is activated. When a user navigates to a specific route, we usually need to fetch data from a server, perform authentication checks, or maybe execute other asynchronous operations. Route resolvers allow us to perform these tasks and ensure that the required data is available to the component when it is instantiated.
To implement a route resolver in Angular, we need to create a resolver service. This service is a class that implements the Resolve interface, which contains a resolve method. This resolve method is where we define the logic to fetch the required data. The data we retrieve is typically based on the route's parameters like an id, or some other context. The method will then return the data which will be used in the component.
In our route configuration, we associate the route with the resolver service. This connection is established by specifying a resolve property in the route definition. You can also specify the name of the property where the resolved data should be stored.
Let's take a look at this example:
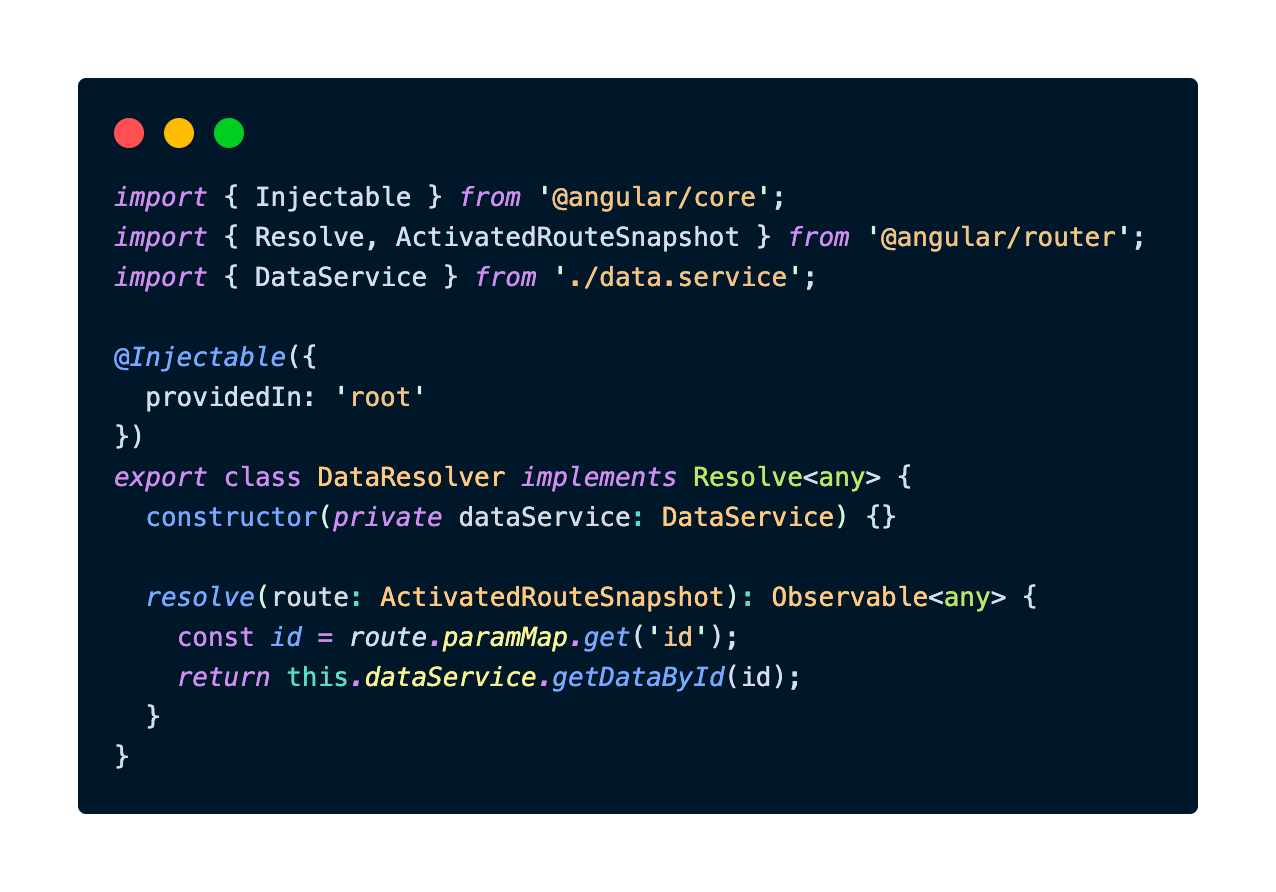
In the code above, the DataResolver service implements the Resolve interface. The resolve method extracts a route parameter id from theroute.paramMap.get('id'), and uses it to fetch data from DataService. This resolve method will return the Observable which contains the data.
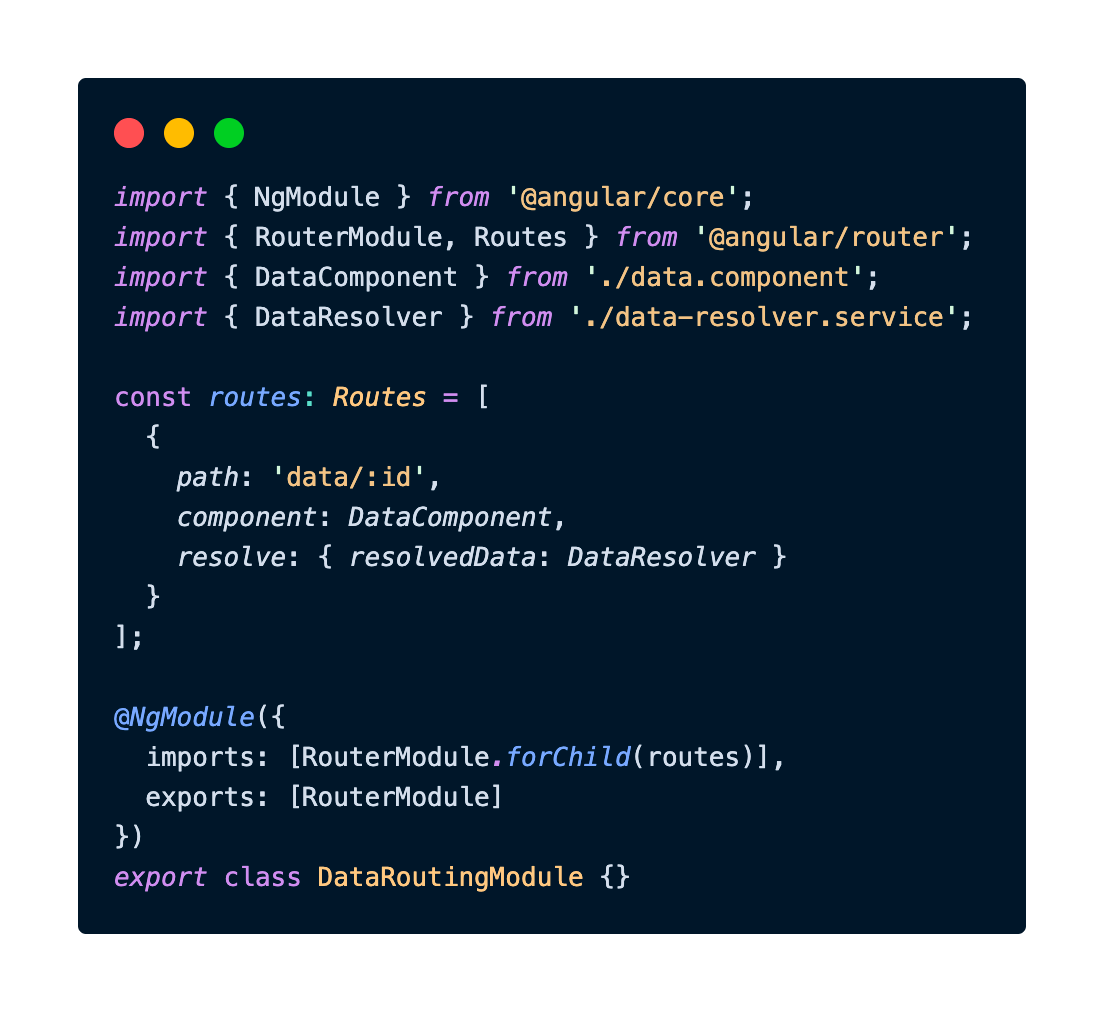
In the route configuration, we add a resolve property. The value of this property is an object, where the object key is the variable name that we can access inside the component, in this case, resolvedData, and the value is the DataResolver service.
So with this configuration in place, when a user navigates to a URL for example /data/123, the DataResolver will be called before the DataComponent is activated, ensuring that the data associated with the id parameter is fetched and available for use in the component.
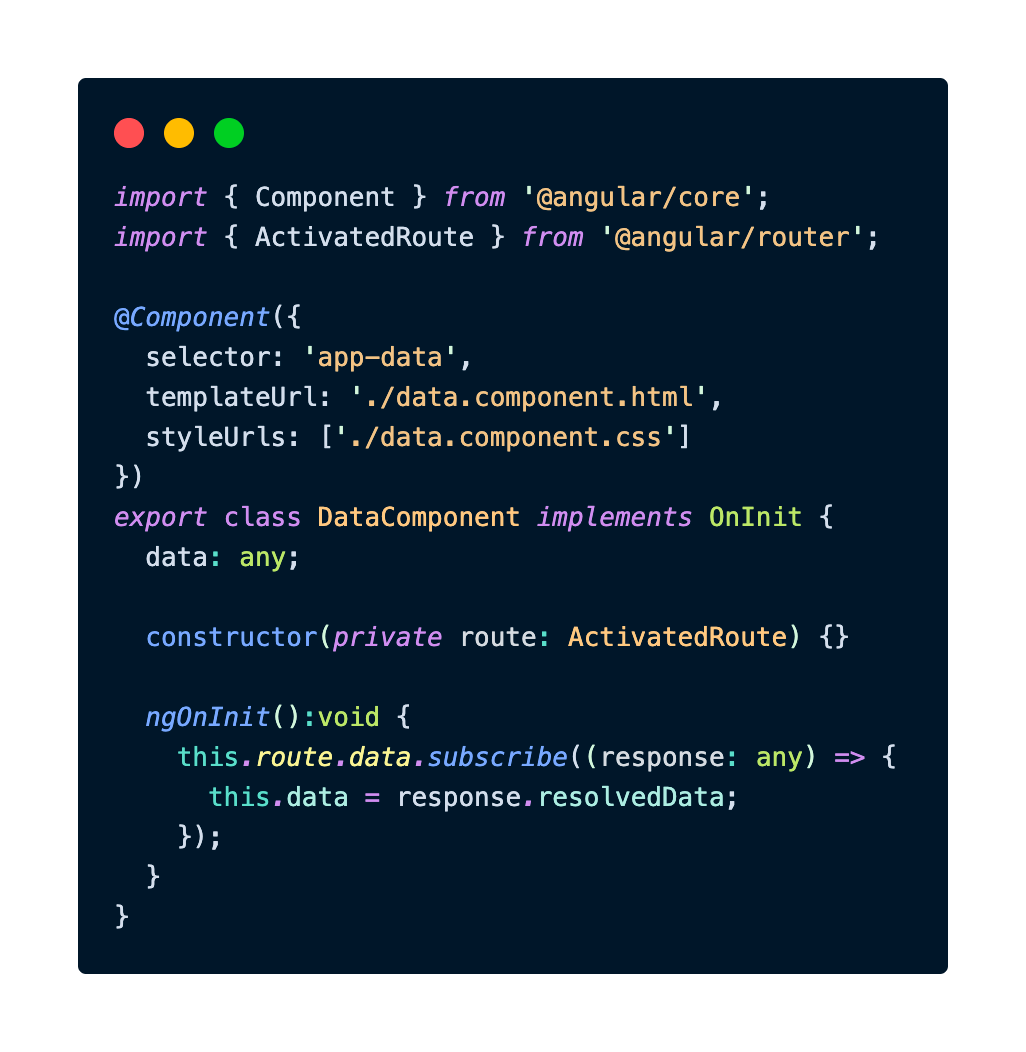
In the component, the resolved data will be accessible through the data property of the ActivatedRoute service. The property which holds the value from the resolver is named resolvedData, as specified in the route configuration.
The Pros and Cons of Route Resolvers
Route resolvers offer several benefits for our Angular web applications:
- Improving User Experience: By resolving data before rendering a component, you ensure that the component is not displayed until the necessary data is available. This prevents empty or partially loaded views, improving the overall user experience.
- Cleaner Component Code: With route resolvers, our component code can focus on presentation and interaction logic. Data-fetching logic is moved to a separate resolver service, resulting in cleaner and more maintainable components.
- Centralized Data Fetching: Resolver services provide a centralized location for data fetching. This can help with code organization and maintainability, especially in large applications with multiple routes and components.
On the other hand, route resolvers also have their drawback, one of the most important ones is the page load delay that the users will experience. This could happen because, after the user clicks, they will not see any change on the UI until the API call in the resolver is finished, especially if we are fetching large data or there are multiple API calls.
This drawback is the reason why we must make a lot of consideration when deciding to use route resolver and whether it suits the use case of our web app or not.
Lazy-Loaded Route Modules
Lazy loading is an important concept in the web development domain, including Angular. Lazy loading allows us to load feature modules on-demand, rather than including them in the initial bundle of your application. This introduces several benefits:
- Improved Initial Load Time: Lazy loading reduces the initial bundle size, resulting in faster application startup times. Users only download the code required for the route they visit.
- Optimized Code Splitting: Angular's built-in code splitting ensures that lazy-loaded modules are loaded efficiently, reducing network overhead.
- Modularity and Maintainability: Feature modules encapsulate related functionality, making your codebase more modular and maintainable. This organization simplifies development and collaboration in large projects.
- Better User Experience: With faster load times and smaller initial bundles, users experience quicker page rendering and smoother navigation.
Key Concepts of Lazy-Loaded Route Modules
In Angular, an application is organized into feature modules, each responsible for a specific part of the application. These feature modules contain components, services, and other resources related to their particular functionality. Feature modules make your codebase more modular and maintainable.
Lazy loading means loading a feature module only when it's needed, rather than loading all feature modules when the application starts. This approach optimizes the initial load time by reducing the size of the initial bundle. Users only download the code they need as they navigate through the application.
Each feature module with lazy loading enabled typically has its routing configuration. The route configuration defines how to navigate to different parts of the module. Lazy-loaded route modules are associated with specific routes that trigger the loading of the respective feature module.
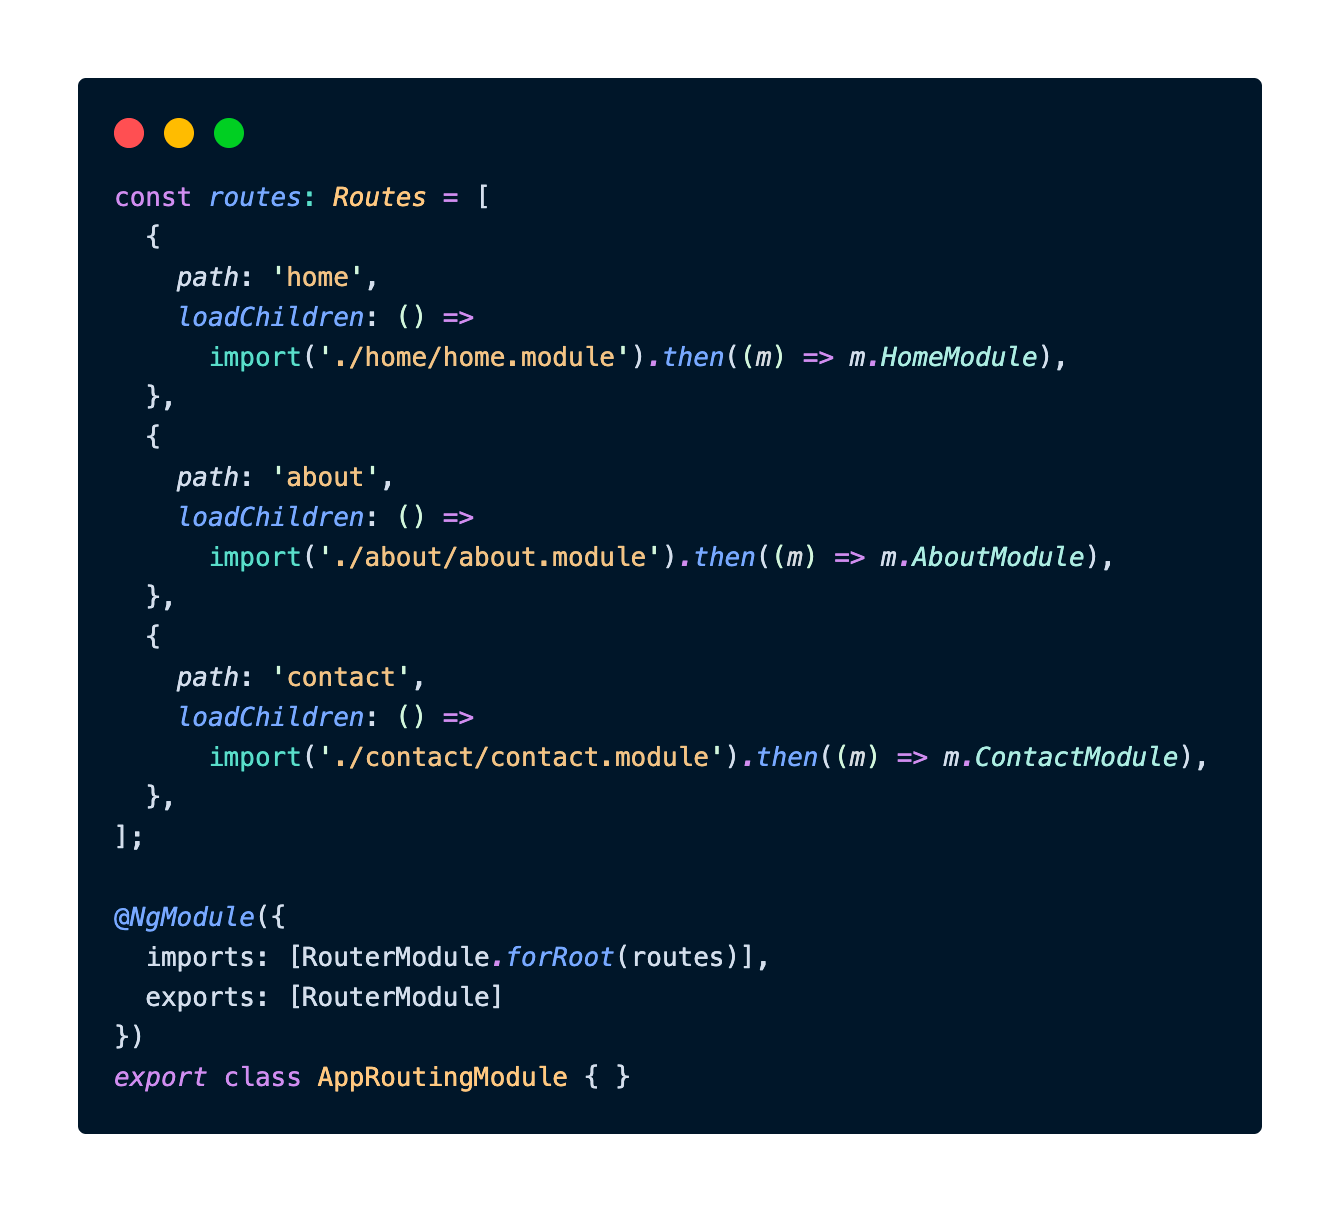
Let's take a look at the example AppRoutingModule that we've mentioned in the previous section:
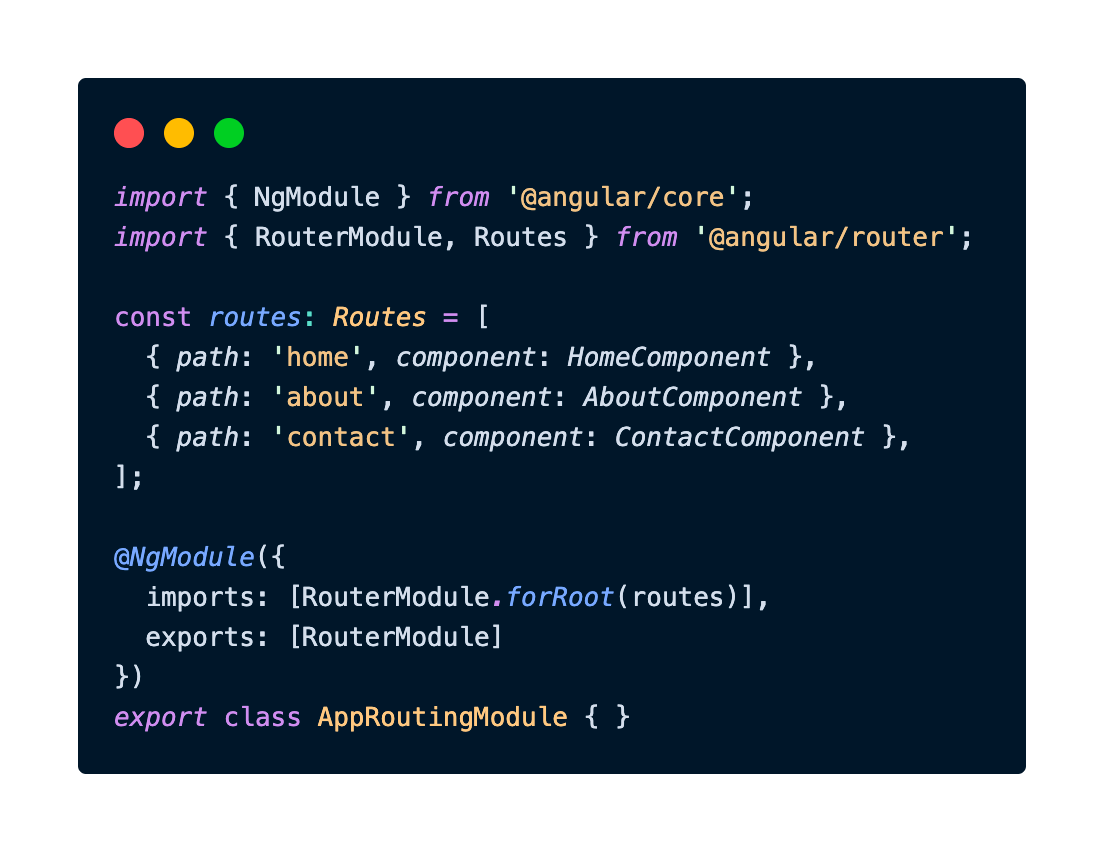
In this example above, every module in the route is compiled and bundled together in the main.js file. Due to this, the file size of main.js will be considerably large, thus making the application load time longer.
That is why we need to implement lazy loading by splitting the routes into smaller modules and loading them using the loadChildren property in the route declaration. This loadChildren property will import only the designated module based on which path the user accesses.
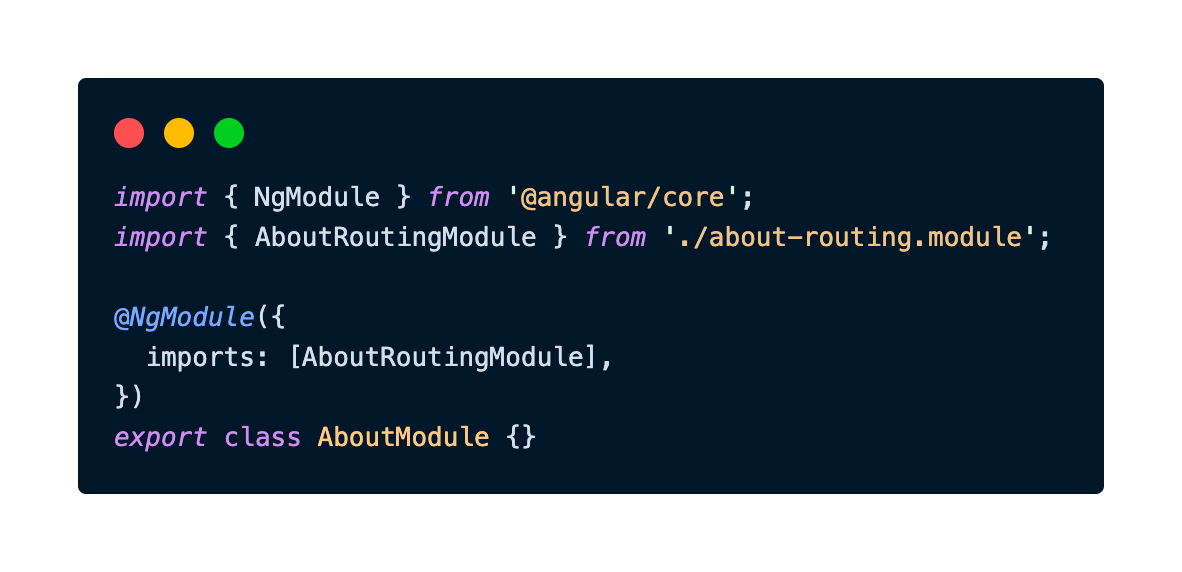
Now let's take a look at how we configure the module for each route. The module needs to import a RouterModule using the RouterModule.forChild() method to load the component. Here's an example of how the AboutRouterModule looks like.

This AboutRoutingModule will then be imported in AboutModule, which is loaded by the loadChildren property in the AppRoutingModule.
Lazy-loading for Standalone Component
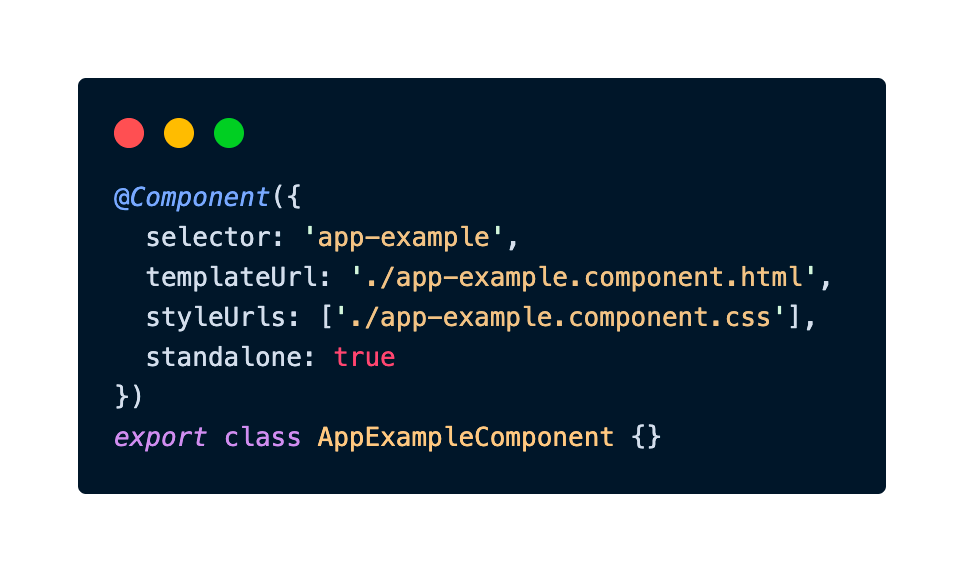
The standalone component is a feature that was first introduced as a preview in Angular 14, and later released as a stable feature in Angular 15. In short, the Angular standalone component allows us to create components without the need for an NgModule. This makes it easier to create reusable components and can help to simplify our code.
To create a standalone component, we simply add the standalone: true property to the component decorator. For example:
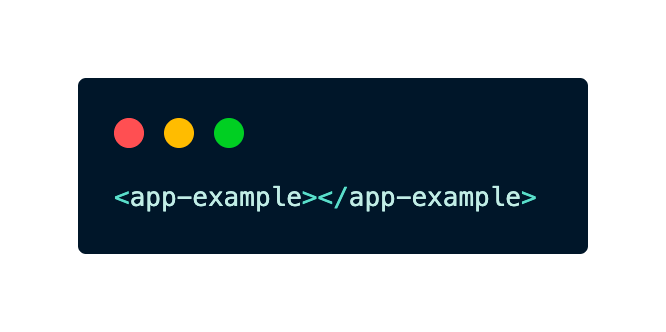
Once we have created a standalone component, we can use it in any part of our application without having to import it into a module. For example, we can add it to a component's template:
For a more detailed explanation of the Angular standalone component please refer to our blog below.
 Maheli Dutta
Angular also introduced a way to lazy load these standalone components, using the loadComponent property instead of loadChildren in the route declaration. Let's take the original AppRoutingModule file example and apply standalone component lazy loading.
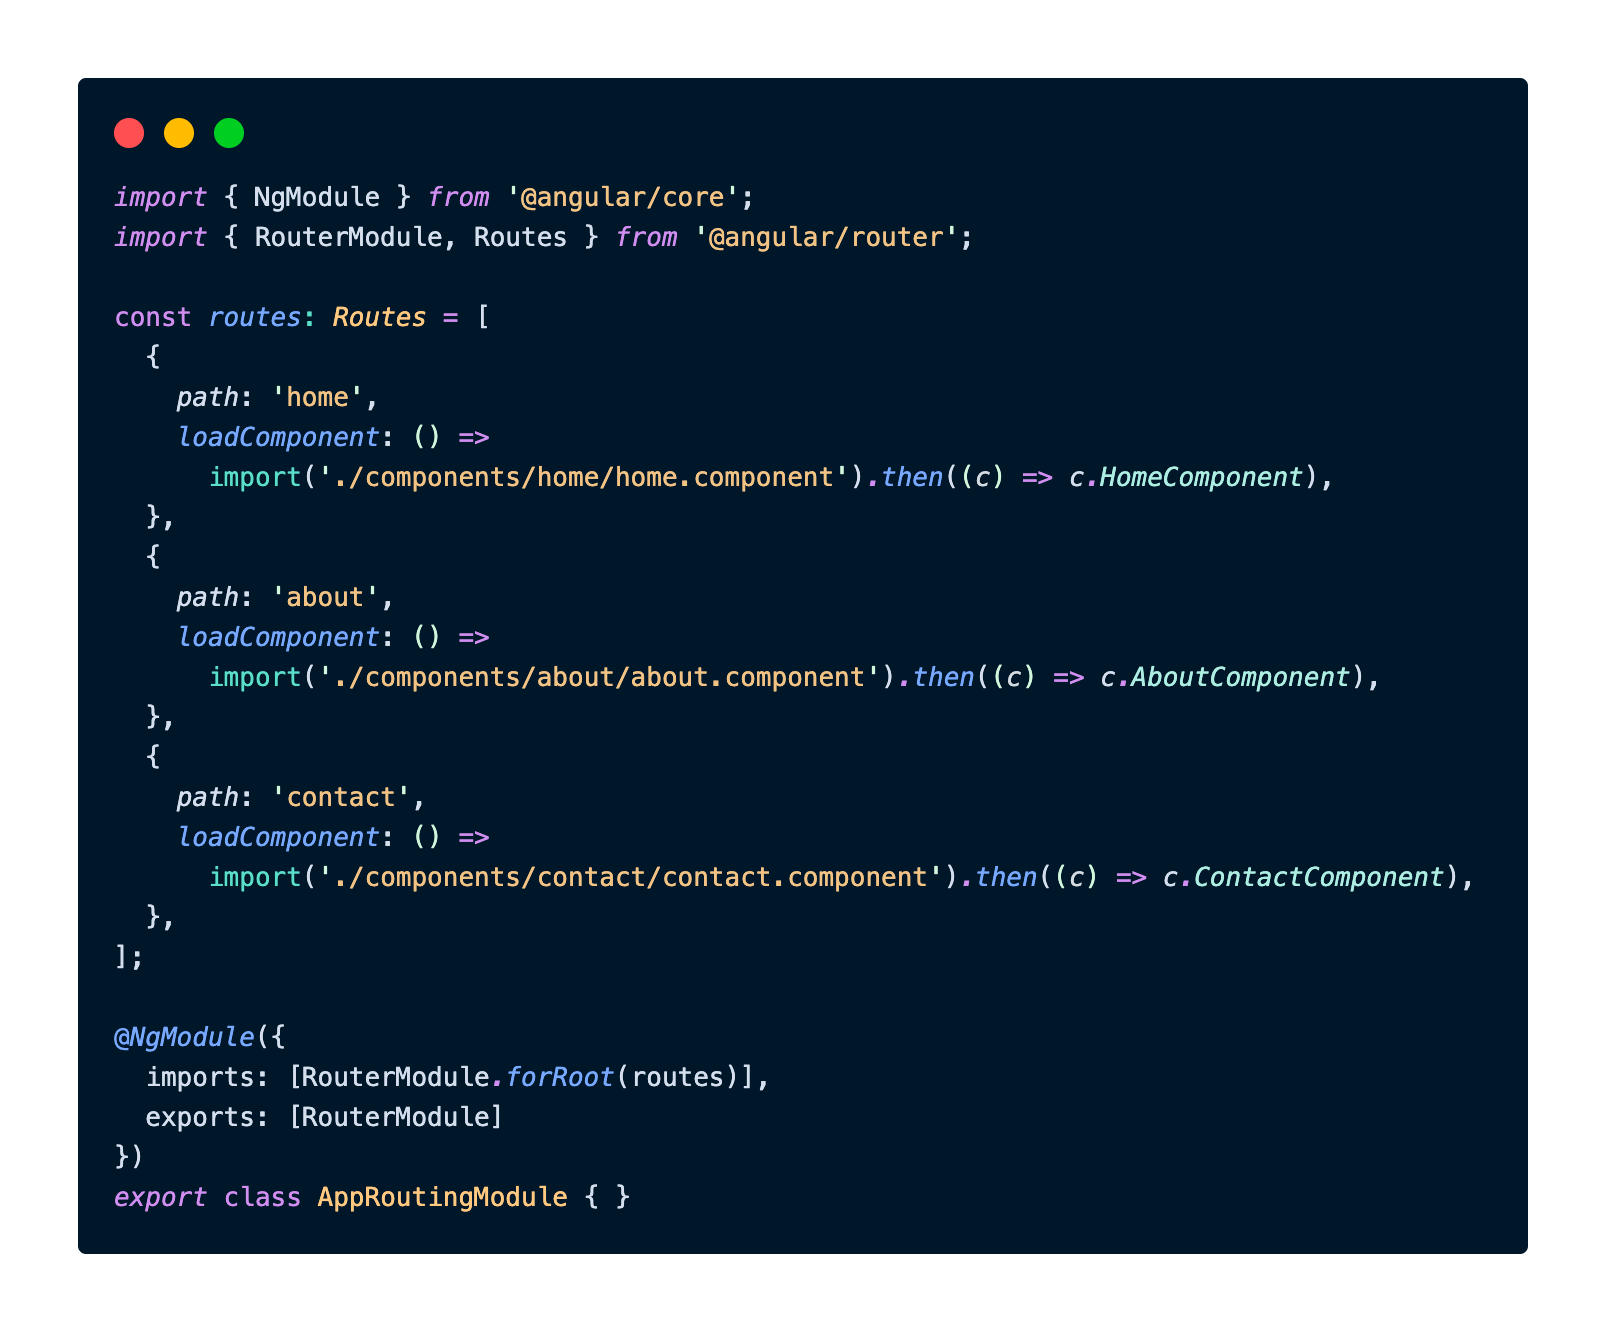
In the example above, we are assuming all HomeComponent, AboutComponent, and ContactComponent have been migrated into standalone components. By importing them with a function that returns a promise that resolves to the component class in the loadComponent property, we successfully apply lazy loading for our standalone components.
Lazy-Loaded Route Modules Implementation at Halodoc
In this section, we will show you how we are implementing lazy-loaded route modules on our Halodoc website. We will show you snippets from our code to help you understand our implementation better. We are taking a look at the routing of one of our business verticals, the Doctor Teleconsultation feature. We will compare the performance of this feature before and after the lazy loading implementation.
First, we take a look at the performance before the implementation of lazy loading. Below is a snippet of the AppRoutingModule of our application:
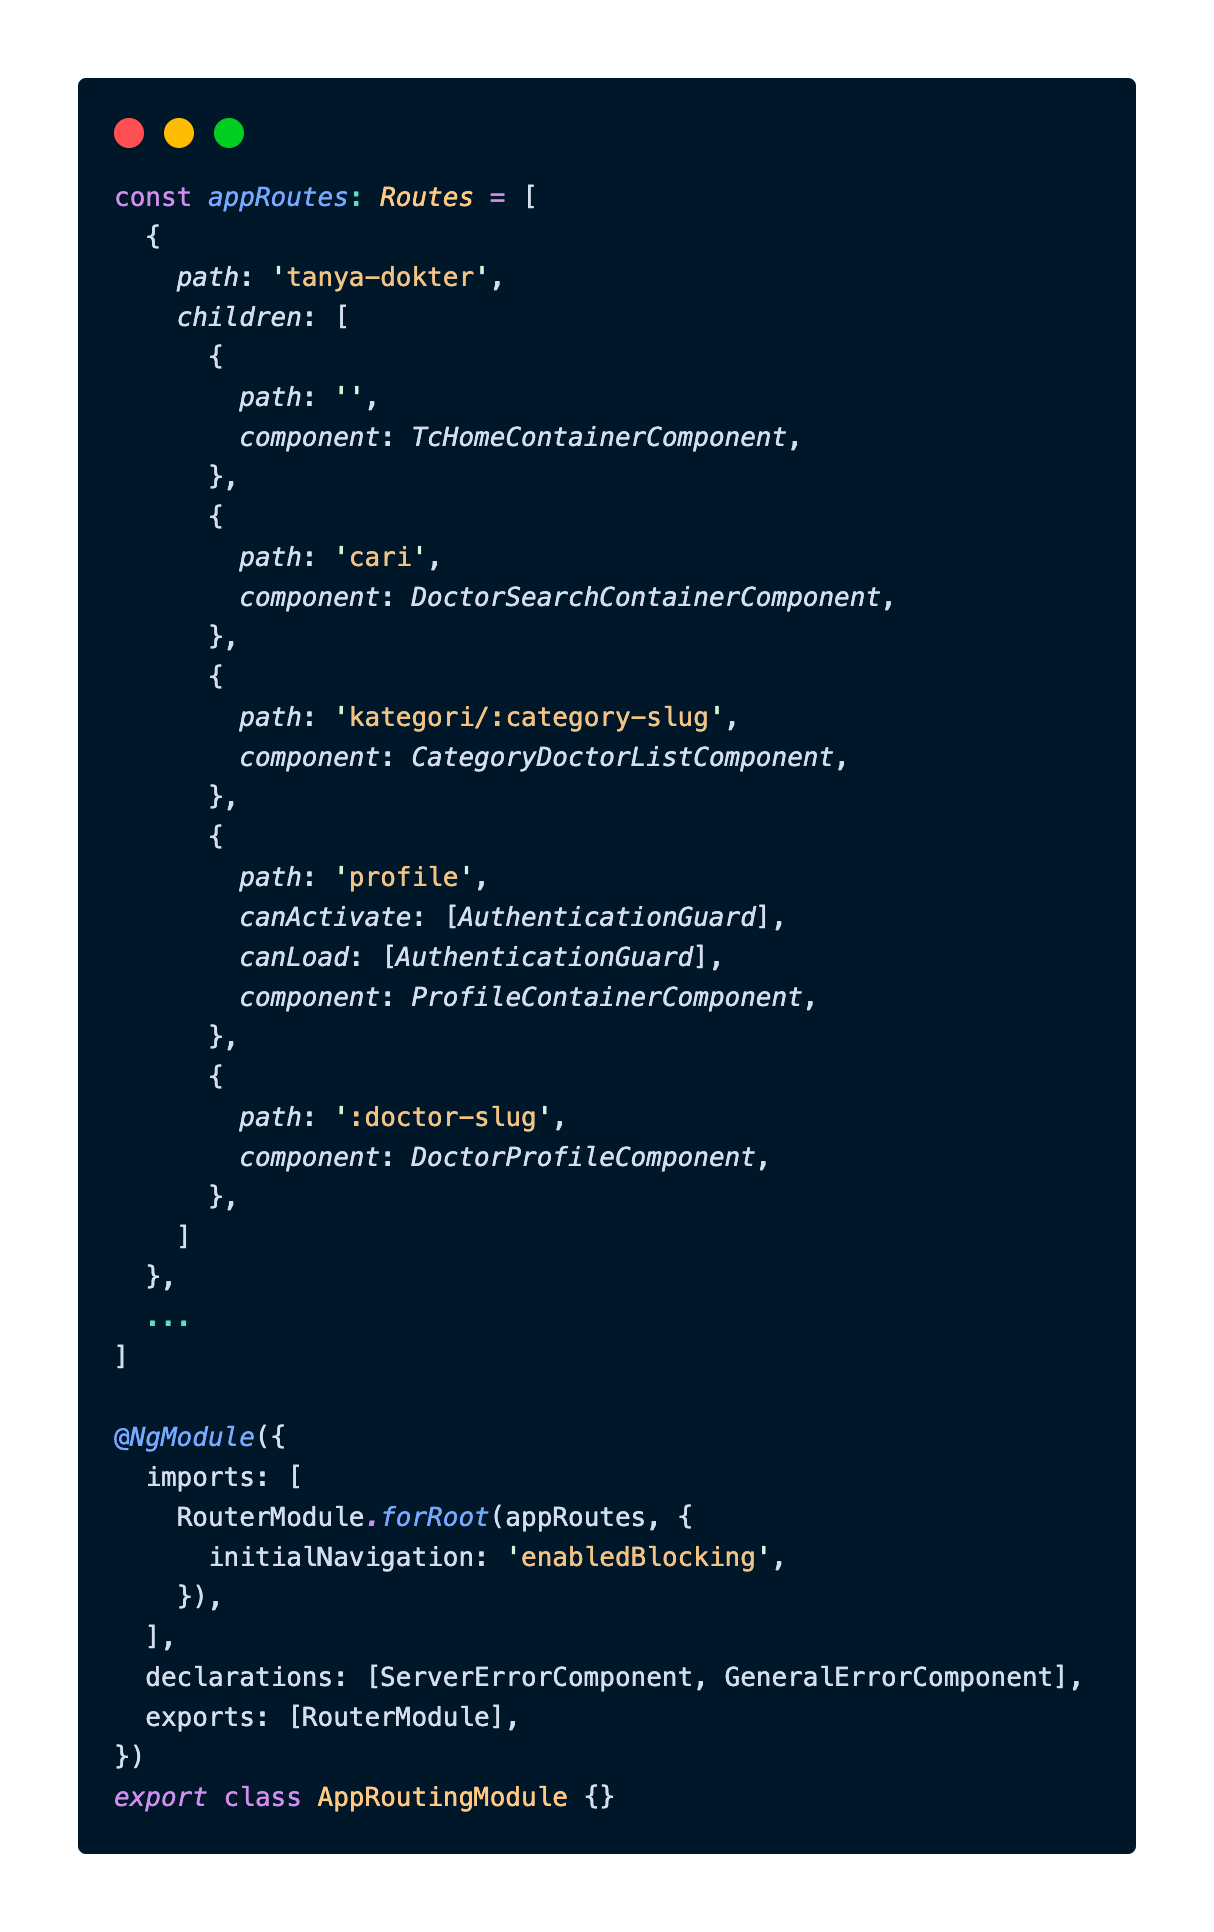
In the above code, we can see that the children routes of the path tanya-dokter are all declared inside AppRoutingModule, using the children property instead of loadChildren, which makes all the components designated to each route eagerly loaded. Let's see the performance output of these tanya-dokter pages in the browser:
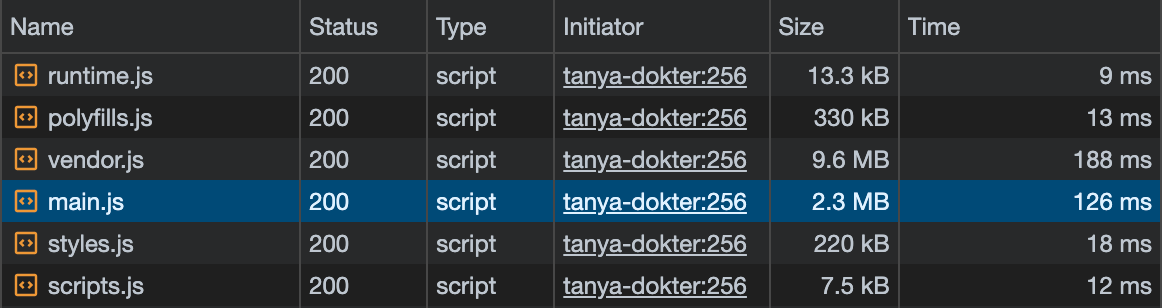
When the user loads one of the tanya-dokter pages, the user loads all components and modules into one single file, the main.js with a massive size of 2.3 MB, and they would need to wait for all the files above to finish before they can interact with the web page.
We could say that the performance of these tanya-dokter pages is inefficient, resulting in a bad user experience.
Let us now improve the performance by using Lazy-loaded route modules.
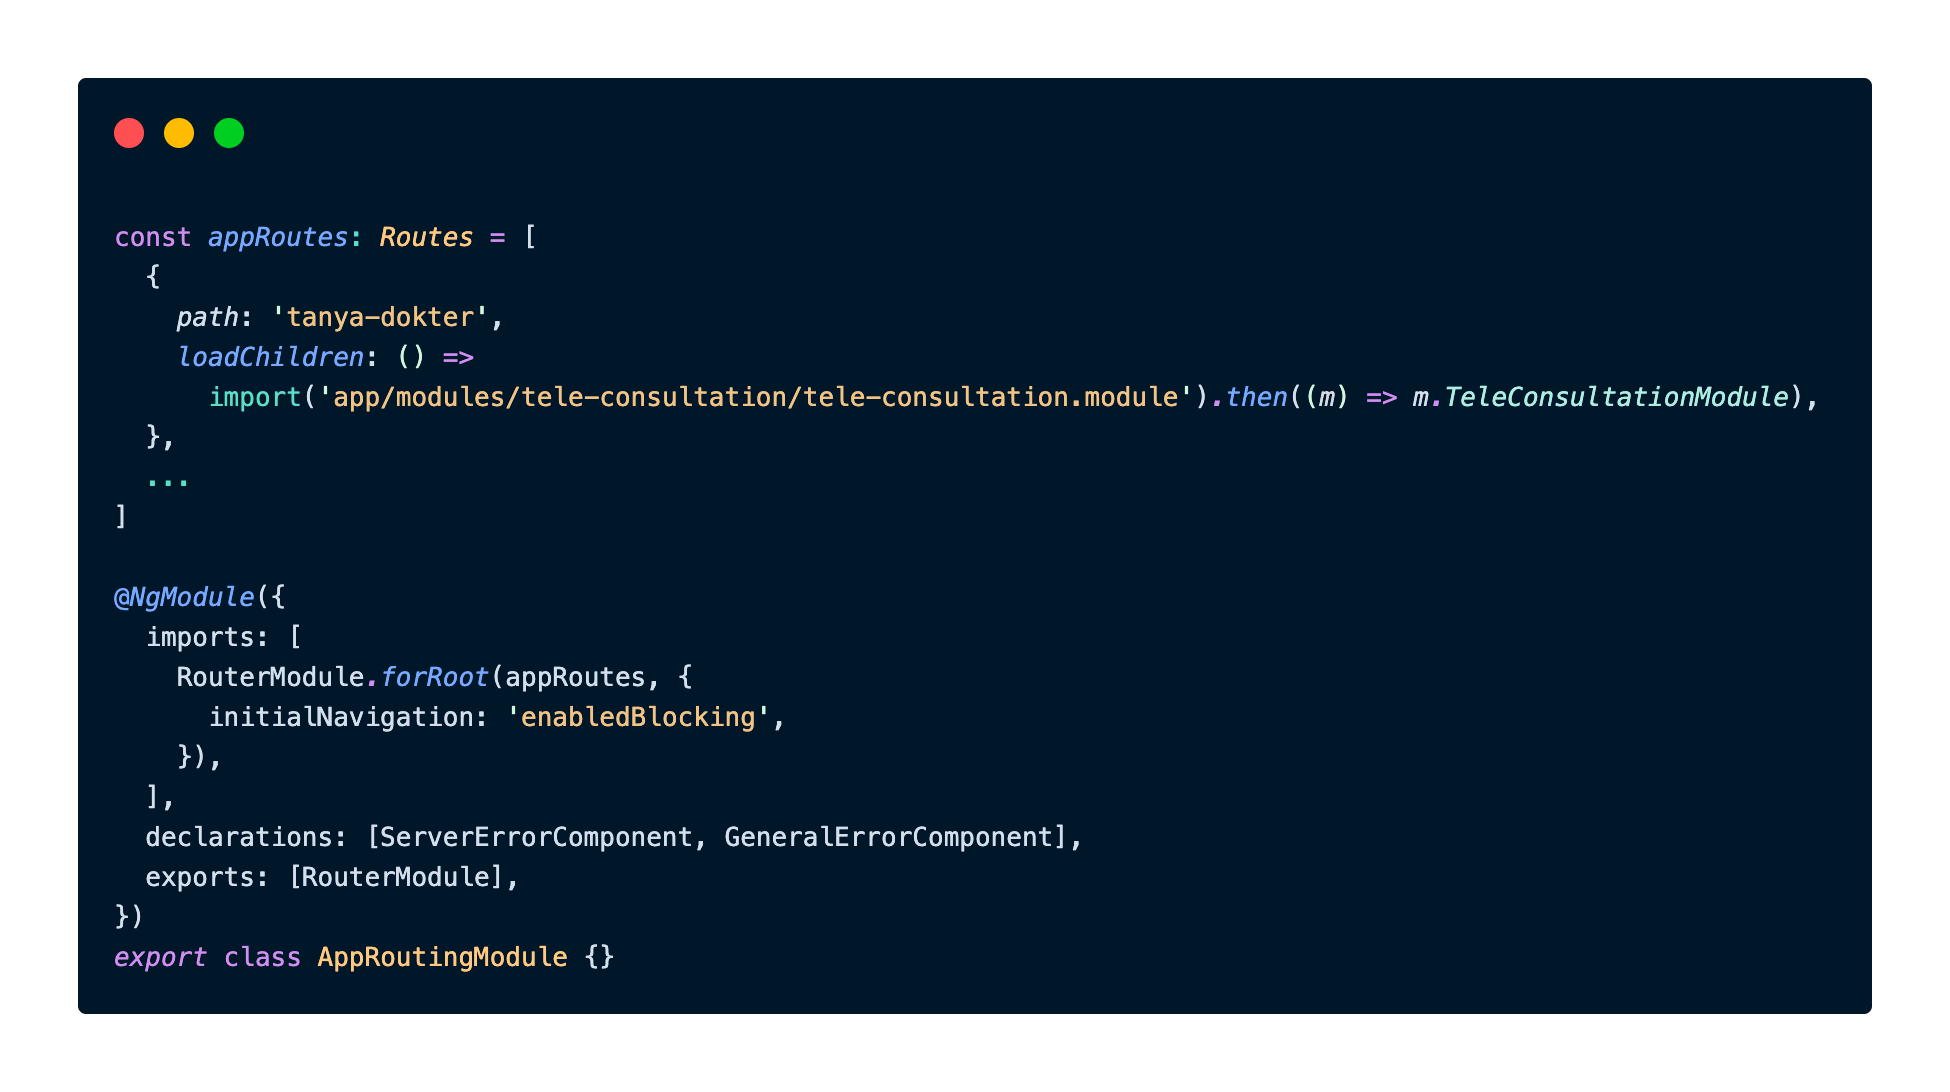
First, we remove all the children paths of tanya-dokter and create a new module file, TeleConsultationModule. We load this module with the loadChildren property to enable lazy loading.
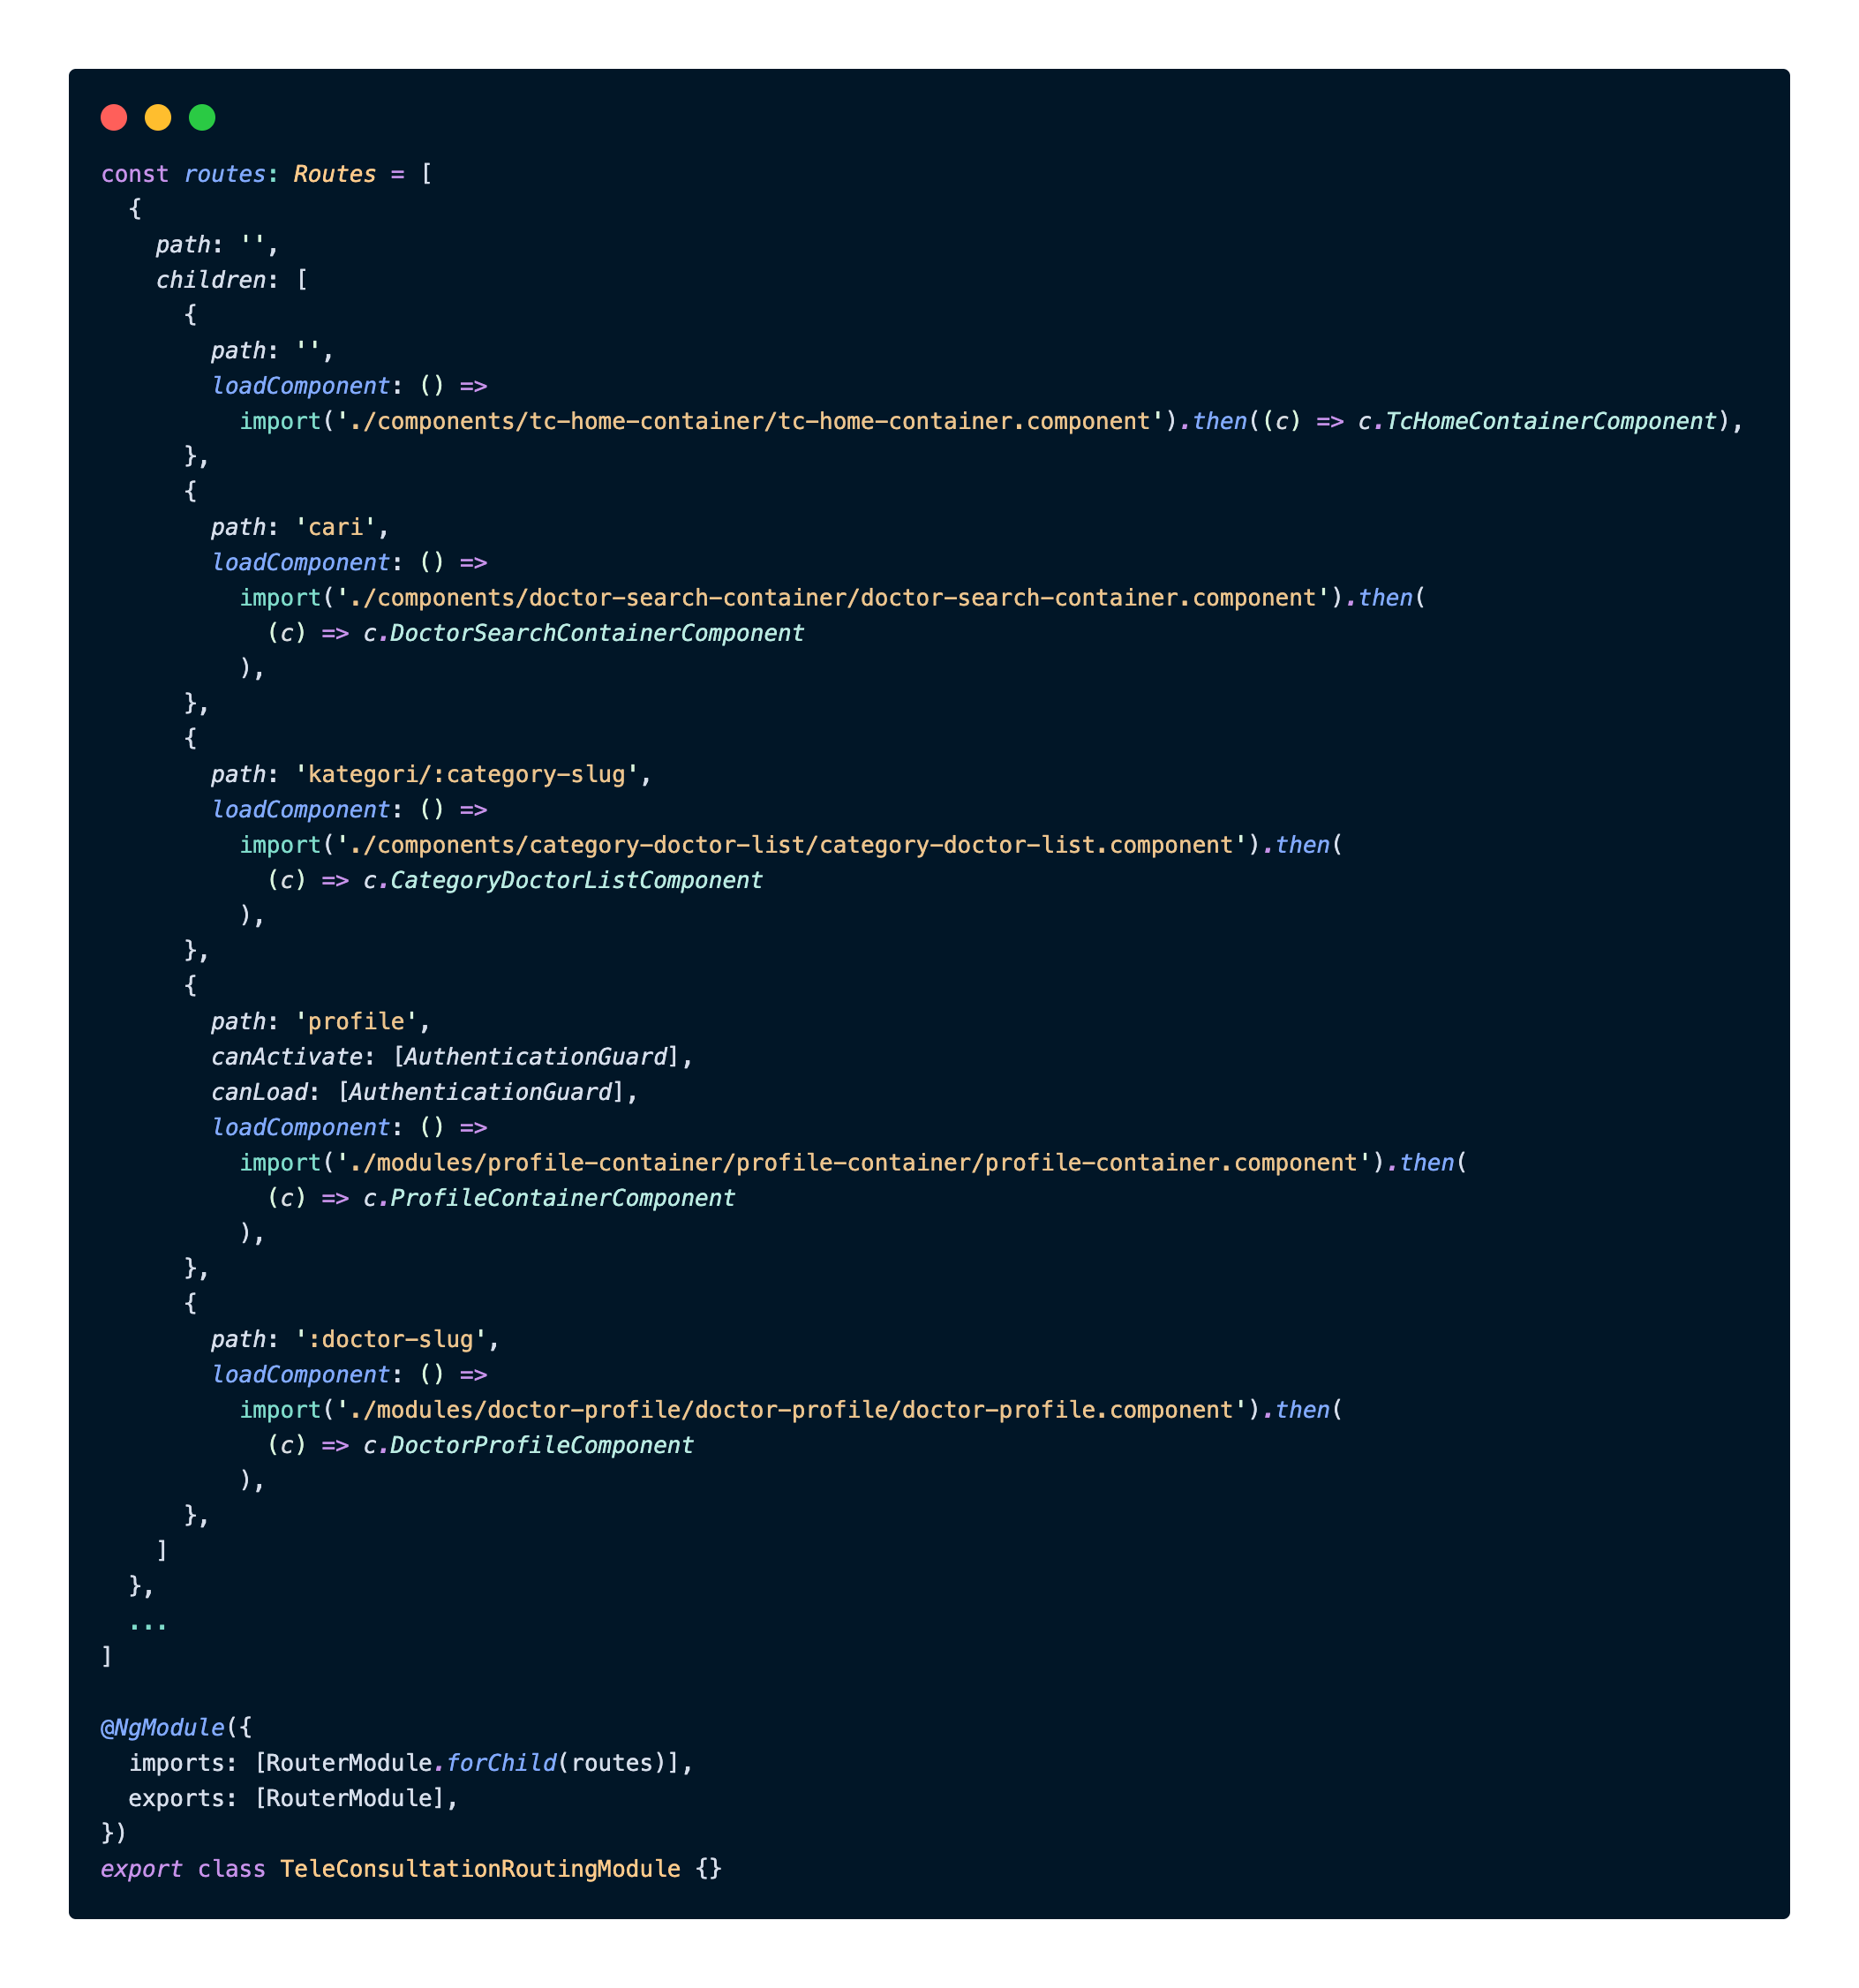
Next, we take a look at the TeleConsultationModule file:
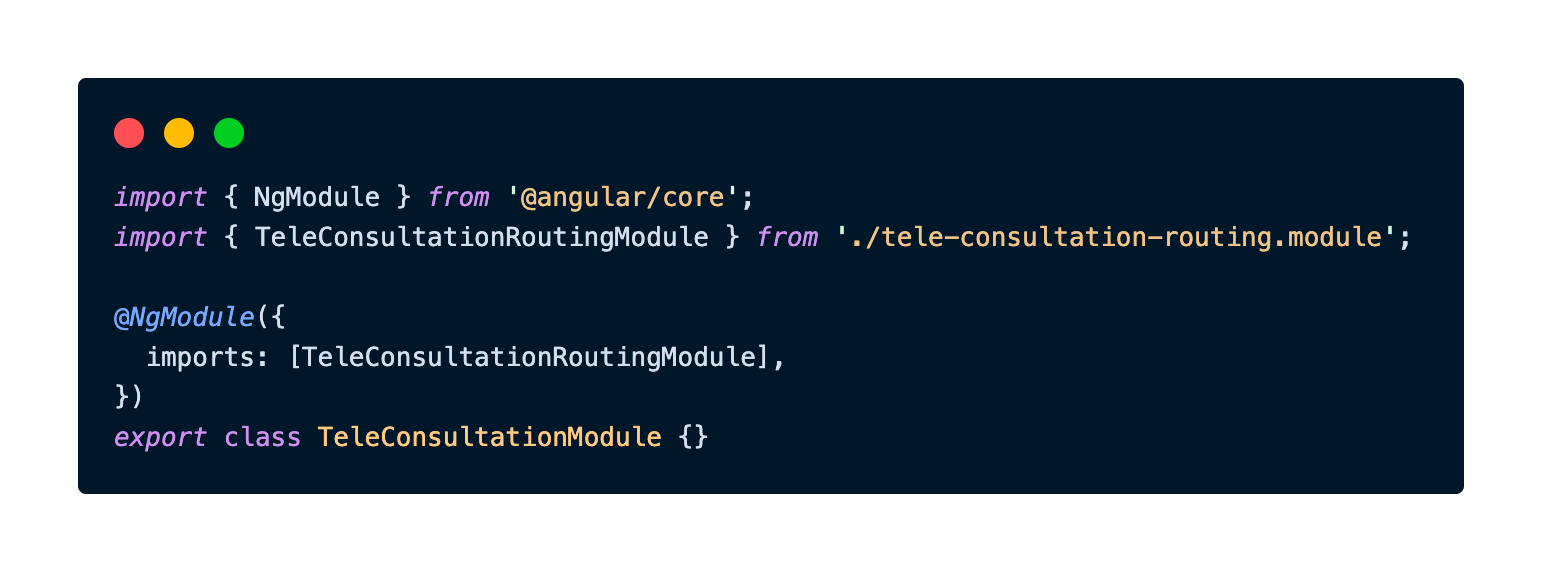
The TeleConsultationModule imports the TeleConsultationRoutingModule, which consists of the children's paths from the original AppRoutingModule. But since most of our Halodoc website components have been migrated to standalone components, we can elevate the performance even further by loading these components with the loadComponent property, which will enable the lazy loading to each of these standalone components, as explained in the previous section.
Let's see the new performance output now after the lazy loading implementation:
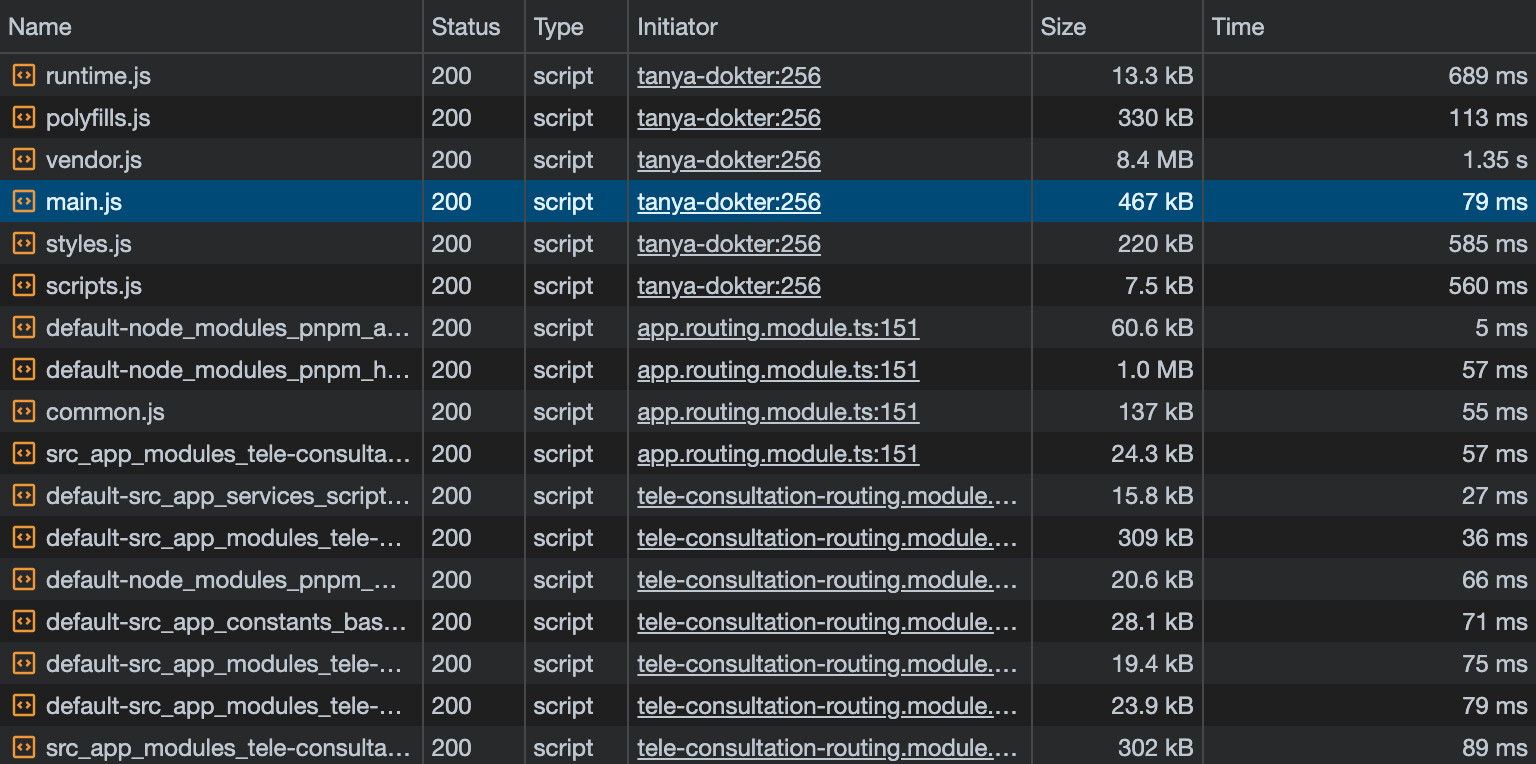
We can see from the above, that the main difference is the file size of main.js, which is now at 467 kB, only one-fifth of the previous test result! That is a significant improvement, which leads to a faster initial load time when the user first accesses the page.
On the bottom part, we can see that the modules and components are being loaded on demand, depending on which page the user accesses inside the tanya-dokter URL path.
We can finally say that we have successfully implemented lazy-loaded route modules in our Doctor Teleconsultation pages of the Halodoc website.
Conclusion
In this blog, we have delved into advanced routing concepts in Angular, namely route guards, resolvers, and lazy-loaded modules. These tools provide fine-grained control over navigation, data pre-fetching, and code optimization, enhancing both security and the user experience.
By mastering these advanced routing techniques and tailoring them to our application's needs, we will be better equipped to create web applications that are both user-friendly and performant.
References
- https://itnext.io/understanding-angular-resolvers-b49f6c227278
- https://dev.to/this-is-angular/working-with-lazy-loading-modules-and-preload-routing-strategies-in-angular-5385
- https://angular.io/guide/router
Join us
Scalability, reliability, and maintainability are the three pillars that govern what we build at Halodoc Tech. We are actively looking for engineers at all levels and if solving hard problems with challenging requirements is your forte, please reach out to us with your resumé at careers.india@halodoc.com
About Halodoc
Halodoc is the number 1 Healthcare application in Indonesia. Our mission is to simplify and bring quality healthcare across Indonesia, from Sabang to Merauke. We connect 20,000+ doctors with patients in need through our Tele-consultation service. We partner with 3500+ pharmacies in 100+ cities to bring medicine to your doorstep. We've also partnered with Indonesia's largest lab provider to provide lab home services, and to top it off we have recently launched a premium appointment service that partners with 500+ hospitals that allow patients to book a doctor appointment inside our application. We are extremely fortunate to be trusted by our investors, such as the Bill & Melinda Gates Foundation, Singtel, UOB Ventures, Allianz, GoJek, Astra, Temasek, and many more. We recently closed our Series D round and in total have raised around USD$100+ million for our mission. Our team works tirelessly to make sure that we create the best healthcare solution personalized for all of our patient's needs, and are continuously on a path to simplify healthcare for Indonesia.