Embracing nerdctl: Our Strategic Shift from docker to containerd at Halodoc
Halodoc's container management journey, initially anchored in Docker within the EKS environment, recently evolved with a shift to containerd. This blog post details our journey, exploring the challenges we faced and how we overcame them. The change was driven by Kubernetes' adoption of the Container Runtime Interface (CRI), a move that broadened the container runtime landscape beyond Docker. This evolution, aligned with the Open Container Initiative (OCI) standards, introduced new ways to build and deploy containers.
To address the compatibility between Kubernetes and the widely-used Docker, Kubernetes introduced 'Dockershim'. This intermediary, compliant with the Container Runtime Interface (CRI), effectively linked Kubernetes' Kubelet to the Docker daemon. This step was crucial due to Docker's compliance with Open Container Initiative (OCI) standards and its extensive use in the industry. The main goal of the CRI was to streamline the interaction between different container runtime and orchestrators like Kubernetes, aiming for a more unified ecosystem. However, since the Docker Engine did not inherently support the CRI, Kubernetes needed to integrate solutions like Dockershim to ensure ongoing compatibility.

Kubernetes evolved to support multiple container technologies, introducing the Container Runtime Interface (CRI) to improve communication within its system. This shift reduced the reliance on Dockershim, addressing stability issues in the Cloud Native Computing Foundation (CNCF) community. It marked a pivotal moment for Kubernetes, emphasizing its adaptability and compatibility in the dynamic containerization field.

Kubernetes version 1.24 came out in 2022, to align with the advancing container technology landscape. This strategic move underscored Kubernetes' dedication to technological leadership and its commitment to evolving with the industry's needs.
Impact of Kubernetes’ Transition on Docker Usage
As Kubernetes continues to evolve, it's important to understand how this impacts the use of Docker, particularly regarding the functionality of Docker-built images and the need for workflow adaptations:
- Continued Functionality of Docker-Built OCI Images: Docker creates Open Container Images (OCI), which are not exclusively tied to Docker. This means that any OCI-compliant images will still function properly in Kubernetes environments.
- containerd Compatibility: Containers that were previously run by Docker can now be managed using containerd. However, the shift to directly scheduling with the containerd runtime implies that Docker-specific tools will no longer be applicable for these containers.
Dockershim and containerd: For containers developed using Dockershim, which utilizes containerd internally, most will continue to function as before. However, certain scenarios will require adjustments:
- Systems that integrate the Docker socket (e.g., /var/run/docker.sock) in their cluster workflows will encounter compatibility issues. Alternatives like Kaniko, Buildah, or Img can serve as viable replacements.
- If Pods execute Docker commands, access Docker services, or interact with Docker-specific files, their functionality might be affected.
- Changes in Amazon EKS: With the rollout of AWS EKS 1.24, the Amazon EKS bootstrap script has dropped support for some specific flags. It is now essential to remove references to unsupported flags, such as --container-runtime dockerd (now only containerd is supported), --enable-docker-bridge, and --docker-config-json. This change means that --container-runtime dockerd (now only containerd), --enable-docker-bridge, and --docker-config-json are no longer valid options.
As a healthcare organization fully committed to containerization, the shift in Kubernetes's support directly impacted our entire CI/CD lifecycle, which depended on Docker for creating Dockerfiles, building images, and deploying on Kubernetes EKS clusters. We initiated a thorough review to adapt our processes, aiming for seamless operations amidst this technological transition.
Confronted with the reality of Kubernetes discontinuing Docker support in version 1.24, our team at Halodoc embarked on a search for an efficient alternative. Our significant reliance on Docker meant we needed a solution that was easy to implement. After careful consideration, we chose nerdctl for several compelling reasons:
- User-Friendly Interface: nerdctl distinguishes itself with a container runtime CLI that is intuitive and mirrors the Docker CLI experience, making it user-friendly.
- Compatibility with containerd: nerdctl is built on top of containerd, offering a Docker-compatible interface while adding new features.
- Support for Dockerfile Syntax: A crucial feature of nerdctl is its support for Dockerfile syntax, allowing us to continue building, running, and managing containers using familiar Docker commands.
- Seamless Transition: nerdctl is designed to provide a smooth transition for developers and users accustomed to Docker, easing the shift to containerd.
nerdctl
nerdctl is a Docker-compatible CLI for containerd, licensed under the Apache 2.0 license. It is a significant tool in the context of this blog, since it played a crucial role in Halodoc's transition from Docker to containerd for container management. Now will see how we replaced Docker with nerdctl with the help of following diagram
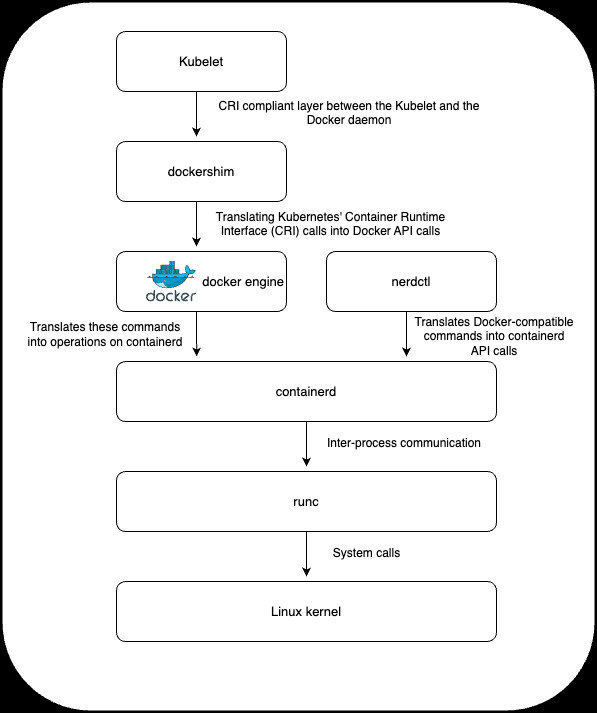
Here's an explanation of nerdctl, especially in relation to the challenges and changes highlighted in the blog:
Addressing Specific Challenges at Halodoc:
- Halodoc's infrastructure, particularly the Docker Inside Docker (DND) scenario, posed unique challenges during the transition. nerdctl's compatibility and flexibility helped in addressing these challenges.
- This blog details how Halodoc overcame the technical hurdles by customizing Amazon Machine Images (AMI) and Container Network Interfaces (CNI) to align with nerdctl’s configuration, ensuring that their complex container management needs were met.
Addressing Docker inside Docker (DND) Challenges with nerdctl
Our scenarios at Halodoc often involve running Docker inside Docker (DND), a complex setup that faced new hurdles with the adoption of nerdctl. To address these, we crafted a custom Amazon Machine Image (AMI) equipped with a Container Network Interface (CNI) specifically tailored to meet nerdctl’s configuration needs. This endeavour was supported by the nerdctl community, which supplied a version of the necessary packages that were compatible with our requirements.
For implementation on EKS 1.24 using Ubuntu EC2, we took the following steps:
- Configured the EKS 1.24 image on Ubuntu EC2, ensuring it included the packages needed for compatibility with nerdctl.
- Customized our AMI and CNI, focusing on achieving seamless integration and functionality when working with nerdctl.
These measures ensured that our Docker inside Docker scenarios could continue to operate effectively, even with the switch to nerdctl.
Steps to perform the migration:
Remove Docker from EC2:

Install containerd:
If your setup involves the AWS EKS 1.24 AMI image, you'll find that containerd is pre-installed by default. However, if you're working with a different setup where containerd isn't already installed, you can easily add it to your system. In such cases, the installation can be performed using the following command:

Next, to ensure proper functionality in your environment, it's important to download the runc command-line tool. runc is a crucial component for running containers according to the OCI specification. You can download runc using the following commands in your terminal or command prompt:


Following the installation of runc, the next step is to acquire the Container Network Interface (CNI). CNI is essential for handling the networking layer for containers. It can be downloaded using the appropriate command in your environment's terminal or command prompt:

To proceed with the setup of the Container Network Interface (CNI), you'll need to create a new directory. This directory will be used to extract the CNI binary. You can do this by executing a command in your terminal or command prompt to make a new directory in your desired location.

To unpack the Container Network Interface (CNI) binary into the newly created directory, you will use the following command. Execute this command in your terminal or command prompt to extract the CNI binary files into the directory you've just created:

The next step in setting up your environment involves configuring containerd. To do this, you should create a directory specifically for housing the containerd configuration files.

To proceed with the setup, you'll need to generate the containerd configuration file. This can be done by executing a specific command in your terminal or command prompt. This command will create the necessary configuration file for containerd in the directory you've set up.

The next step in configuring containerd involves enabling the SystemdCgroup. This is an important setting related to how Linux system services manage resources and processes. To enable SystemdCgroup in containerd, you will need to execute the following command in your terminal or command prompt. This command will adjust the necessary settings to enable SystemdCgroup within your containerd configuration.

To effectively manage the containerd service, you'll need to download a pre-configured systemd file. This file is essential for integrating containerd with the system's service management. You can download this file by executing the following command in your terminal or command prompt, which will retrieve the pre-configured systemd file necessary for managing containerd.

To apply the changes made to the systemd configuration, you'll need to reload the systemd daemon. This step ensures that your system recognizes and implements the new settings. You can reload the systemd daemon by executing the following command in your terminal or command prompt. This command will prompt the systemd to refresh its configuration, incorporating the changes you've made:

Great! With the systemd daemon reloaded and your configurations set up, you're now all set to proceed with the installation of nerdctl. This step will integrate nerdctl into your system, allowing you to leverage its capabilities for container management and orchestration in your Kubernetes environment.
Installing nerdctl
To begin installing nerdctl, the first step is to download the nerdctl binary file. This can be done by executing the following command in your terminal. This command will retrieve the necessary nerdctl binary file for installation on your system.

To unpack the nerdctl binary, you should first create a new directory specifically for this purpose.

Once you have created the new directory for the nerdctl binary, the next step is to unpack the nerdctl binary into this directory. You can accomplish this by running the following command in your terminal or command prompt. This command will extract the nerdctl binary files into the directory you just created, preparing them for installation and use.

The next step involves unpacking Buildkit and Buildctl, which are essential components for your container environment. Buildkit is necessary for transforming build definitions into images, while Buildctl is used for communication with Buildkitd. To proceed, you'll need to run the following commands in your terminal or command prompt. These commands will unpack Buildkit and Buildctl, setting them up for their role in building your container images.

Start the Buildkit daemon with the following command:

With the daemon up and running, your setup is now ready to build and run container images using nerdctl. Before proceeding with building and running your images, it's a good practice to verify that everything has been installed and configured correctly.
To validate your nerdctl installation, you can check the version of nerdctl installed on your system. This is done by executing the following command in your terminal or command prompt, which will display the current version of nerdctl. This step ensures that you have the correct version installed and that it is functioning as expected.
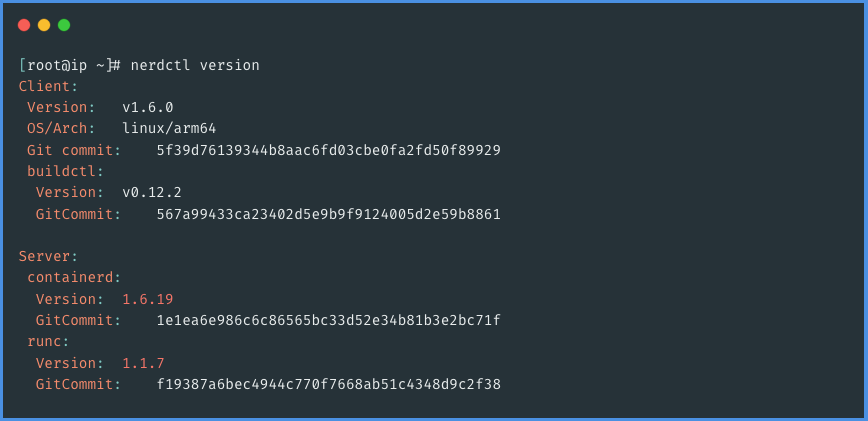
Now that you have successfully configured all the necessary binaries required for building and deploying containers without the Docker engine, it's time to put your setup to the test. To do this, you can run a series of commands that will demonstrate the functionality of your new container environment. These commands will help you verify that you can build and deploy containers effectively using the tools and configurations you've just set up, ensuring that everything is working as intended in your Docker-free environment.
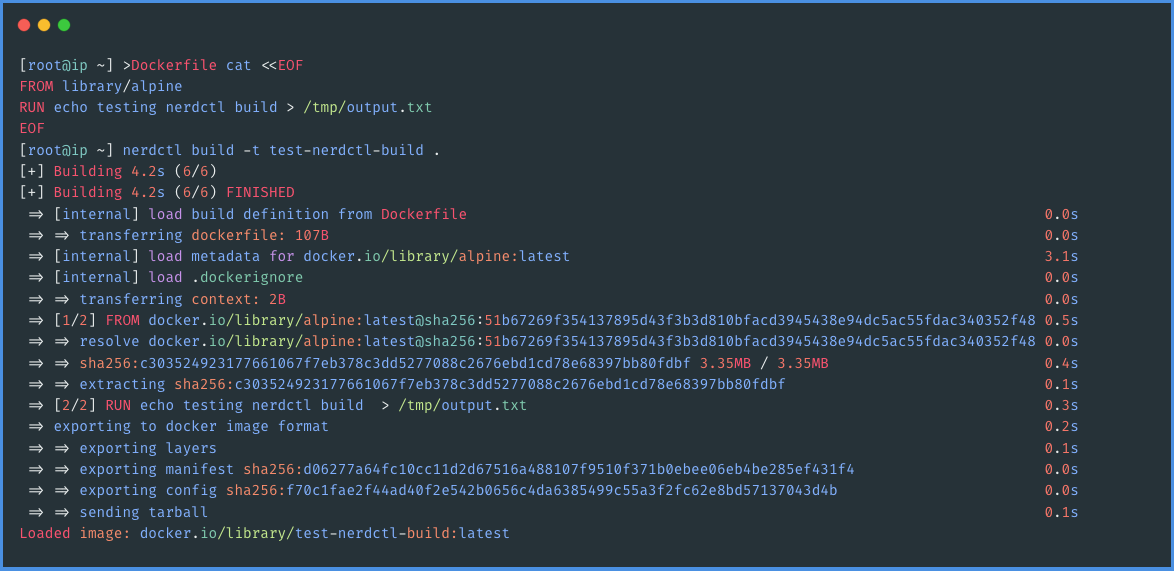
In practice, as evidenced by the results from the previous steps, it's clear that we can successfully create container images using the same Docker image format. This capability is one of the standout features of nerdctl, greatly facilitating the transition from Docker to nerdctl. By allowing users to continue using the familiar Docker image format, nerdctl ensures a smooth and user-friendly shift to a new container management system, effectively bridging the gap between the old and new technologies. This ease of transition is particularly beneficial in environments where teams are already accustomed to Docker workflows.
Now that you have successfully created container images using nerdctl, the next step is to deploy a container to test its runtime functionality. This will confirm whether the container can be run effectively in your new setup. Deploying and running a container using nerdctl will demonstrate the full cycle of container management in your environment, from building an image to successfully running it, thus validating the effectiveness of your transition from Docker to nerdctl.
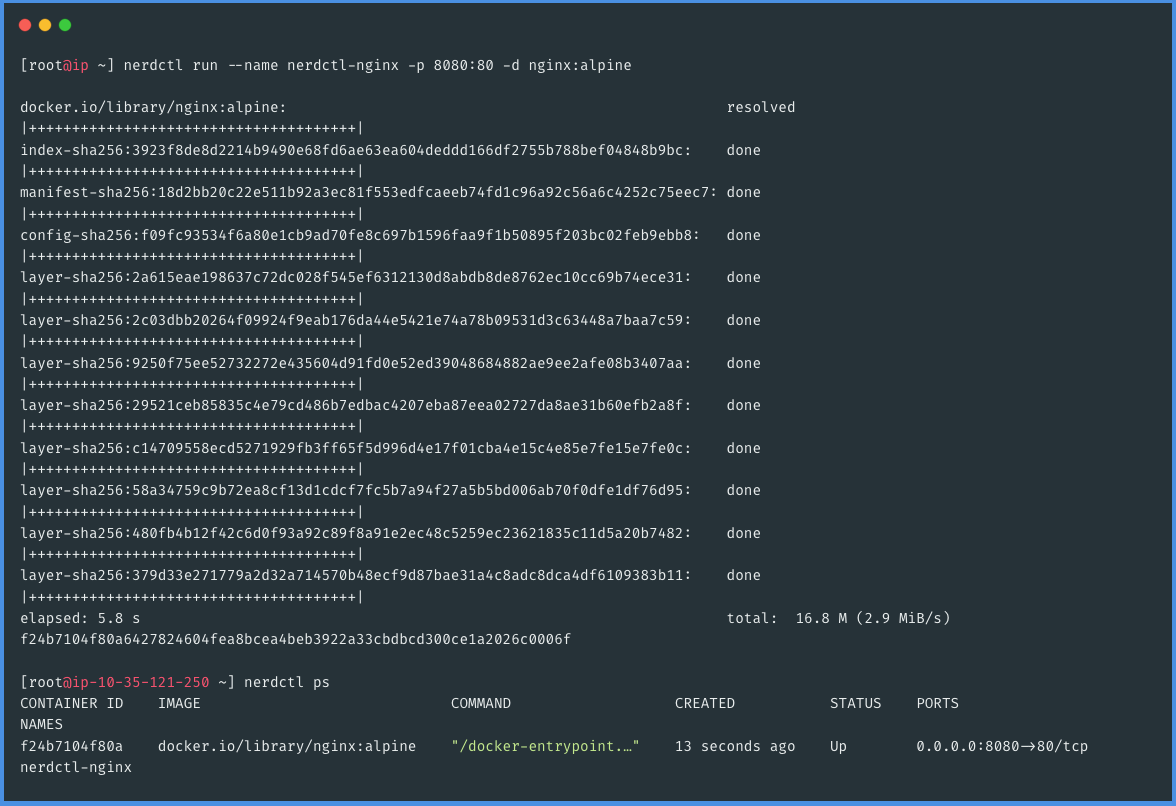
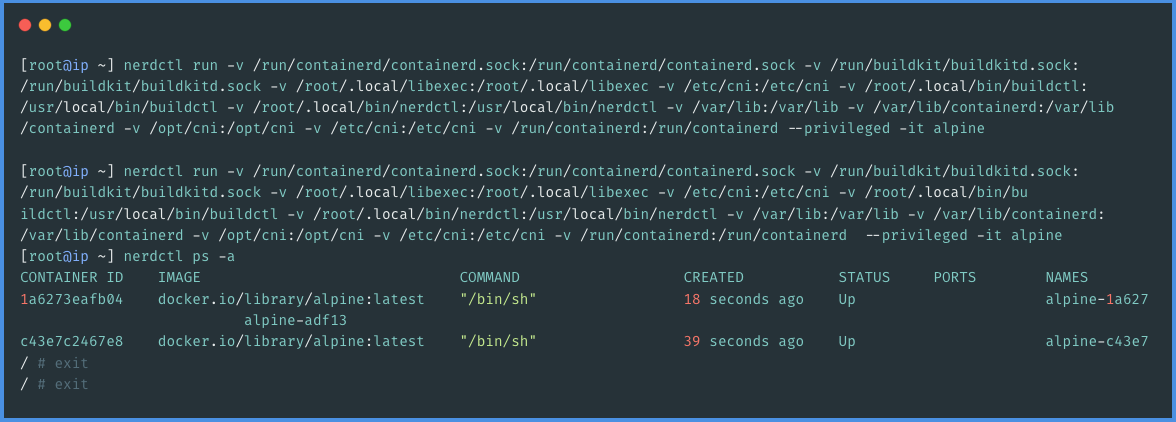
We've achieved success in building and deploying a container without relying on Docker at Halodoc. This accomplishment marks a significant milestone, especially considering the complexity of our use case which involved Docker inside Docker (DND). To replicate this functionality with nerdctl, we had to implement additional volume mounts. These mounts were essential for the first container to effectively run the second container in our DND setup. This process, while challenging, illustrates the adaptability and versatility of our new container management approach. The intricacies of this setup and how we addressed them can be better understood with the following exhibit, which provides a visual representation of our successful deployment.
Conclusion:
In conclusion, docker and containerd serve distinct roles within the containerization ecosystem. Docker is renowned for its comprehensive, user-friendly nature, making it a preferred choice for those seeking a complete container management solution. In contrast, containerd specializes as a container runtime, tailored for integration with container orchestration platforms and adaptable for incorporation into a variety of systems.
The decision by Kubernetes to phase out Docker support, notably with the removal of dockershim, underscores the growing importance of this distinction. Dockershim acted as a crucial intermediary between the Kubernetes control plane and the Docker runtime, facilitating Kubernetes' ability to manage Docker containers. This strategic move by Kubernetes marked a significant shift in the container management landscape.
The transition to Kubernetes version 1.24 brought its own set of challenges, particularly in terms of creating and building Docker images with the containerd runtime. However, the emergence of nerdctl has played a pivotal role in overcoming these obstacles. nerdctl has effectively filled the void left by Docker's absence in the latest Kubernetes version, offering a practical and efficient alternative for container workflow management. This tool has enabled us at Halodoc to adapt seamlessly to the changing dynamics of containerization, ensuring continuity and efficiency in our operations.
Reference
- https://www.guide2wsl.com/nerdctl
- https://kubernetes.io/docs/tasks/administer-cluster/migrating-from-dockershim/check-if-dockershim-removal-affects-you
- https://thenewstack.io/containers/how-to-deploy-containers-with-nerdctl
Join us
Scalability, reliability, and maintainability are the three pillars that govern what we build at Halodoc Tech. We are actively looking for engineers at all levels, and if solving hard problems with challenging requirements is your forte, please reach out to us with your resume at careers.india@halodoc.com.
About Halodoc
Halodoc is the number 1 Healthcare application in Indonesia. Our mission is to simplify and bring quality healthcare across Indonesia, from Sabang to Merauke. We connect 20,000+ doctors with patients in need through our Tele-consultation service. We partner with 3500+ pharmacies in 100+ cities to bring medicine to your doorstep. We've also partnered with Indonesia's largest lab provider to provide lab home services, and to top it off we have recently launched a premium appointment service that partners with 500+ hospitals that allow patients to book a doctor appointment inside our application. We are extremely fortunate to be trusted by our investors, such as the Bill & Melinda Gates Foundation, Singtel, UOB Ventures, Allianz, GoJek, Astra, Temasek, and many more. We recently closed our Series D round and in total have raised around USD$100+ million for our mission. Our team works tirelessly to make sure that we create the best healthcare solution personalized for all of our patient's needs, and are continuously on a path to simplify healthcare for Indonesia.


