
Optimizing for Speed: Leveraging Client-Side Image Compression with HTML Canvas
At Halodoc we believe that reducing API latency directly improves user experience by making the application more responsive and faster to use. This can lead to increased user satisfaction and engagement.
Halodoc successfully tackled the challenge of slow upload API response times by implementing image compression. This strategic move has led to a remarkable improvement in our API's performance, significantly reducing response times and enhancing the overall user experience. By compressing images on the client side before transmission, we've not only optimized data transfer but also minimized latency, ensuring that our users can upload images swiftly and efficiently. This improvement reflects our commitment to innovation and customer satisfaction, showcasing our ability to proactively address performance bottlenecks and deliver a more responsive and seamless service.
In this blog we will take a look at how we implemented image compression on client side without any external package.
Why Compress Images on the Client Side?
- Faster Load Times: One of the primary reasons to compress images on the client side is to reduce their file size. Smaller images load faster, which can significantly improve the overall loading speed of your website. This is particularly important for mobile users and those with slower internet connections.
- Bandwidth Optimization: Compressed images consume less bandwidth when they are uploaded to a server. This can lead to cost savings, especially for websites or applications that handle a large volume of image uploads.
- Improved User Experience: Faster load times result in a better user experience. Visitors to your website are more likely to stay and engage with your content if they don't have to wait for large images to load.
- Reduced Server Load: By compressing images on the client side, you can reduce the load on your server. This can improve server performance and response times, especially during peak traffic periods.
- Storage Space Conservation: Compressed images take up less storage space on the server, which can be important for websites that store a large number of images.
Before compressing images on the client side, several factors should be considered to ensure the best balance between image quality and performance. Here are some key points to consider:
- Image Quality: Determine the acceptable level of image quality for our application. Higher compression ratios can lead to lower quality images, which may be acceptable for some use cases but not for others.
- File Size: Consider the target file size for your images. Compressing images too much can result in a loss of detail and visual artifacts, while insufficient compression can lead to larger file sizes and slower loading times.
- Performance Impact: Consider the performance impact of image compression on the client side. Compressing images can consume CPU resources, especially for large images or devices with limited processing power.
- Browser Compatibility: Ensure that the compression algorithm we choose is supported by the browsers used by your target audience. Consider using fallbacks or polyfills for older browsers that do not support modern image formats like WebP.
- User Experience: Balance image quality and file size to provide a good user experience. Images should load quickly without sacrificing too much quality, especially on slower network connections.
How to Compress Images on the Client Side
There are couple of libraries available like compressorjs but in this blog we will talk about HTML canvas which provides APIs for dynamically rendering and manipulating images within web pages. By leveraging these capabilities, developers can create interactive image compression tools that allow users to adjust compression settings and preview the results in real-time.
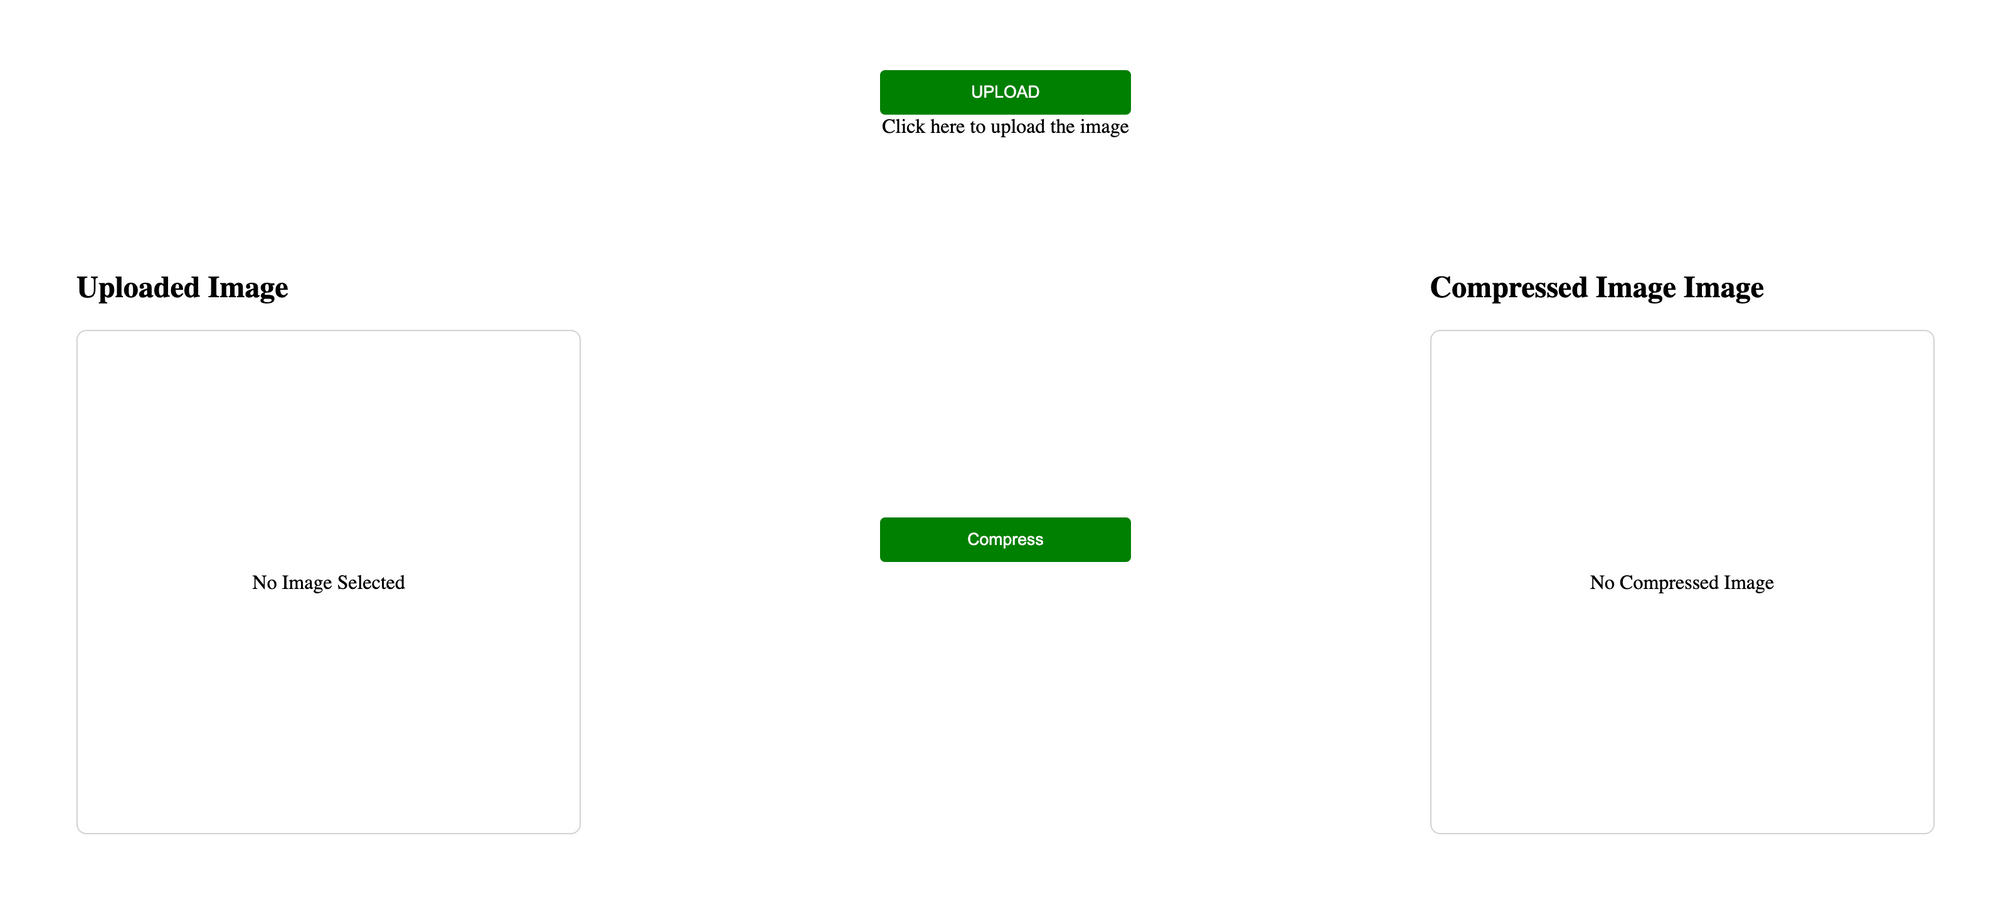
1) Setup component to view uploaded image and compressed image
Lets create the component image-uploader to view the uploaded and compressed image with the size.
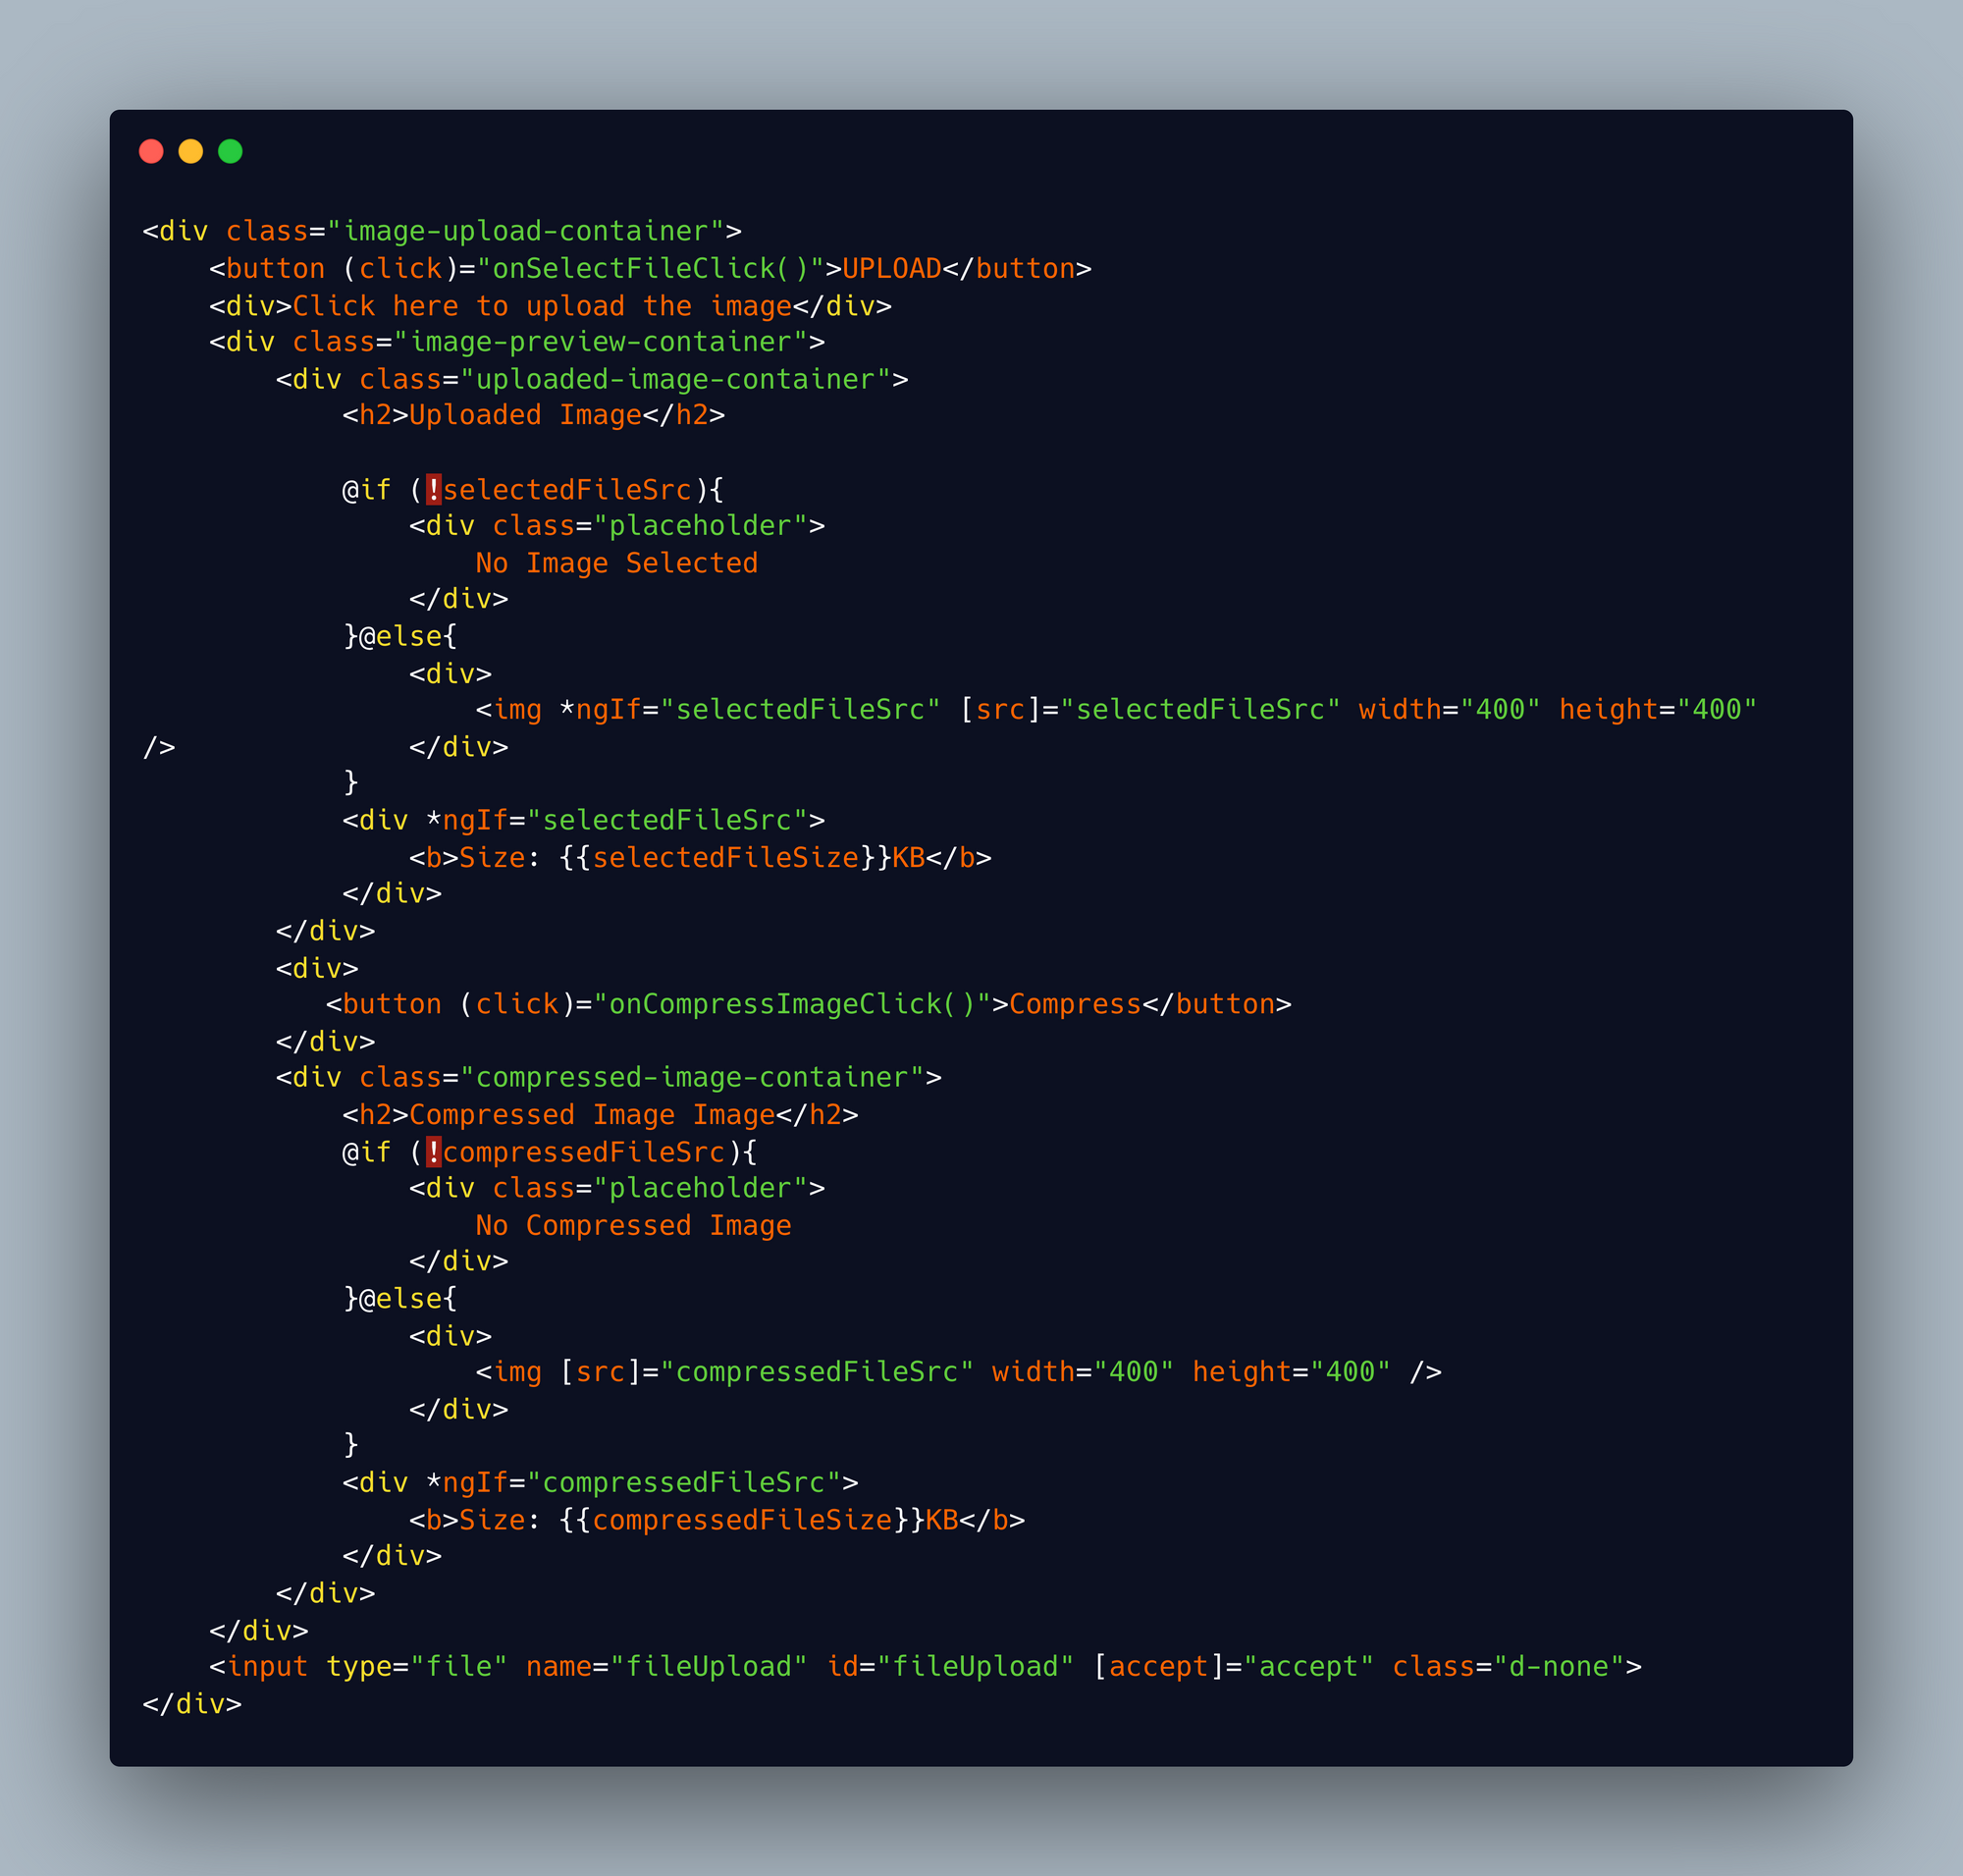
The UI for the above code snippet looks like below.
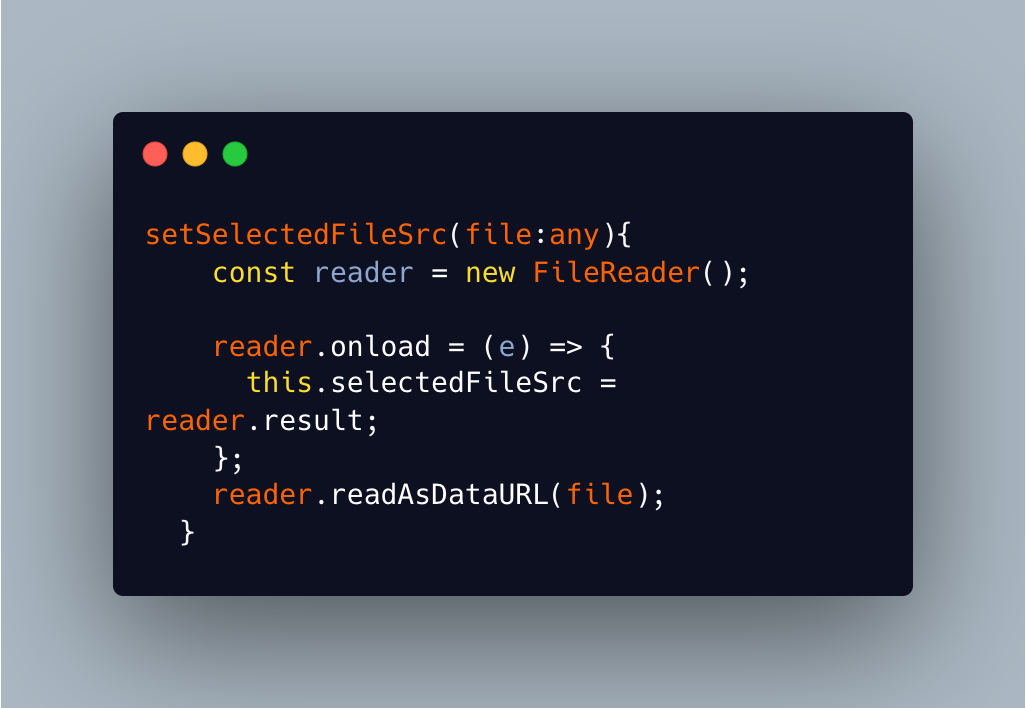
2) Adding Listener to handle input change
Now lets add the function which listens to the input change whenever user wants to upload an image.
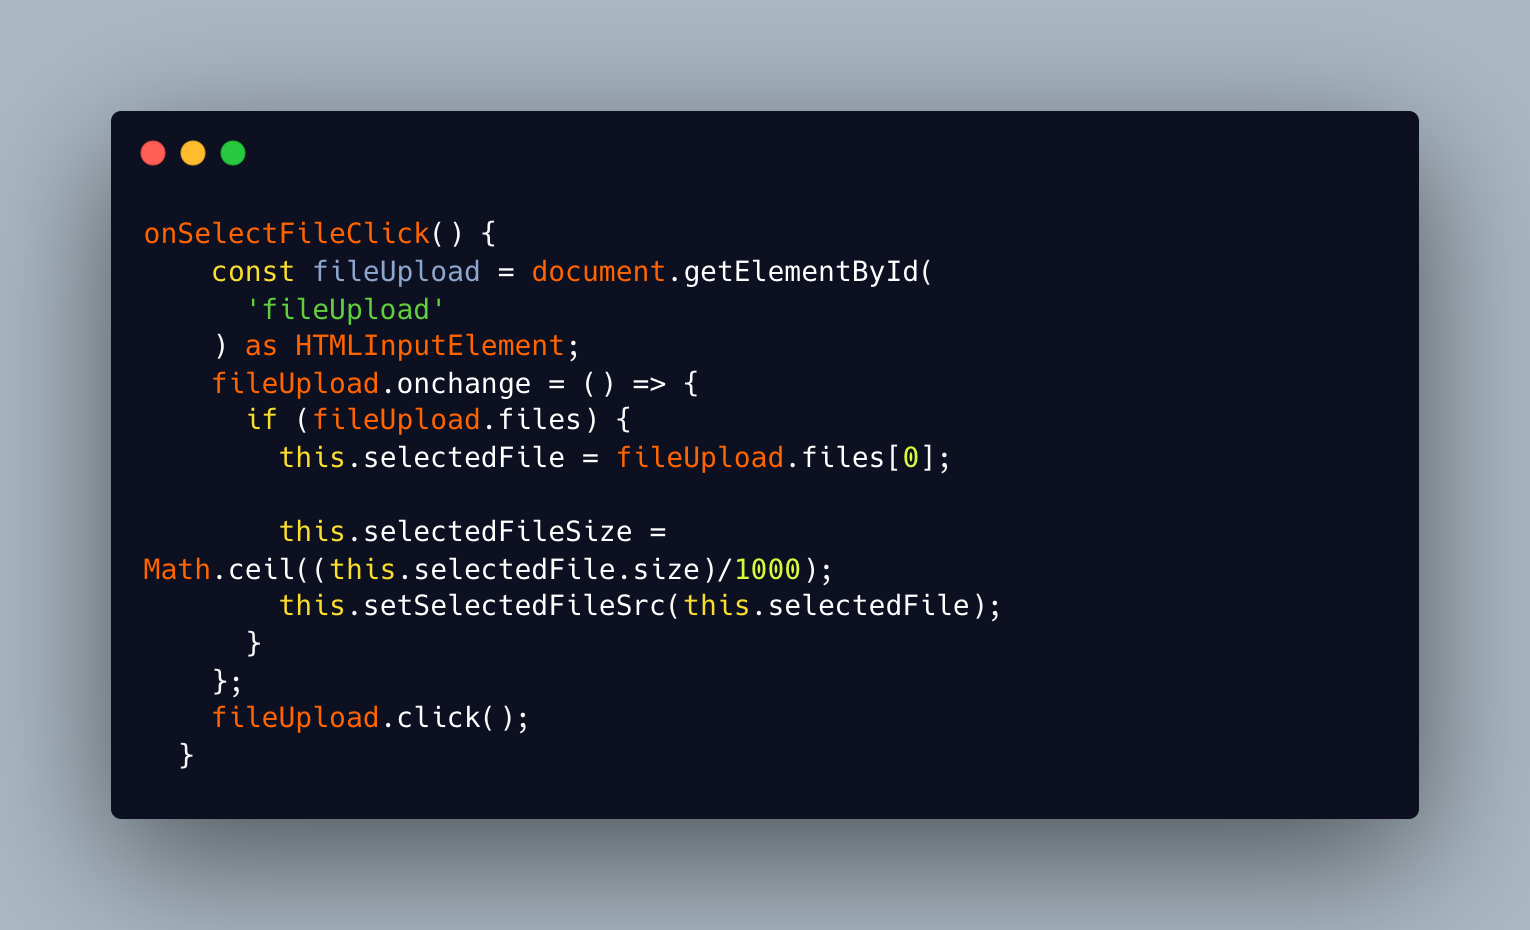
Above code snippet shows whenever there is change in the selected file we calculating the size of the file and setSelectedFileSrc function converting type File to dataURL .The FileReader object lets web applications asynchronously read the contents of files (or raw data buffers) stored on the user's computer, using File or Blob objects to specify the file or data to read.
3) Setup Image Compression Service
Now we’ll create a new service for Image compression to keep the code of image compression in one place so that we won’t have to write the code again and again.
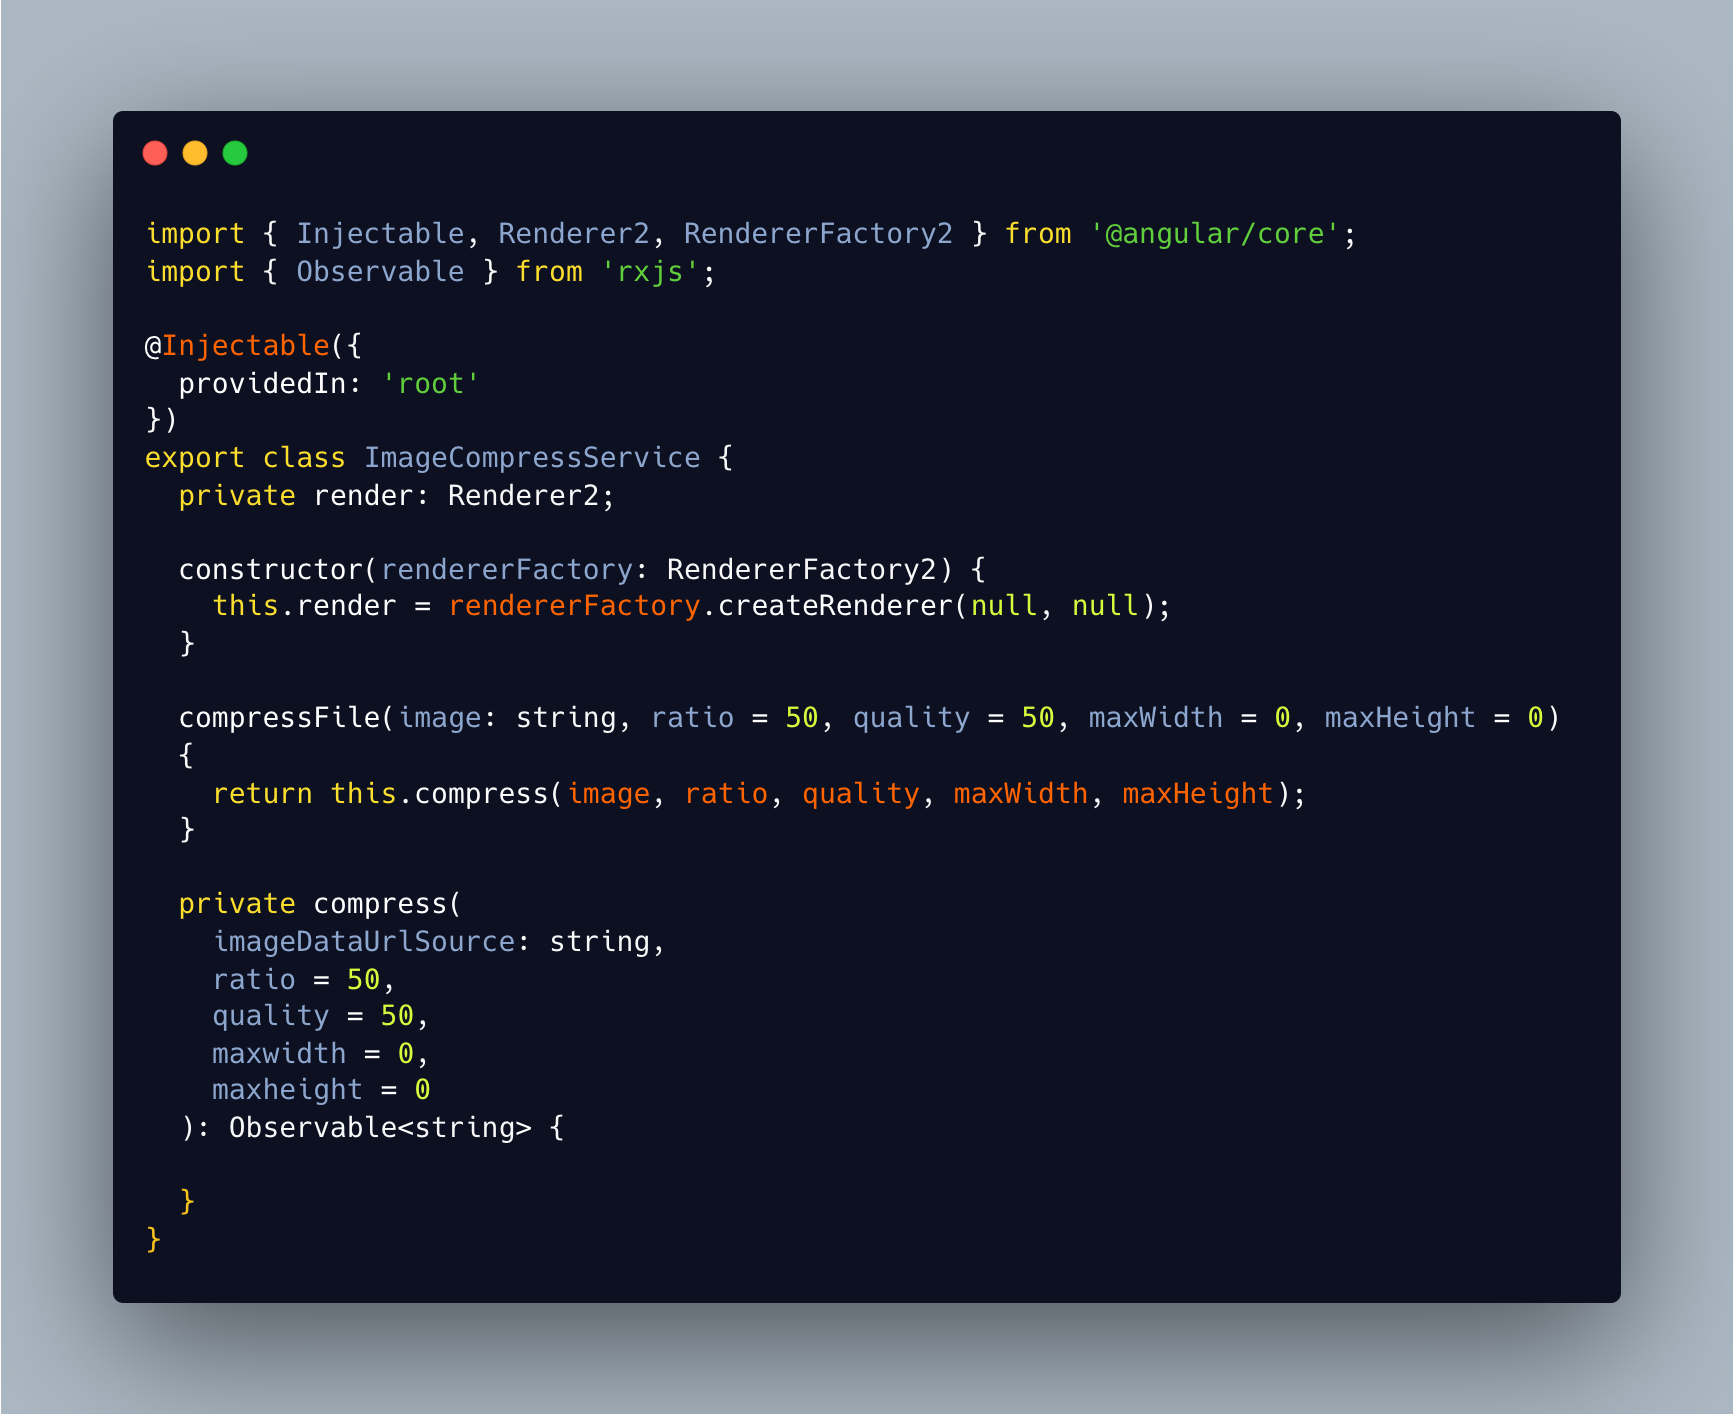
In this service we instantiating renderer2 as we need it to host DOM element which we are seeing in the upcoming section.And we have compressFile function which takes imageDataUrlSource , ratio , quality , maxWidth , maxHeight as an parameters and return result of compress that is an Observable of compressed imageDataUrl.
4) Resize and compress image with HTML canvas
Let’s get to the fun part and make the compress function in ImageCompressService
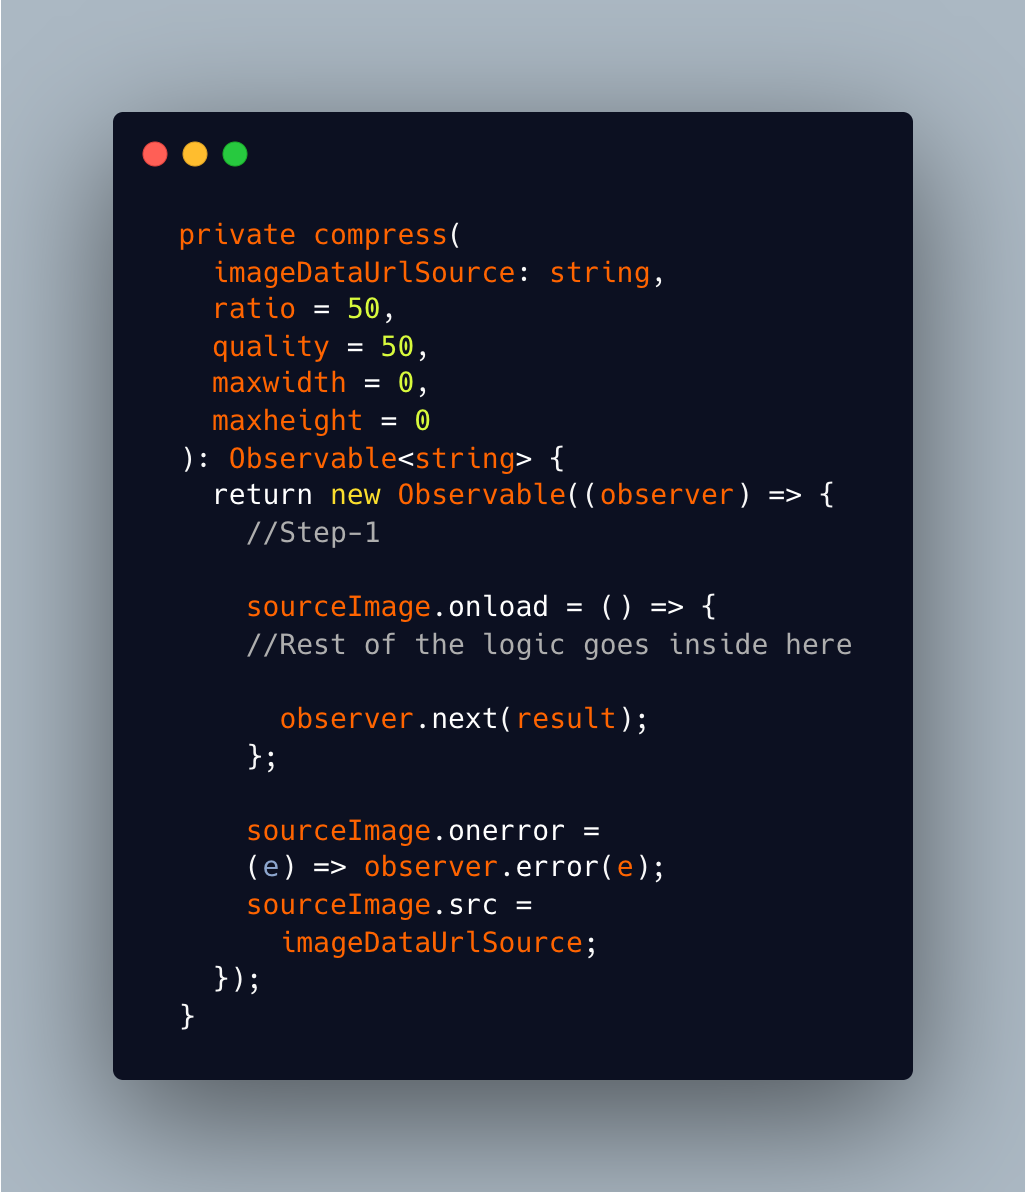
As shown in the above code snippet compress function takes imageDataUrl, ratio (scaling factor), quality, maxWidth and maxHeight of the image after compression.
Lets understand the compress logic stepwise:
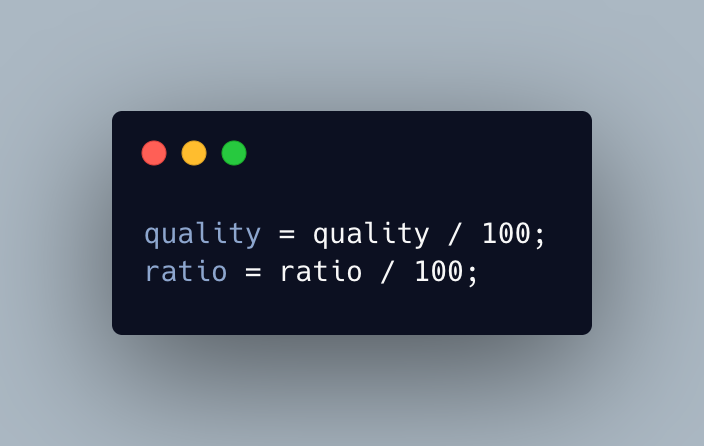
Step 1: We convert quality and ratio factor to 0 to 1 range
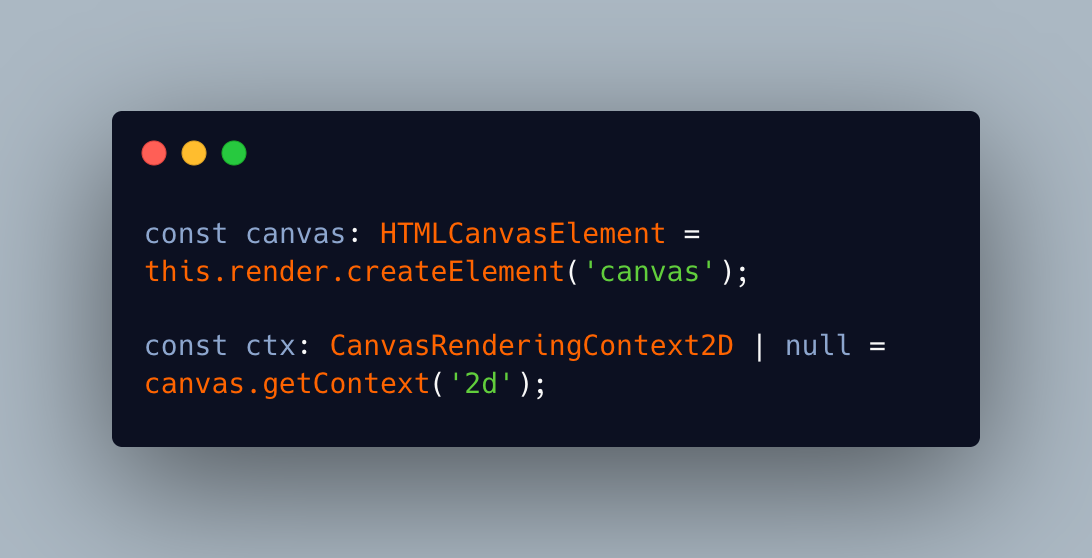
Step 2: Creating canvas and getting context to draw the content.
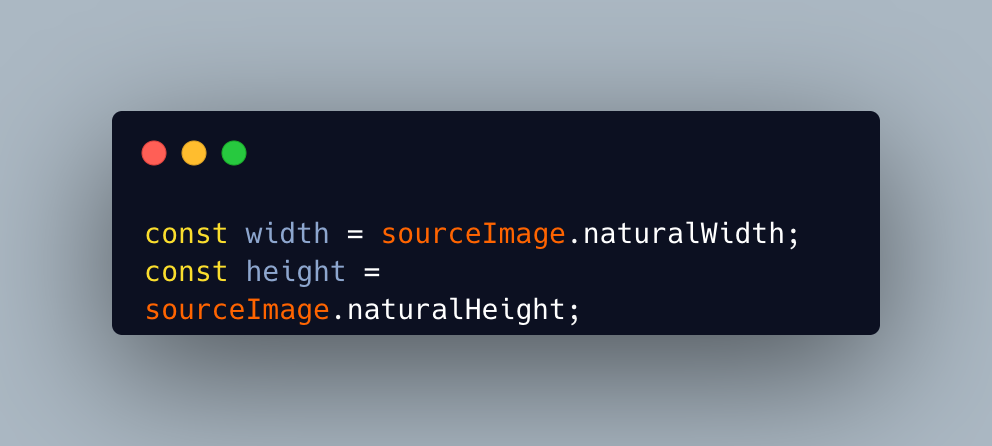
Step 3: Getting actual width of the image
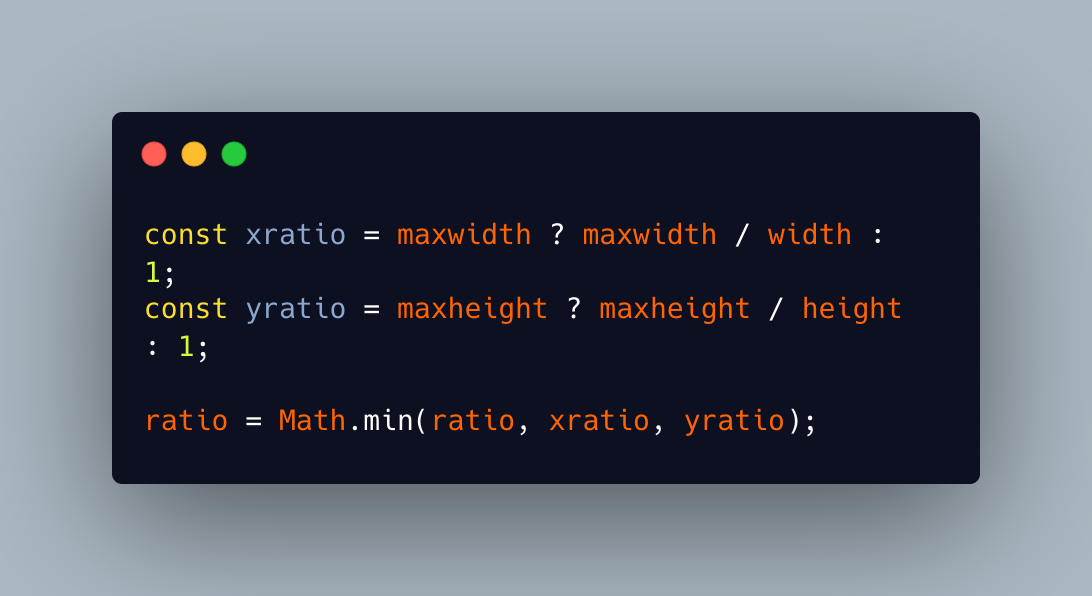
Step 4: In this step we calculate ratio (scaling factor) based on the aspect ratio. An image’s aspect ratio (xratio : yratio) is the proportional relationship of the width to the height.
we are calculating the xratio and yratio based on the maxWidth and maxheight respectively. By comparing the aspects ratio and the ratio which is taken as parmeter we are taking the one which is minimum as ratio (scaling factor).
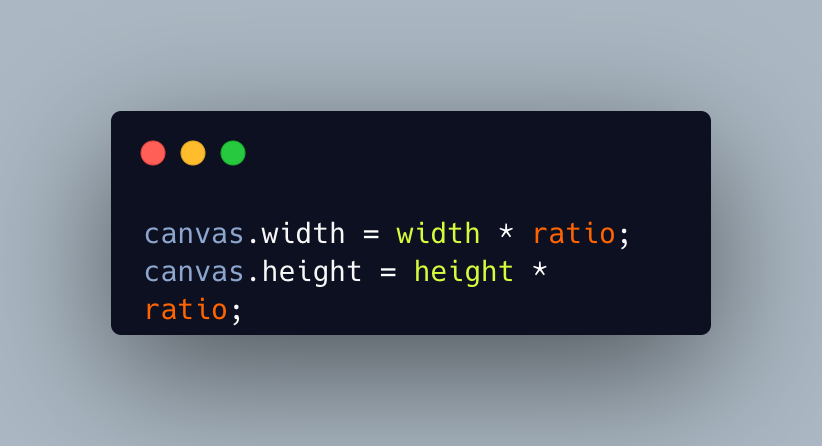
Step 5: We are setting canvas width and height with the scaled down width and height
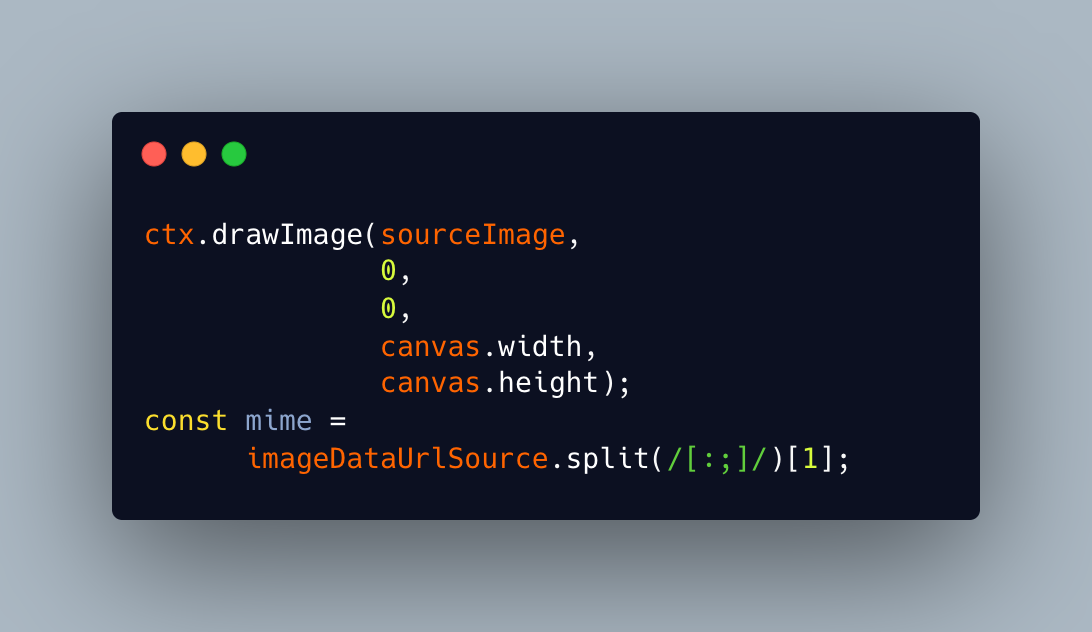
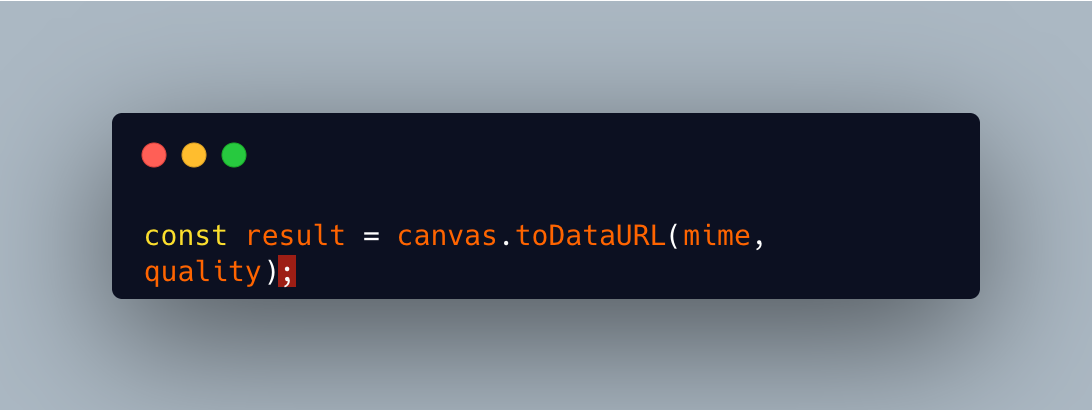
Step 6: Now we are drawing downscaled image on the canvas. After that we are taking mime type of image like image/png or image/jpg etc.
Step 7: In this we are using toDataURL method provided by canvasElement which takes type (mime in this example) and a number between 0 and 1 indicating the image quality to be used when creating images using file formats that support lossy compression. Both of these parameters are optional.
So this function returns compressed imageDataUrl.
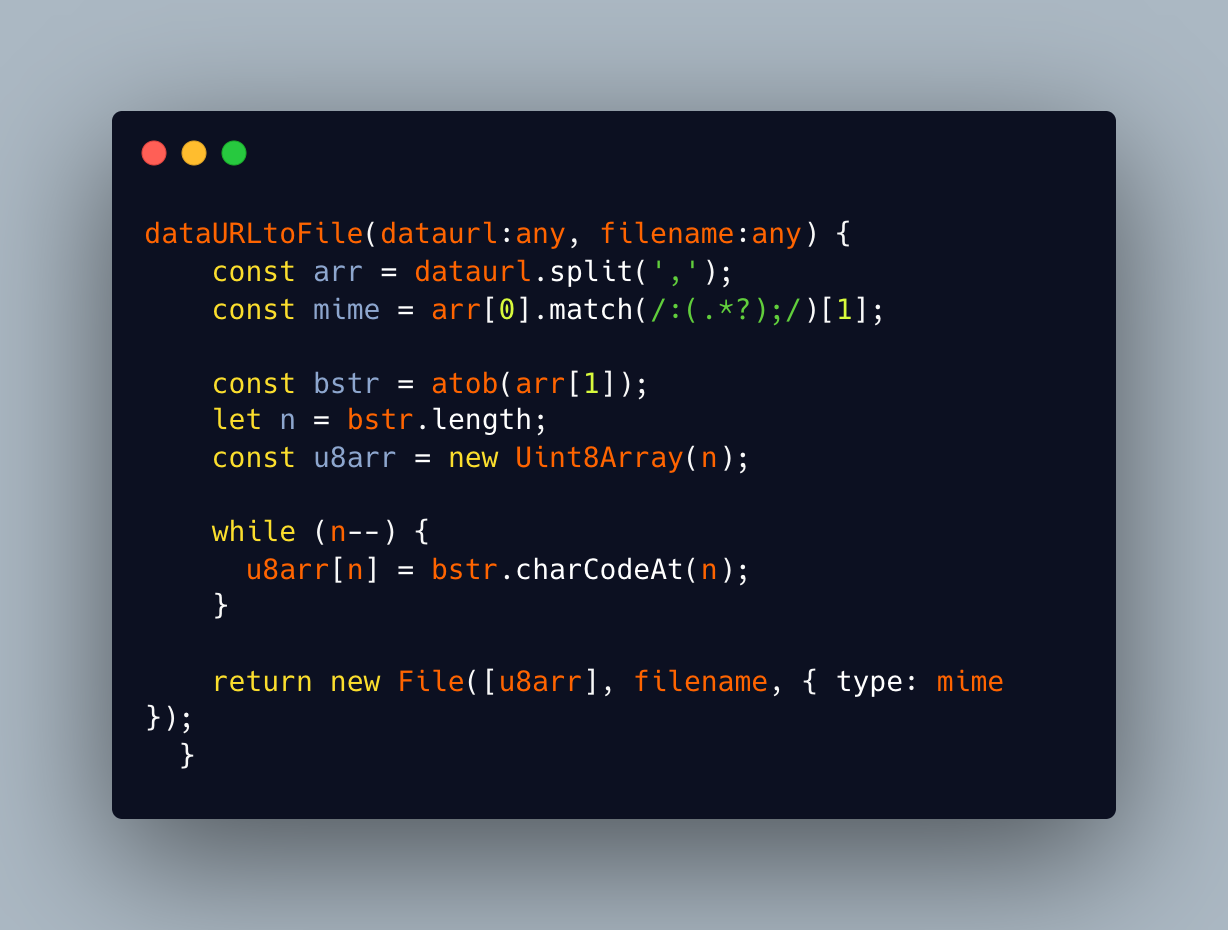
So after compressing the image the data return from compress function is string that is imageDataUrl but if we want to send the compressed image to server it needs to send as File so we need to create function to convert this imageDataSrcUrl to File.
ImageCompressService in Action
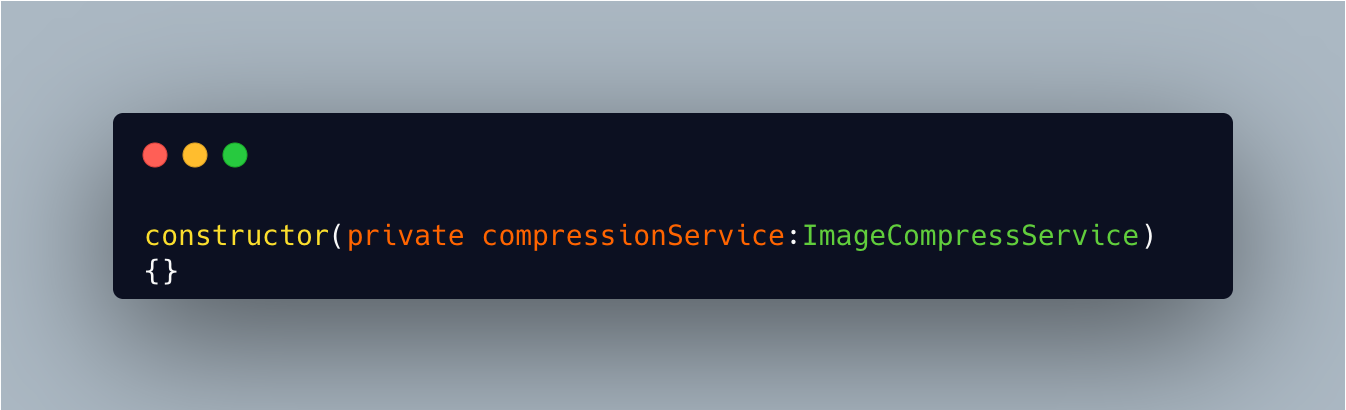
Now lets make use of ImageCompressService in our ImageUploader component
Injecting the service in our component
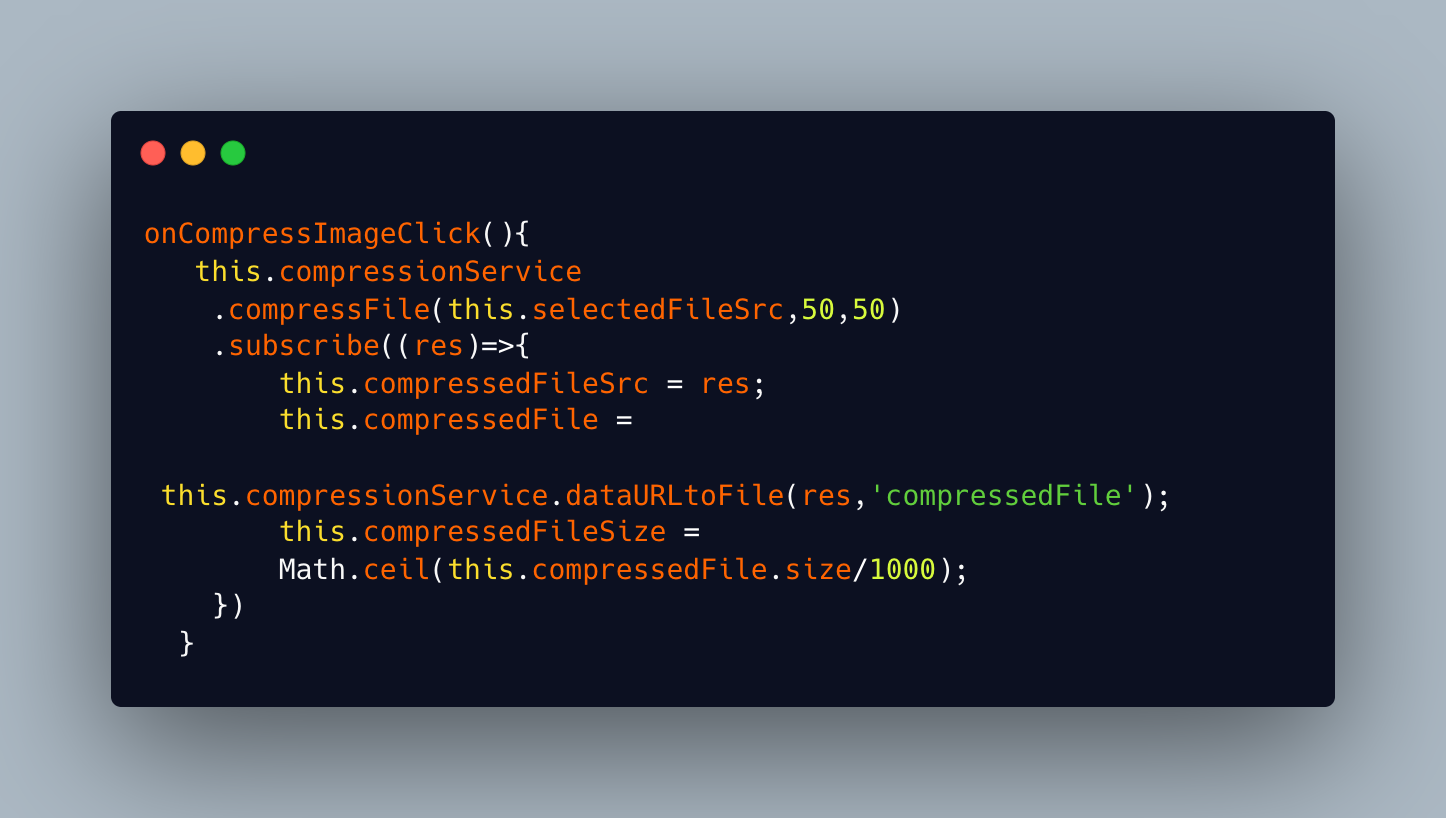
On compress button click we are calling onCompressImageClick inside which we are making use of compressFile function from ImageCompressService with imageDataUrl , ratio (scaling factor) and quality .
Now lets see how all these work together to compress the image
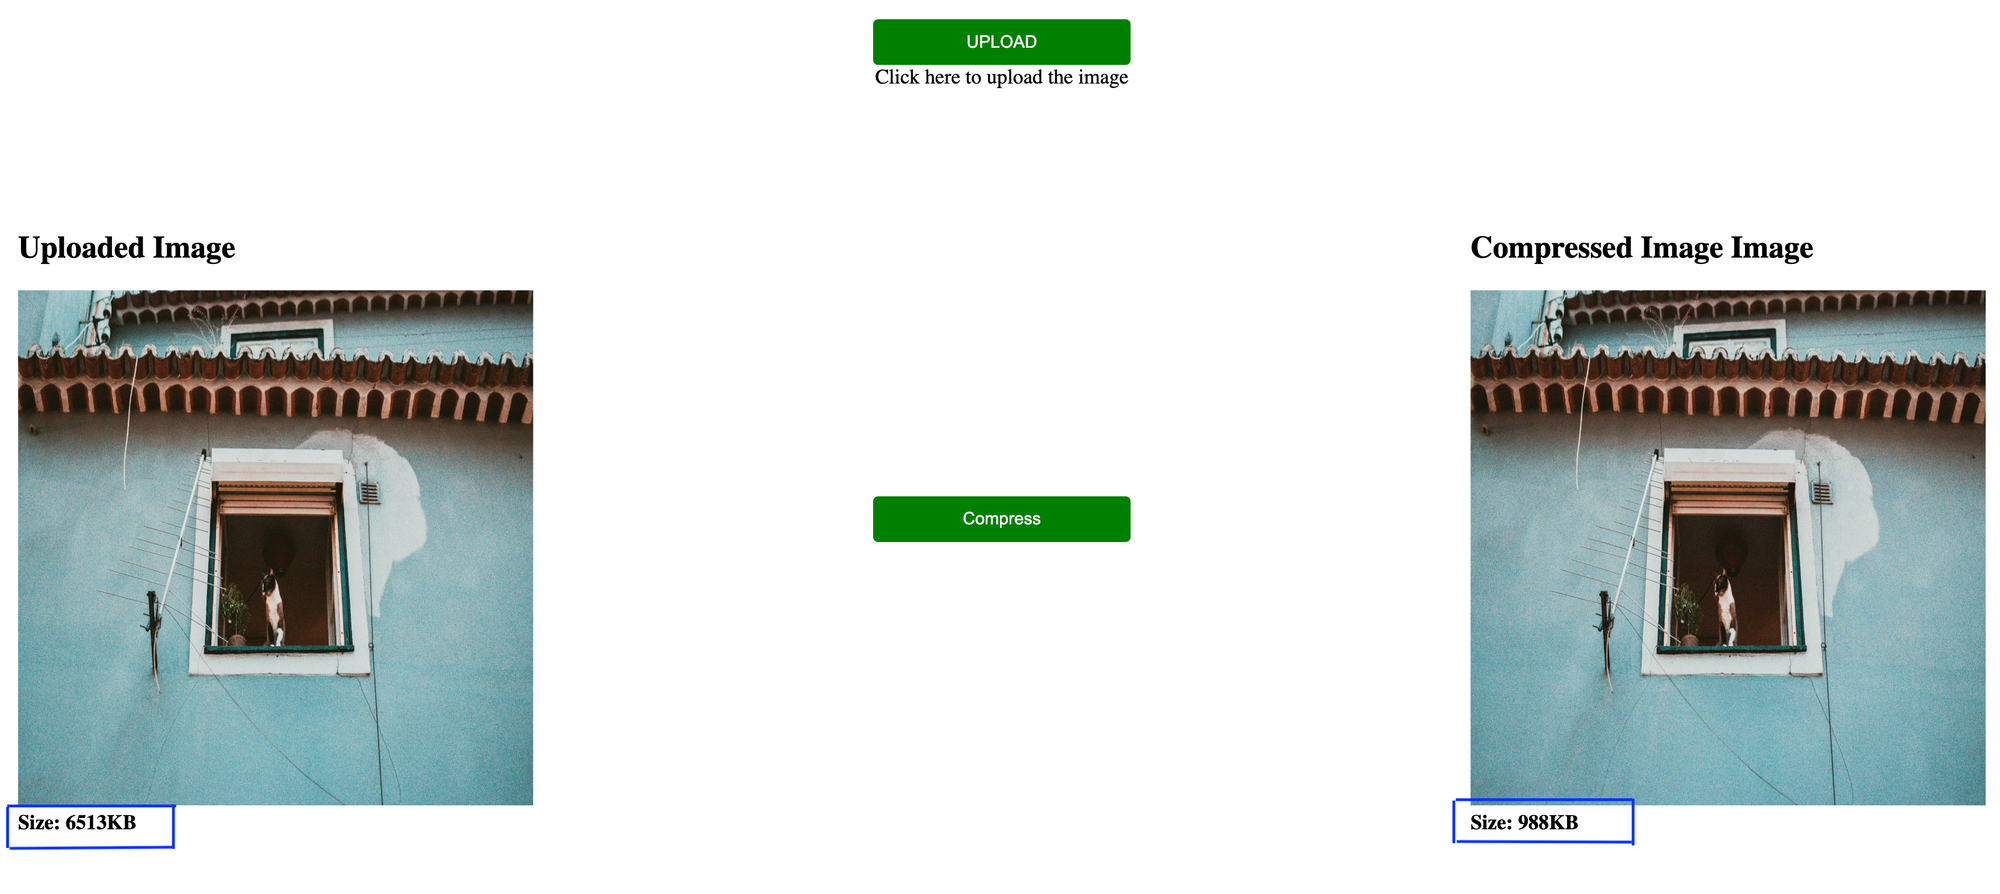
As per the above screenshot we can see the size of uploaded image is around 6.5MB and after compressing the image the size of the image came down to ~1MB.
When compressing images using the HTML canvas, the quality, maxWidth, and maxHeight parameters can all impact the size of the compressed image:
- Quality: The
qualityparameter controls the level of compression applied to the image. It is a number between 0 and 1, where 0 is the lowest quality (highest compression) and 1 is the highest quality (lowest compression). Lower quality settings result in smaller file sizes but poorer image quality, while higher quality settings result in larger file sizes but better image quality. - Max Width and Max Height: The
maxWidthandmaxHeightparameters specify the maximum dimensions (in pixels) that the compressed image should have. If the original image is larger than these dimensions, the canvas will resize the image to fit within the specified dimensions before applying compression. This can help reduce the file size of the compressed image, especially if the original image is very large.
By adjusting these parameters, we can control the trade-off between image quality and file size when compressing images using the HTML canvas.
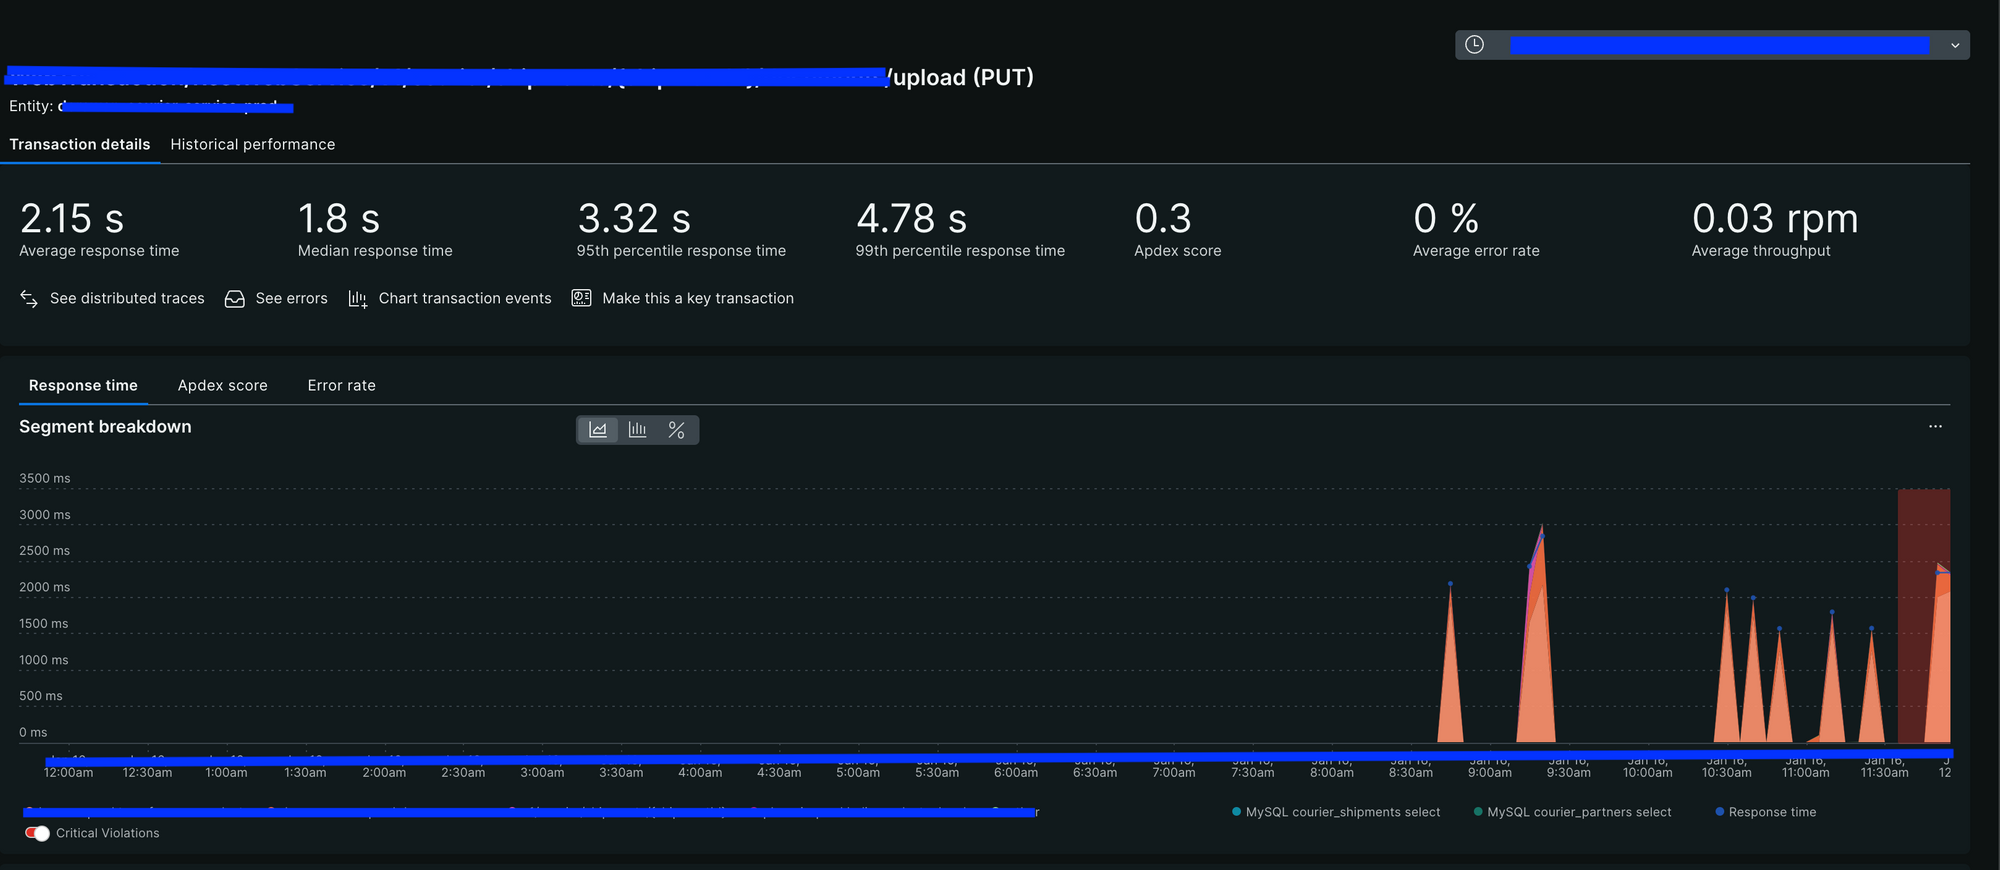
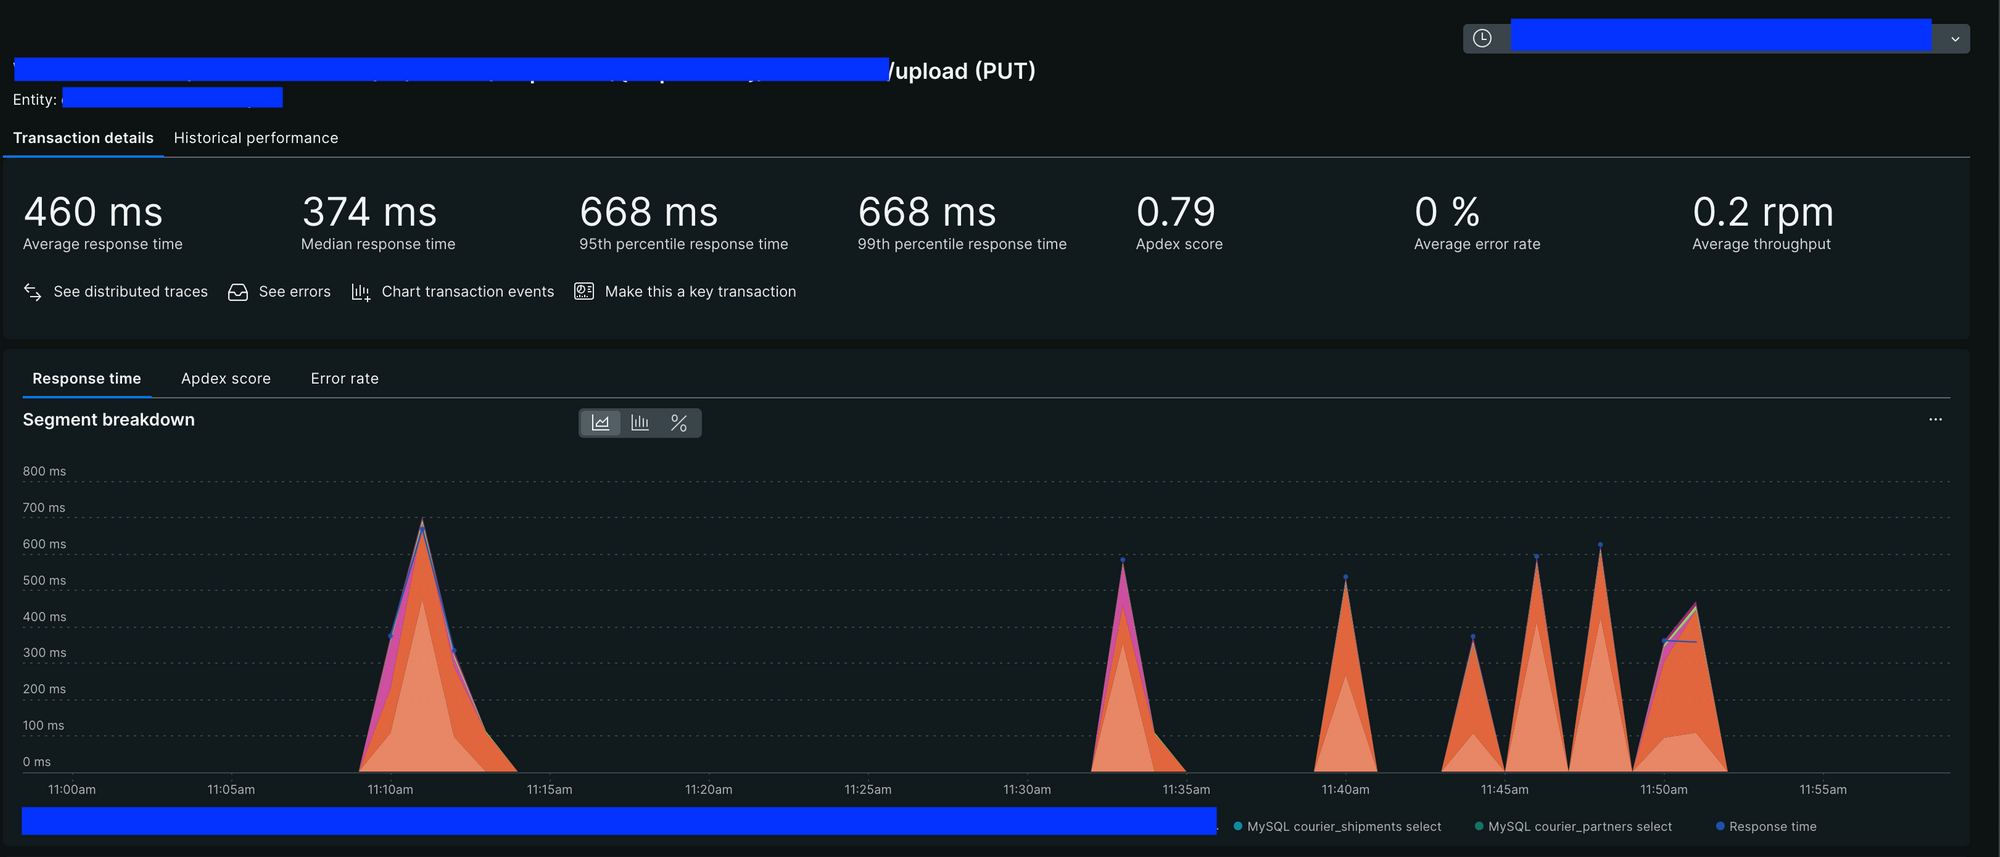
At halodoc we have implemented this compression technique and achieved remarkable results for improving response time:
Before Implementing Image Compression
After Implementing Image Compression
Conclusion
Compressing images on the client side can be a useful technique for optimizing web performance and improving user experience. It allows us to reduce image file sizes without compromising too much on quality, thereby speeding up page load times and reducing bandwidth usage.
However, it's important to consider the trade-offs involved. Aggressive compression can lead to noticeable loss of image quality, which may not be acceptable for all use cases. It's also important to ensure compatibility with a wide range of browsers and devices, as not all compression techniques are supported universally.
In conclusion, client-side image compression can be a powerful tool for improving web performance, but it should be used judiciously, taking into account factors like image quality, browser compatibility, and performance impact.
Join us
Scalability, reliability, and maintainability are the three pillars that govern what we build at Halodoc Tech. We are actively looking for engineers at all levels, and if solving hard problems with challenging requirements is your forte, please reach out to us with your resume at careers.india@halodoc.com.
About Halodoc
Halodoc is the number 1 Healthcare application in Indonesia. Our mission is to simplify and bring quality healthcare across Indonesia, from Sabang to Merauke. We connect 20,000+ doctors with patients in need through our Tele-consultation service. We partner with 3500+ pharmacies in 100+ cities to bring medicine to your doorstep. We've also partnered with Indonesia's largest lab provider to provide lab home services, and to top it off we have recently launched a premium appointment service that partners with 500+ hospitals that allow patients to book a doctor appointment inside our application. We are extremely fortunate to be trusted by our investors, such as the Bill & Melinda Gates Foundation, Singtel, UOB Ventures, Allianz, GoJek, Astra, Temasek, and many more. We recently closed our Series D round and in total have raised around USD$100+ million for our mission. Our team works tirelessly to make sure that we create the best healthcare solution personalized for all of our patient's needs, and are continuously on a path to simplify healthcare for Indonesia.