
Deep dive into Angular component DOM testing
Unit Testing is an important aspect of every Web Development. Having Advanced Unit Test will cover more component logic and increase the quality of product development.
In the previous blog on AngularUnit Testing, we talked about pure component class testing. Though, component class testing is more than sufficient to validate most of the component logic; it falls short in validating component class and template interaction, which is indeed an important aspect of web development.
In this blog, we will dive deep into component testing and talk about DOM testing and we will also go through some of the important aspects of unit tests that we should be knowing for creating TestBed. We will also cover writing some performant UTs.
What is Component DOM testing?
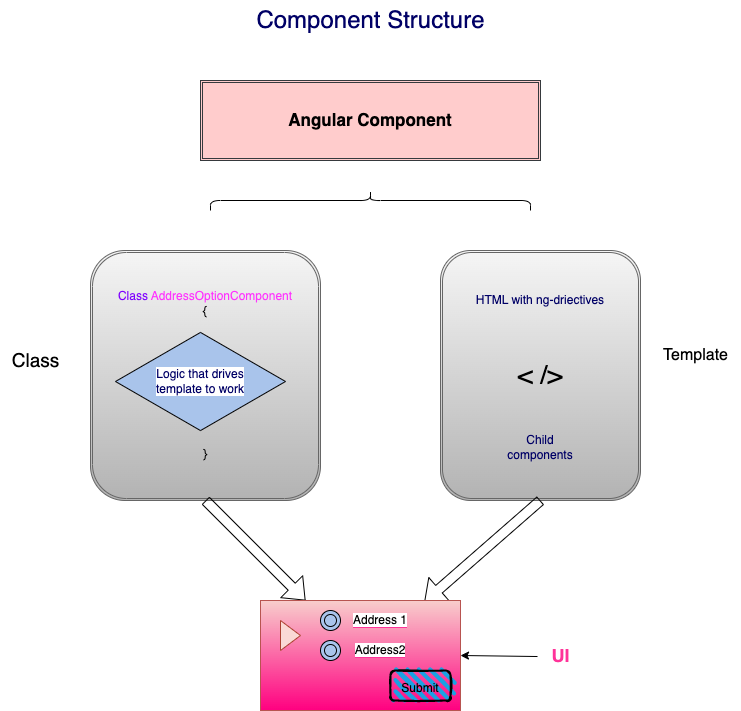
As Angular rightly defines, the component is more than just class itself. it's a combination of template and class. DOM testing can be defined as a way of Unit testing a component class from a template perspective or user perspective. It involves testing the component in its entirety. It covers all aspects of user interaction from a click of a button to the colour of a button that the user sees in the application.
DOM Testing over Automation Scripts
Though we have automated integration tests in-place to check and validate the UI behaviour, a developer would not know the issue before hand especially when there is a time gap between development and running automation scripts.
Dev errors are inevitable and can occur both in creating a new component and upgrading the existing component. Pure component class testing fails to identify errors in the following scenarios
- When logics used in directives like ngIf and ngClass are left unattended after a component upgrade
- if any child components are used within the template and its attribute is not defined correctly.
- Any random texts introduced in a template that are unintended to be there.
we might ask if these error wouldn't be catched while building the TestBed, the answer is when writing unit test focused on component class, we add schemas to bypass the errors, which will be discussed later in this article.
We cannot substitute Automation scripts with component DOM testing, However it helps in early catching of error and avoid QA dev cross iterations in case the above mentioned errors were introduced.
Getting started with DOM testing
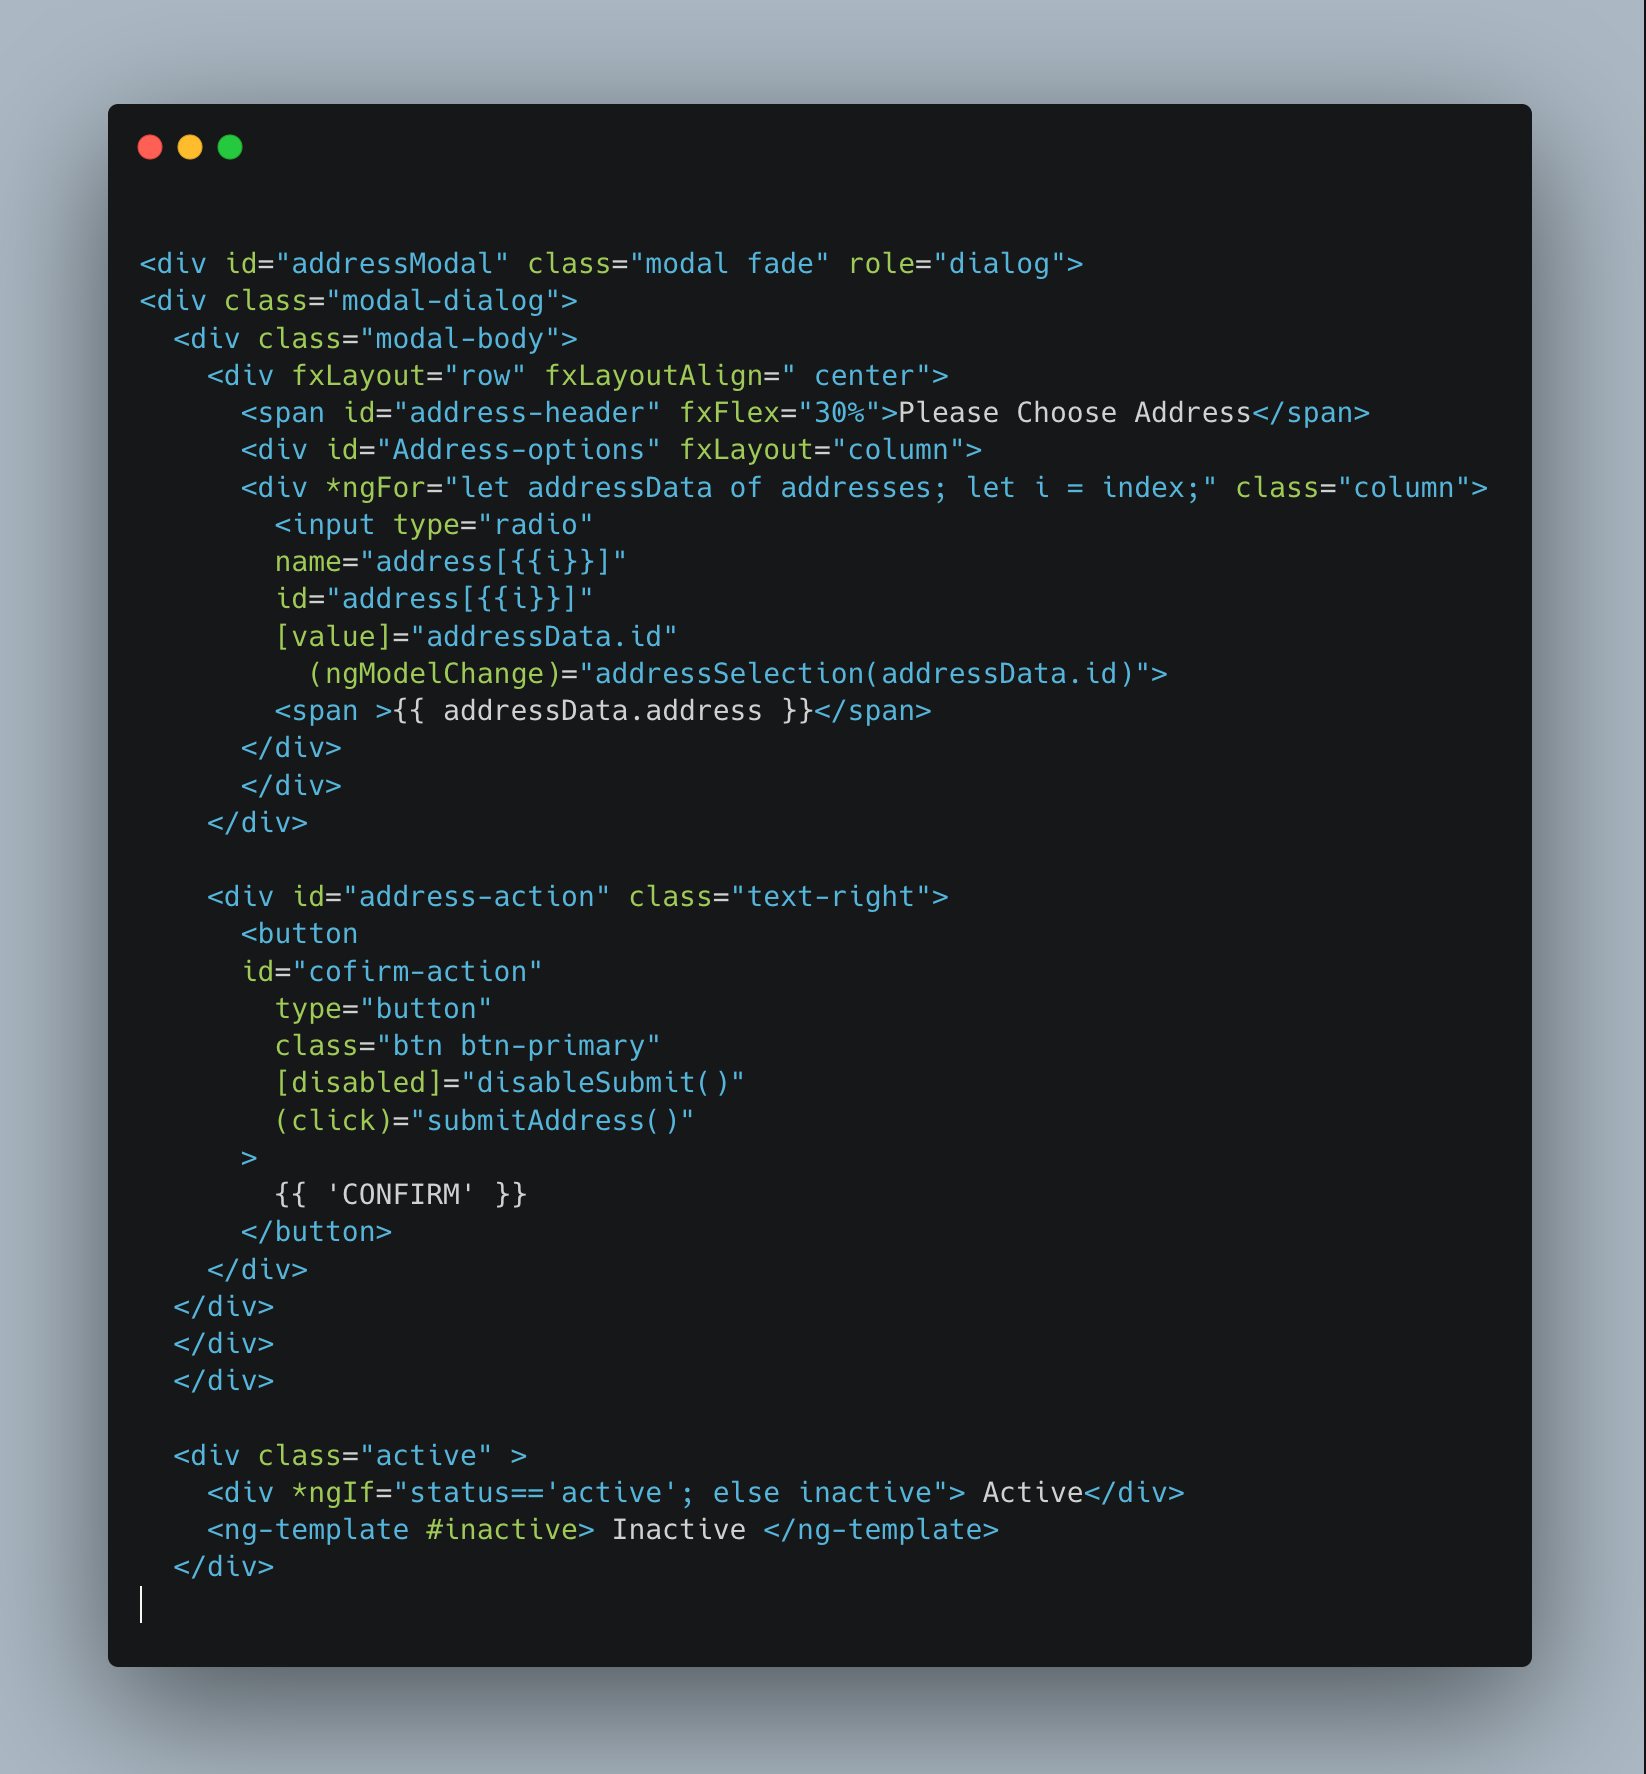
We will take a pretty common UI example mostly used in e-commerce applications; let's define a child Dumb UI component called AddressOptionsComponent where the user will be prompted to select addresses from the savedAddress and proceed, template of the component is shown below
the component class is as below.
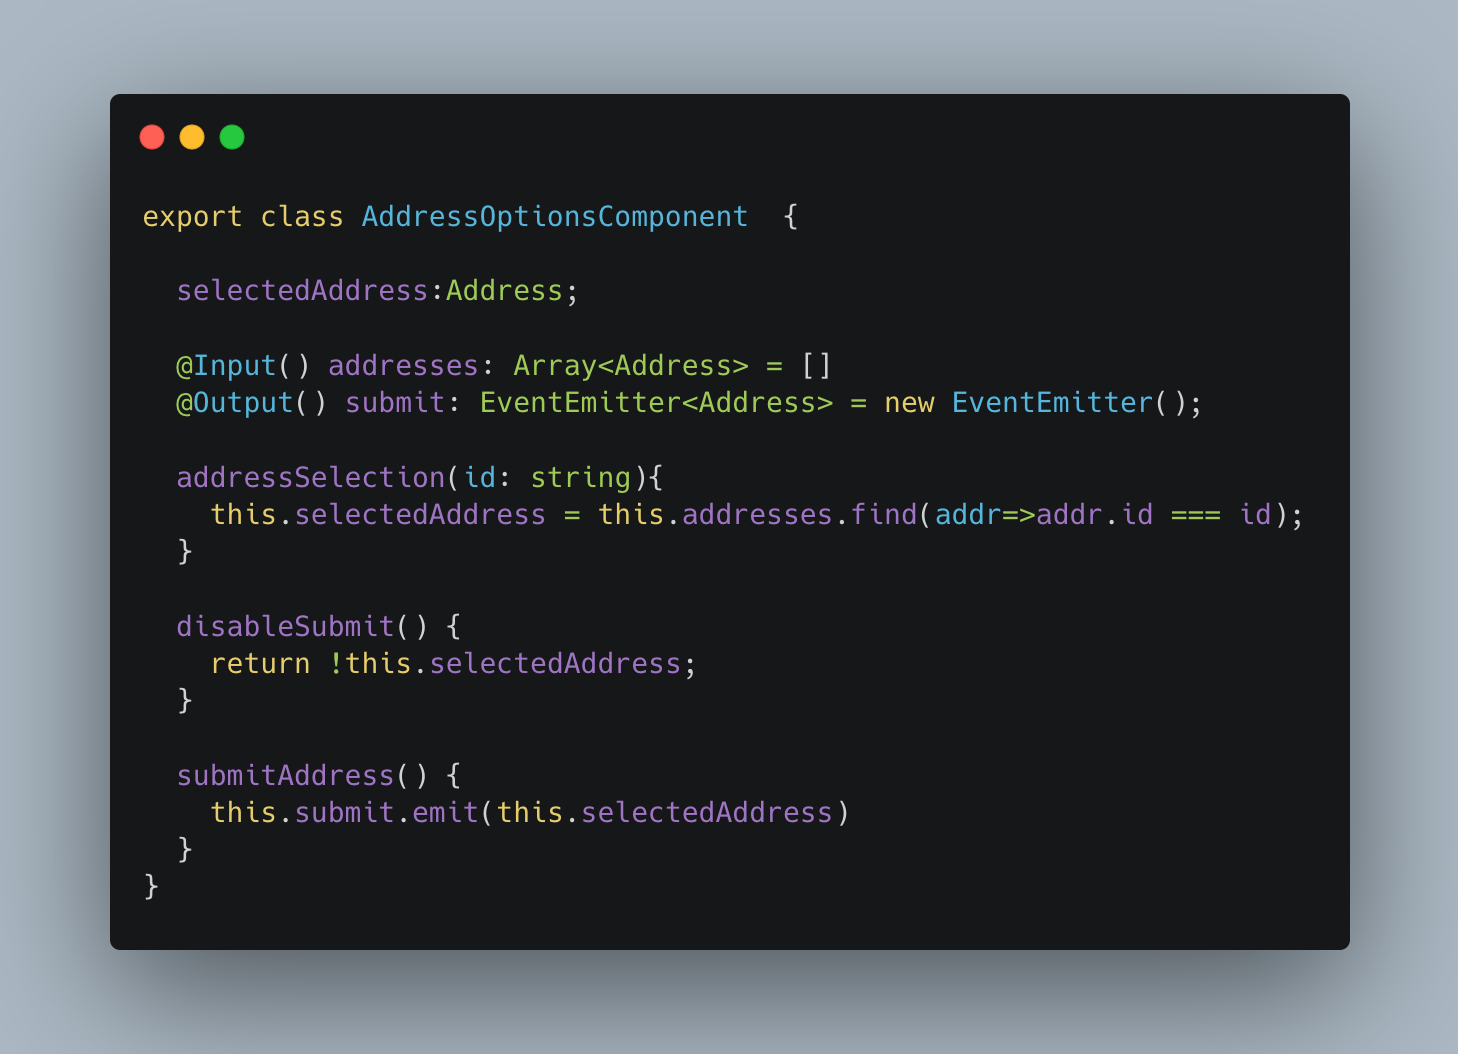
this component is used inside a smart parent component which binds the savedAddresses to the @Input and listens to the event raised by the `@Output` property, This is the data source for addresses and events triggered after address selection to process further in the parent component respectively.
We have defined three simple methods inside the component viz, disableSubmit(), addressSelection(), submitAddress().
Advantages of DOM testing over class testing
Usually, when we write Unit testing for component classes we would write the test as follows, We will skip the Test bed setup here since we have already talked about it in the previous blog, the tests will be like
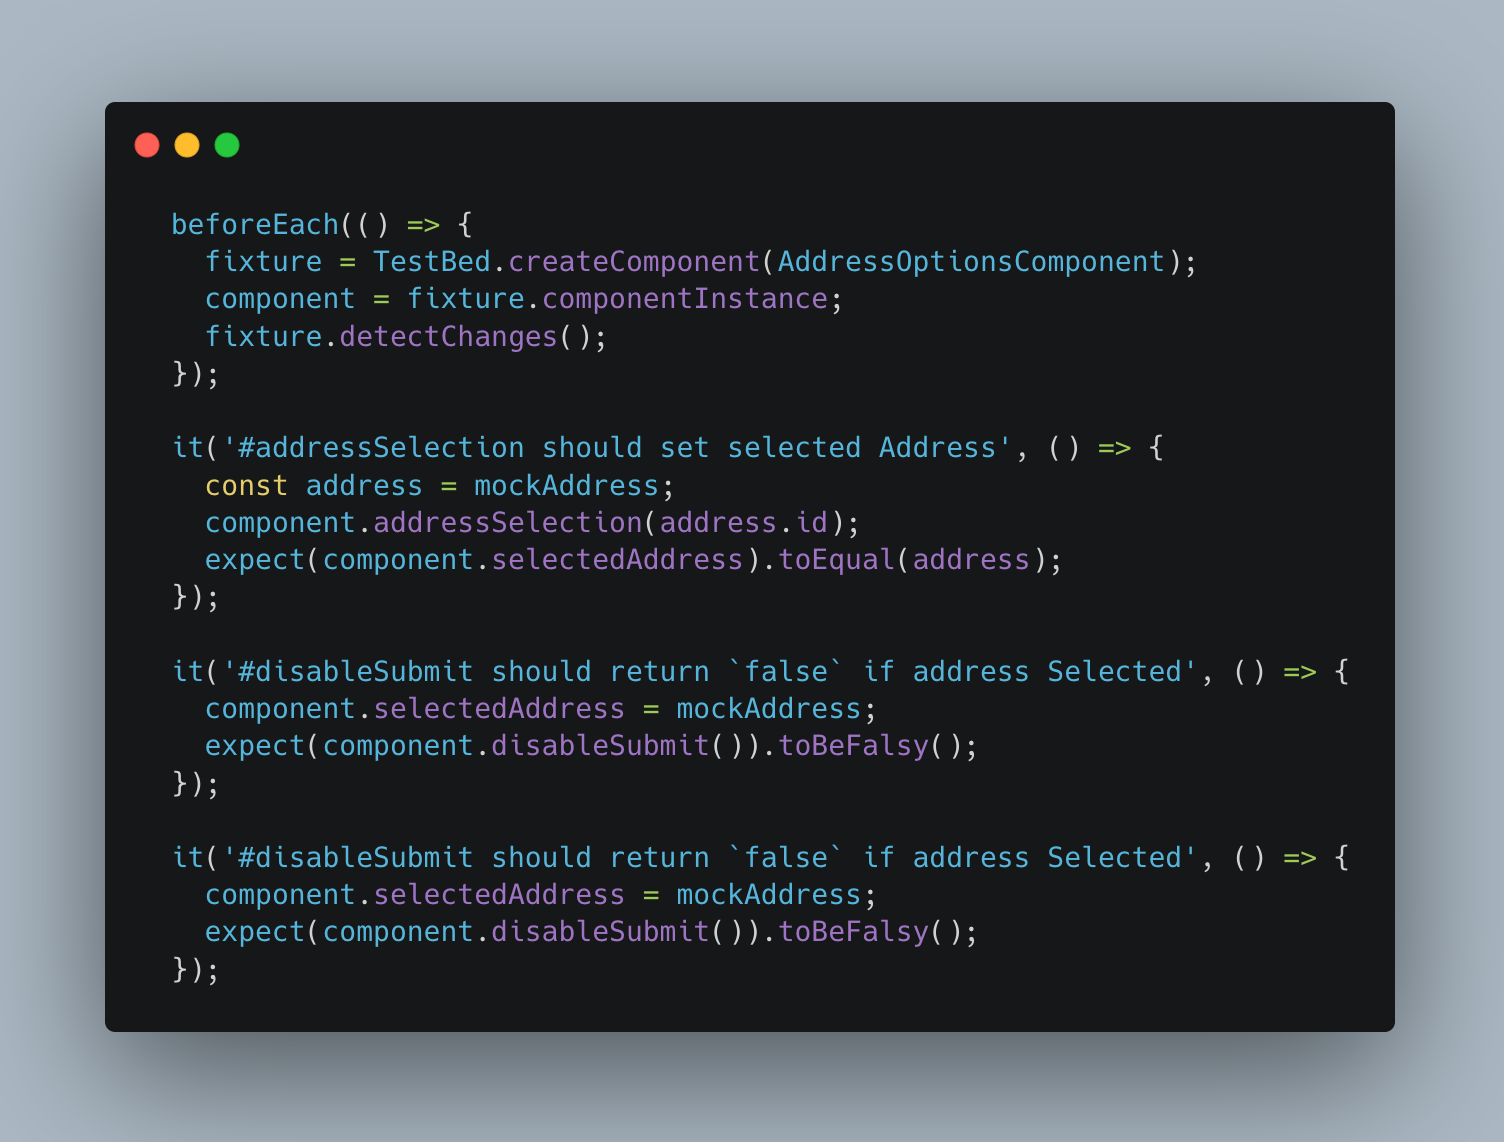
Here, in the test file, we can see, we create component Instances and logically verify that each method works as it intends to be. But we do not validate core workflows and user interaction like mentioned below
- Interaction between Parent and child component
- What users see on UI.
- User interactions like selecting an address/clicking on submit
- If predefined ng directives like
ngIfandng-templateare used in the template itself.
We write Component class tests on the assumption that the template works well if the class is error-proof, but it might not be the case always. hence DOM level testing comes to rescue.
Writing your First Component DOM test.
When we create a component Instance with TestBed like TestBed.createComponent(), along with creating a component instance, it adds a related template to the test runner and returns a Component Fixture.
We can access the template of the Component fixture by fixture.nativeElement however this is risky as it needs us to be running our unit tests in a browser like ChromeHeadless. This is a problem when we want to run unit tests in a non-browser platform that doesn't support DOM like CI/CD pipeline.
So we will employ a much safer alternative fixture.debugElement.nativeElement This returns the platform-specific element object instead of creating an HTML element tree.
Now, let's add a few more tests which mimic user interaction or you can say it does component DOM testing.
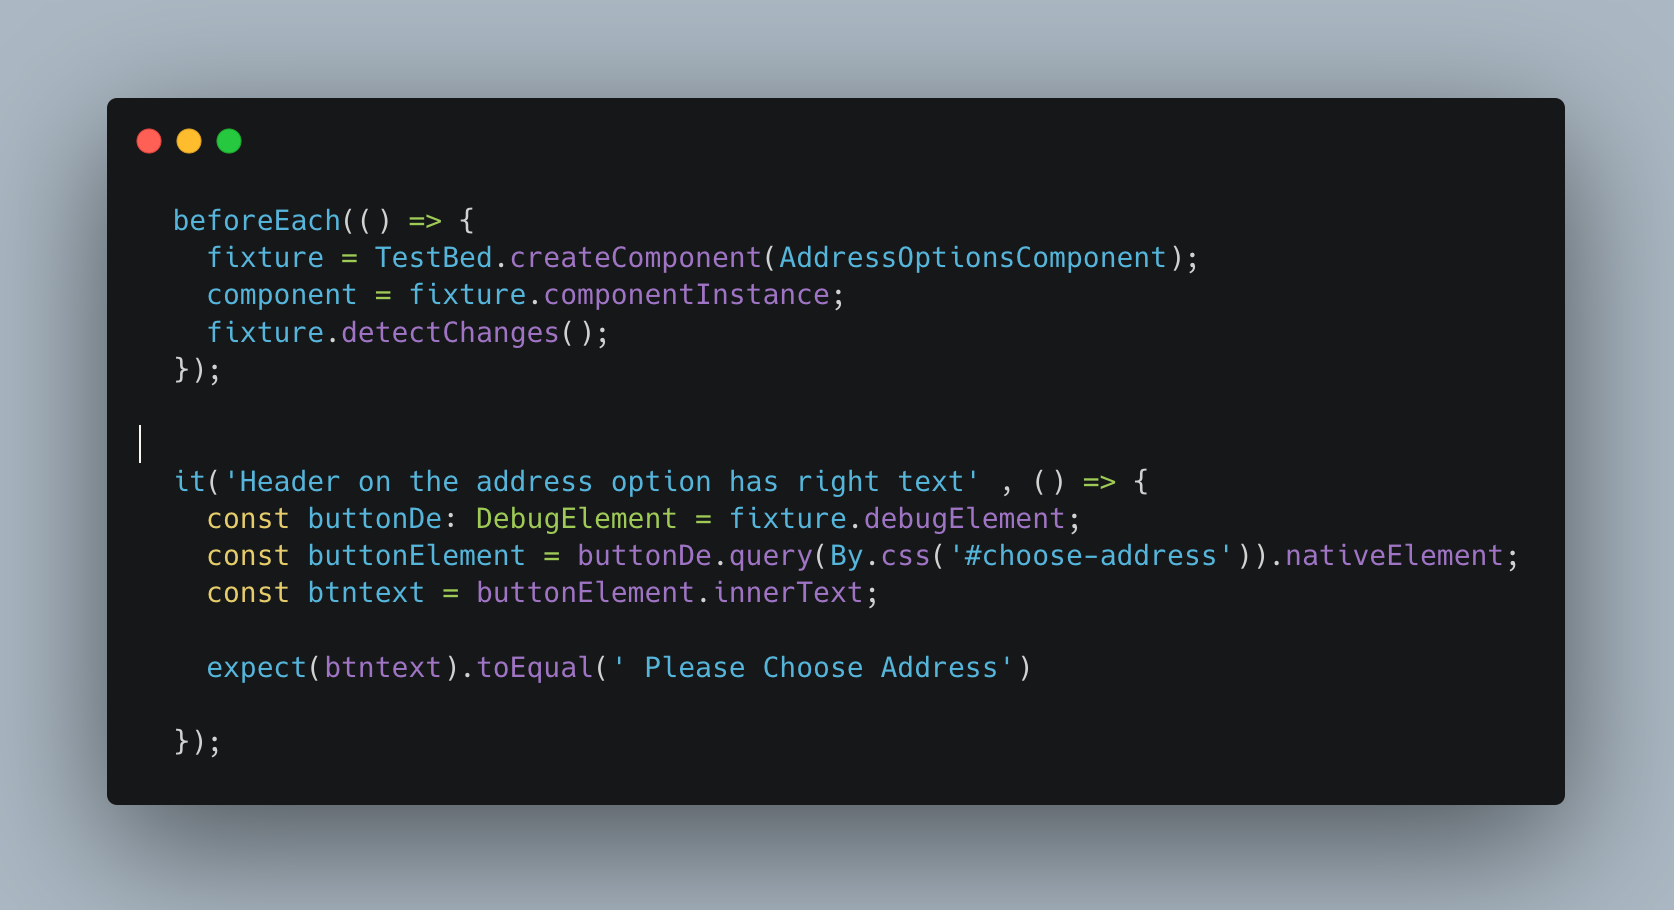
This test validates the header shown for selecting the address, which wasn't tested in class testing. We do that by querying the debug element with id #address-header using By from platform-browser package like By.css('#someId') and then we get innerText of the element with its nativeElement.innerText. later we expect the header element to be what we intended it to be. There are few other ways to query the debug elements other than id, some are element, .class,` #id, and [attribute]
Testing User Interaction via Events
Lets now see how do we test interaction , the test goes like below
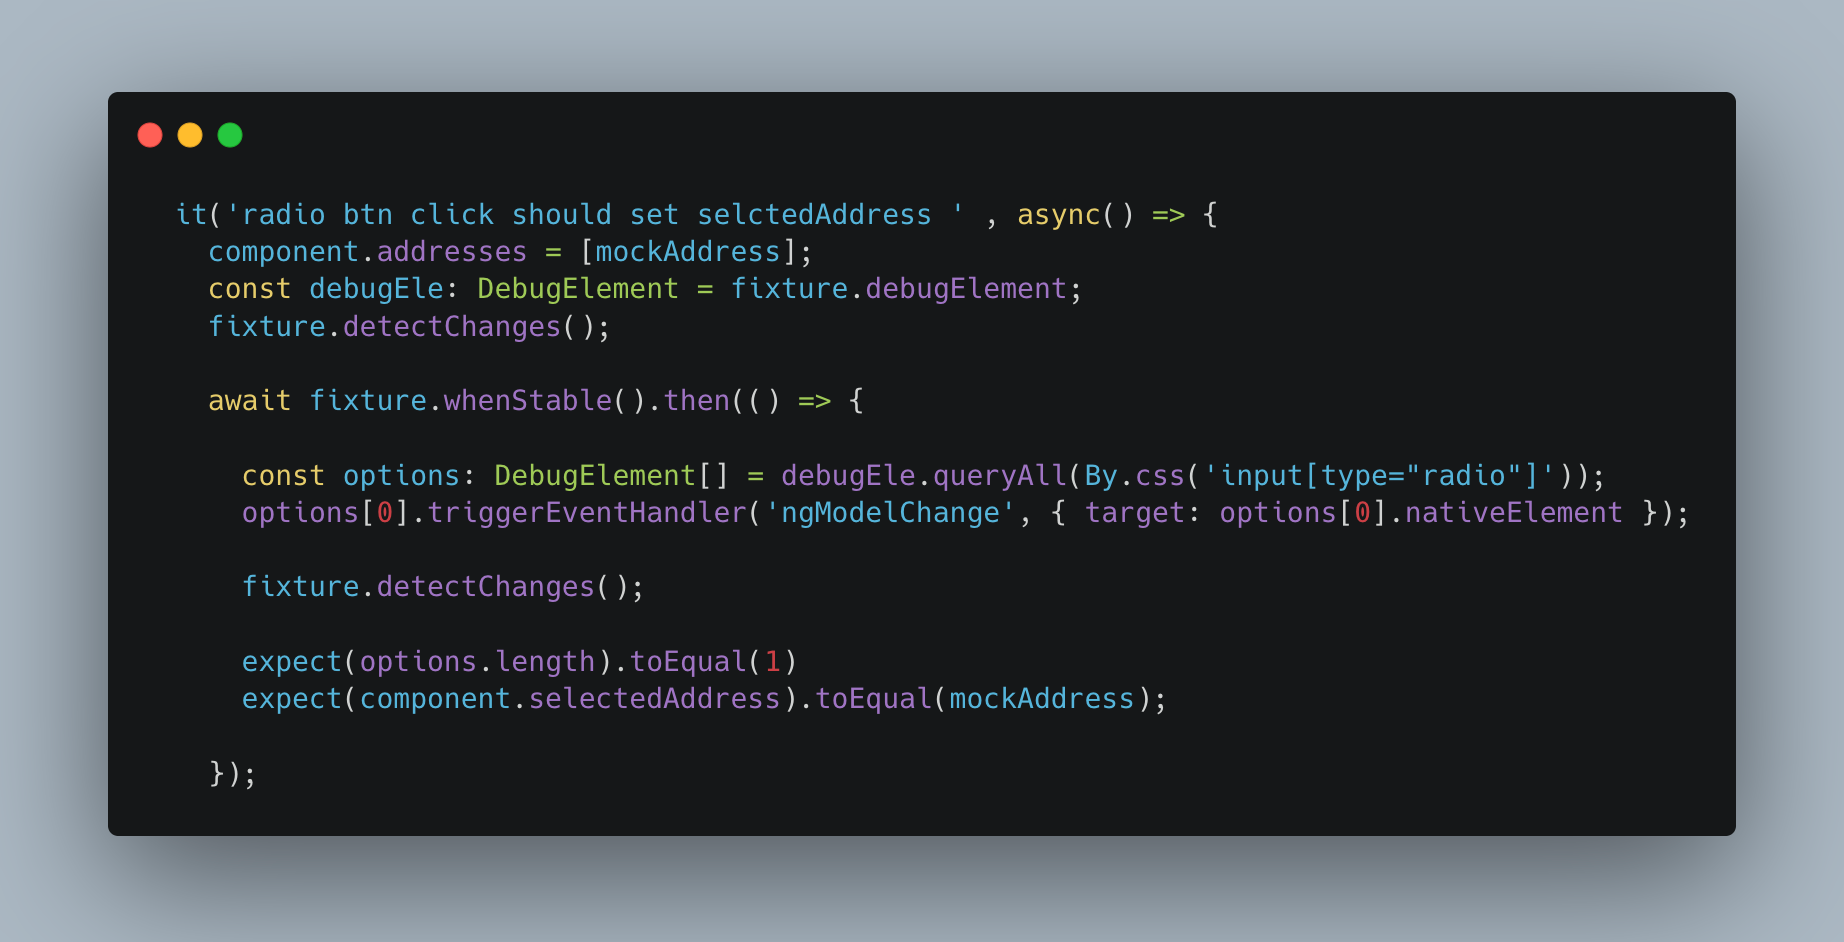
similar to the header text we saw earlier, we query the debugElement, but now we have used the input element to get all the elements within the input field, we could also specify id in case of a complex project with multiple input element. one of the other ways of getting hold of the input like radios is to use ng-reflect-value.
Now we try to access the first option element and try to trigger an event for ngModelChange mimicking the user selecting one of the address options. later we expect the selectedAdddress is the same as what the user clicked on.
you might see `fixture.DetectChanges() `is being called in multiple places, Here is the reason why: If you see the HTML template, it renders or builds DOM layer based on the addresses that's been input to the component. In the first statement of the test when we assign the mock address, the DOM layer is already rendered and it has not built radio button DOM yet. So when we do fixtureDetectChanges, it triggers a change detection cycle for the component and builds up the DOM layer for the radio buttons, In case the change detection cycle is not done after Data is fed into the component, our radio element will still be Null. We once again run the change detection cycle after we trigger ngModelChange to mimic user interaction.
We have used fixture.WhenStable , This is used to resume testing after events have triggered asynchronous activity or asynchronous change detection. We should note that when we are using await , The test should always be run in async.
Component DOM testing ng Directive
Let us now see how can we test directives like *ngIf For this We can take simple example of displaying status, the template code for it will be like
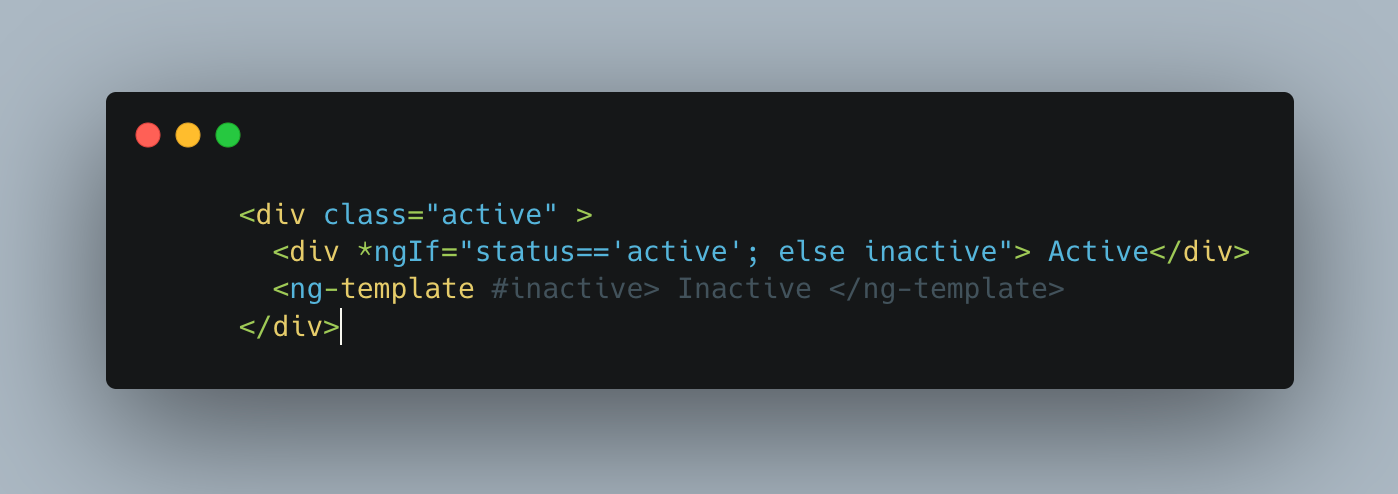
in this component we check for the variable status and display Active/Inactive based on boolean value of component instance variable status.
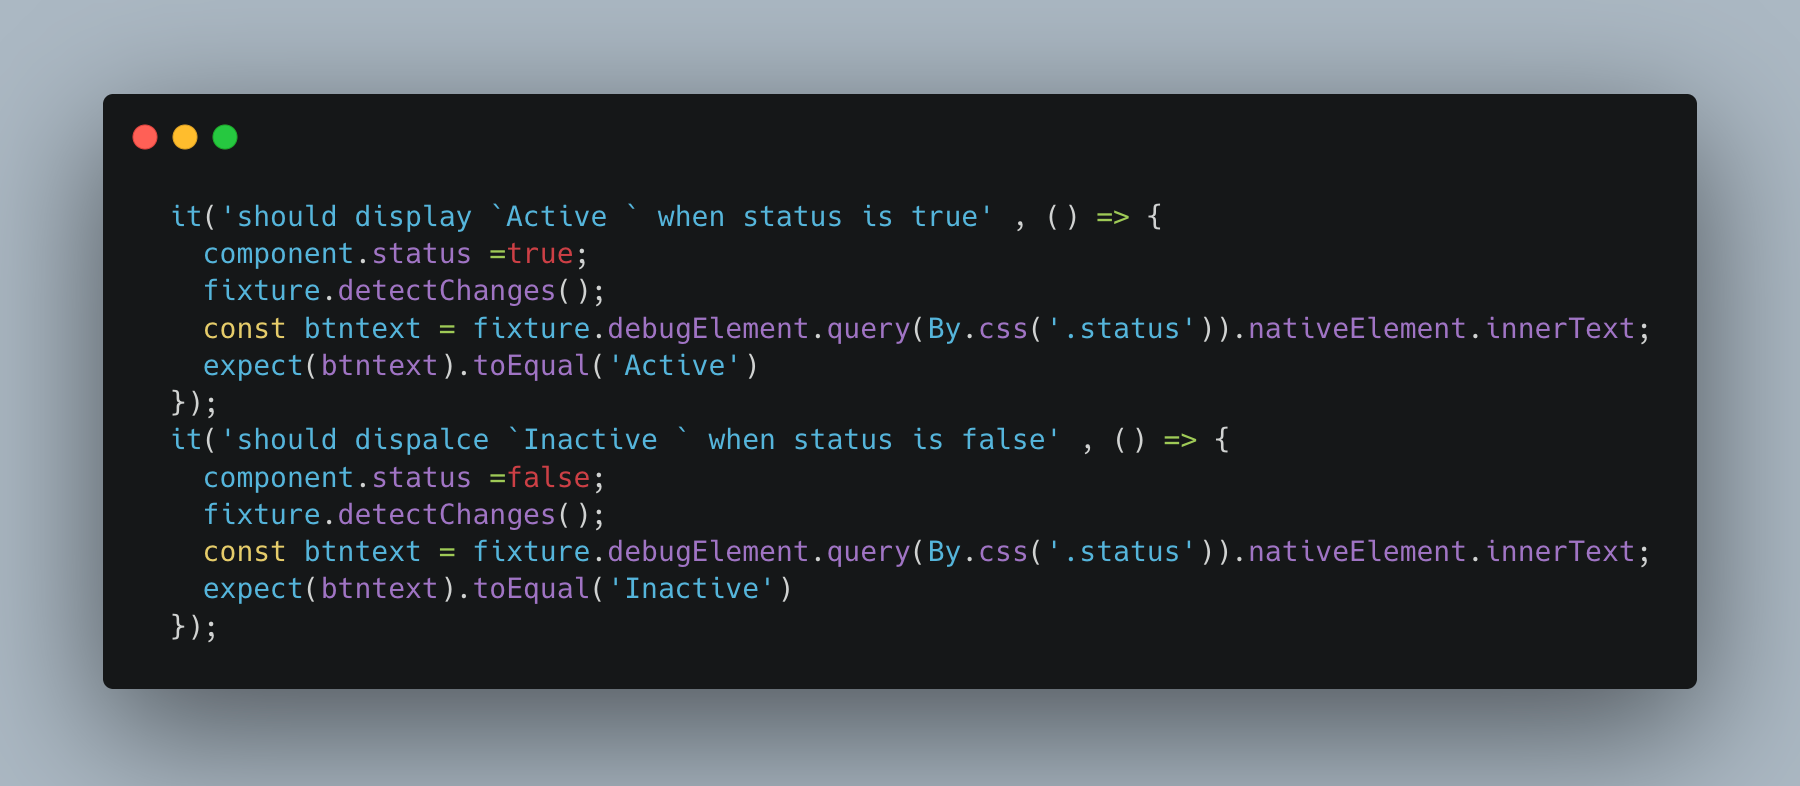
For this in the unit test; First, we assign the status a boolean value true, and then trigger DOM rerender with fixture.DetectChanges and expect the text content inside the queried element to be Active. similarly, we set the status as false, and expect the textContent to be shown as Inactive
Few points to keep in mind when you write DOM testing
- Add
fixture.Destroy()inafterEach()=>{}block , it destroys the component after each run, and so you will not have component residual bugging you in your nextit()block - This can also resolve hanging DOM tree if there is any. which might result in conflicting results next time you query the template
- Try to Avoid
click()on the nativeElements and end up in error loops ; where astriggerEventHandlercan directly trigger the click event and is the right way to mimic user interactions
Disadvantage of writing component DOM test
Though DOM testing helps in error-proof UT, it has some negatives, they are
- Since DOM interaction is involved and we call
fixture.DetectChangesregularly; it rerenders the whole component which can slow down Unit tests execution time. - tests become bulky even for simple component
BeforeEach vs BeforeAll ,which one is compilation heavy?.
We already have talked about the implementation of beforeEach() in my previous blog, This could be compilation Heavy as discussed below
- If you have written Component class unit testing for some complex component, you might already be aware of the amount of Spy for services we create in complex component. Most of the cases, these spy needs to created or injected only once, and they are never reassigned.
- For them we can use
beforeAll()instead ofbeforeEach, so the spies for services are crated only once. TestBed.configureTestingModule(...).compileComponents()in beforeEach() unnecessarily compiles the component before each test, But for the most part, the testing module is going to be static for a particular .spec file. Hence configuring the module at each iteration of the test is adding time to the total time execution- Then we might ask, why cant we configure Testing Module in
beforeAll()?, the answer is NO, Angular has definedResetTestingModule(), after each tests that resest the the testing module and it needs to be configured before each test. - This condition can be fixed. by mocking the resetTestingModule itself, This can reduce UT performance by heaps, but can result in unstable UT setup.
To address this, recent updates of Angular introduced Ivy compilation, We need to enable it by setting enabledIvy: true in tsconfig.json. By this TestBed.configureTestingModule(...).compileComponents() gets faster by skipping later compilation of components if it already exists.
Schemas
In your testbed, along with providers, and imports, you can add one more attribute called schemas, which typically have the value NO_ERROR_SCHEMA with this we are saying our testbed ignores any template errors. This means that the compiler just ignores any elements it does not recognize, meaning you do not need to declare all the components used in the template of the component under test.
Working on DOM testing, and ignoring the template errors is the last thing you want to do, let us take an example of a parent component using AddressOptionComponent as a child, since this component has input addresses, and you wrongly miss spelt it while using the input, this error could be bypassed with NO_ERROR_SCHEMAS. which defies the purpose on unit testing.
In case if we are using third party components like material components, we can use ng-mocks to mock the child component.
Nested Describe block Do's and Dont's,
Nested Describe block are indeed a better way to write logically separate test for the method of interest with different possible inputs, . but what we often miss is the common inputs or common Function we tend to define in each it() block. for this beforeAll() come handy .we could also use beforeEach() if some data has to instantiated for each tests, we can take sample test for this
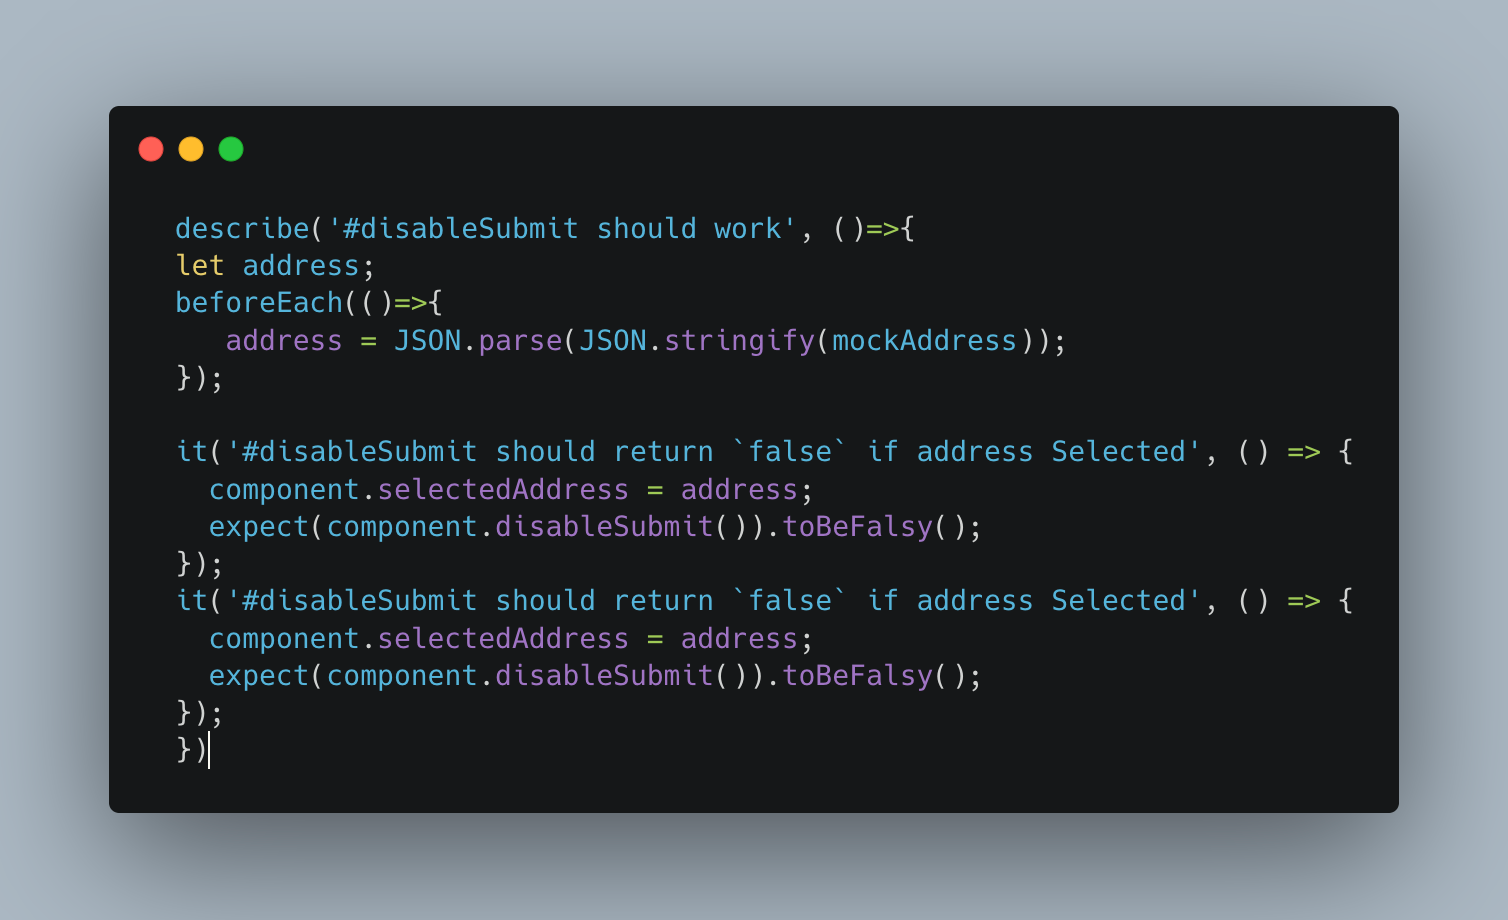
Here we have defined the mock variable in describe and we have deep copied the mock value in beforeEach and used that in it() block.
Summary
In this blog we talked about benefits of Component Testing in detail and How DOM testing can avoid dev errors, later we went through ways of writing unit tests with reduced execution time. Hope this blogs helps you well in writing complex and performant unit test in angular.
careers.india@halodoc.com
About Halodoc
Halodoc is the number 1 all around Healthcare application in Indonesia. Our mission is to simplify and bring quality healthcare across Indonesia, from Sabang to Merauke.
We connect 20,000+ doctors with patients in need through our teleconsultation service, we partner with 1500+ pharmacies in 50 cities to bring medicine to your doorstep, we partner with Indonesia's largest lab provider to provide lab home services, and to top it off we have recently launched a premium appointment service that partners with 500+ hospitals that allows patients to book a doctor appointment inside our application.
We are extremely fortunate to be trusted by our investors, such as the Bill & Melinda Gates foundation, Singtel, UOB Ventures, Allianz, Gojek and many more. We recently closed our Series B round and In total have raised USD$100million for our mission.
Our team work tirelessly to make sure that we create the best healthcare solution personalized for all of our patient's needs, and are continuously on a path to simplify healthcare for Indonesia.