
How Halodoc built Scalable Auth service with JWT while also saving cost
Introduction
At Halodoc, we're constantly striving to enhance our platform's performance and scalability to provide a seamless experience for our users. Recently, we embarked on a significant architectural shift: Migrating our authentication system from a traditional access/refresh token setup using DynamoDB and MySQL to JSON Web Tokens (JWT). This journey was driven by the need to address scalability bottlenecks and improve overall system efficiency. This blog post delves into the challenges we faced, the solutions we implemented, and the remarkable improvements we achieved.
This migration resulted in 80%+ faster authentication response times, zero database calls for token validation, and a 30% reduction in RDS CPU usage. Additionally, we eliminated DynamoDB storage costs and significantly reduced MySQL load, making our authentication system more scalable and cost-efficient.
Challenges with the Legacy Authentication System
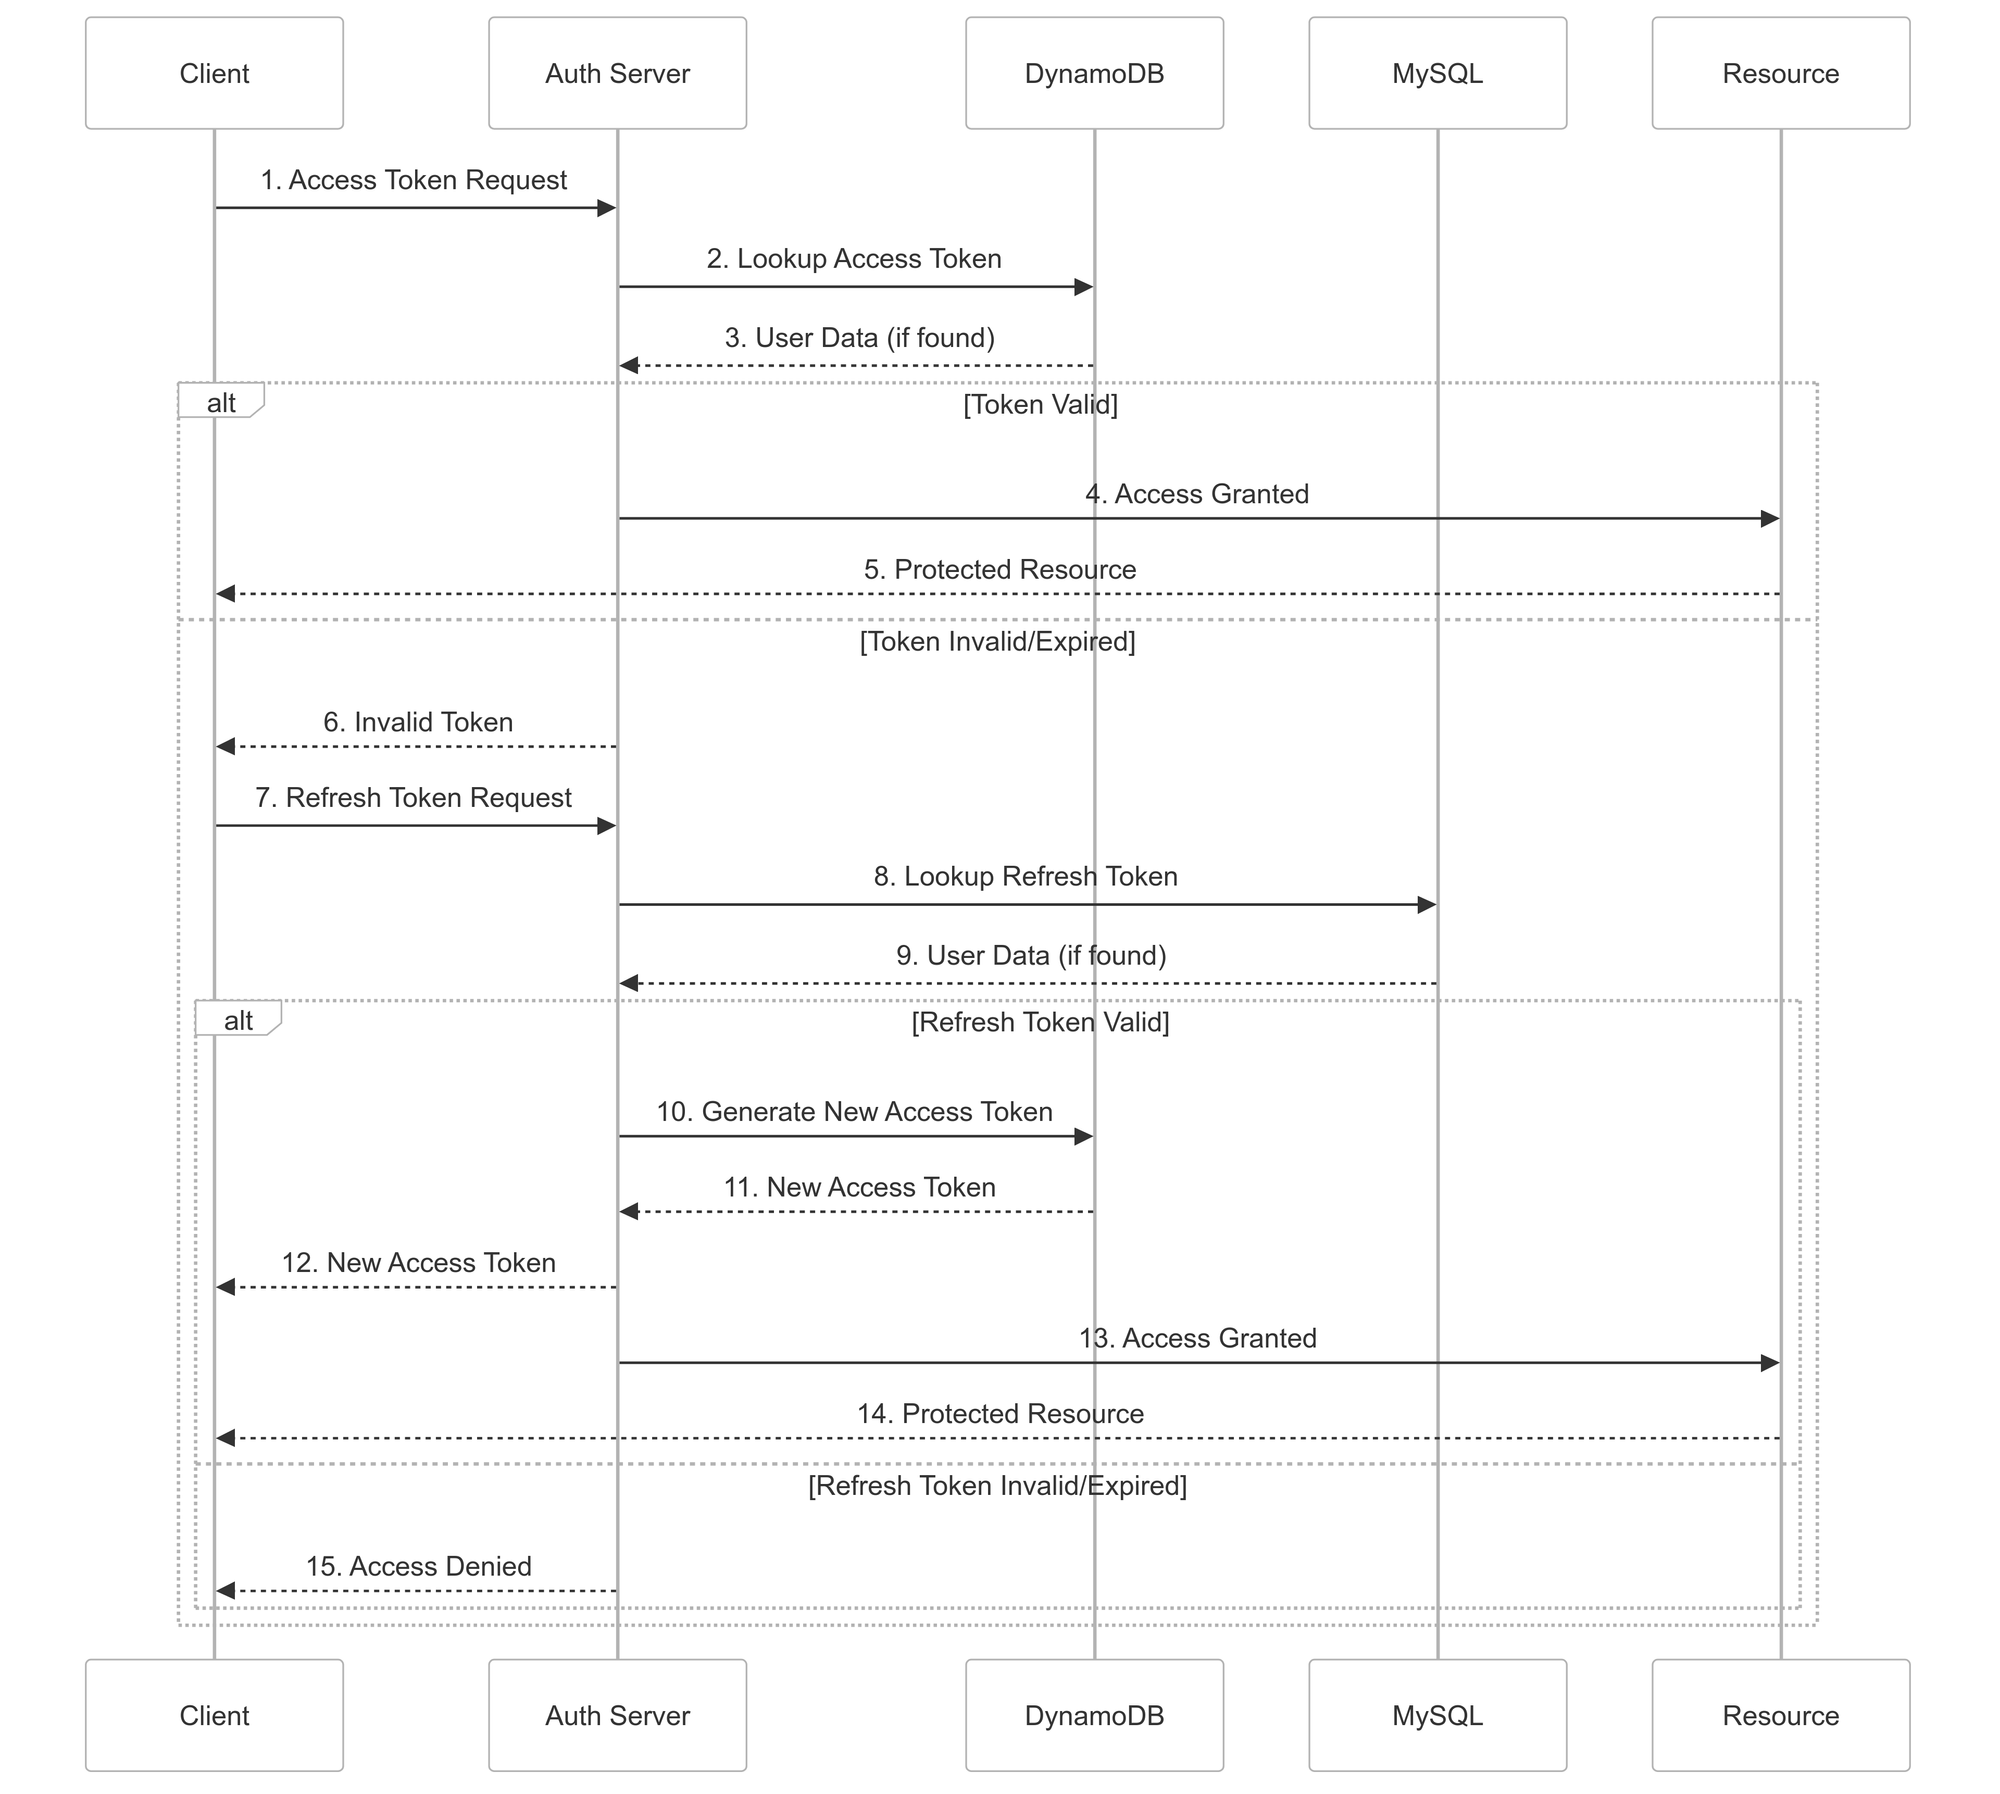
Our authentication system operates with two types of tokens: an access token (which is short-lived) and a refresh token (which allows obtaining new access tokens without requiring the user to re-authenticate). Every Halodoc API call from a client includes an access token in the header, requiring immediate validation by our authentication server before further processing. Access tokens were stored in DynamoDB and refresh tokens in MySQL. While functional, this architecture presented several scalability challenges. This design required two database lookups for every token validation. With our growing user base, this became a critical bottleneck. Specifically, we were handling approximately 30,000 requests per minute to both MySQL and DynamoDB for token validation alone. This load resulted in:
- High latency in token validation, impacting user experience.
- Increased operational costs due to database resource consumption.
- Complexity in managing and scaling two separate data stores.
- Potential single points of failure.
Evaluating Alternatives: Rationale for JWT
During our evaluation, we explored multiple authentication approaches, including cache for access token storage, PASETO, and even eliminating storage entirely with JWTs.
After careful consideration, we decided to move forward with JWT-based authentication. The key reasons for this decision were:
- Eliminating Database Lookups for Access Tokens: With JWTs, access token authentication becomes inherently stateless, severing the dependency on external storage systems like DynamoDB or MySQL for access token validation.
- Scalability – JWTs can be validated on the server without additional DB calls, making them well-suited for high-throughput systems. Our current request rate (~30K RPM) benefits from this efficiency.
- Maintaining refresh token storage – Due to their longer lifespan and higher security impact, refresh tokens remained securely stored in MySQL, given the low throughput of refresh calls (~200 RPM) compared to the significantly higher volume of validate calls (~30K RPM).
- JWT's Non-Revocable Nature: One significant drawback of JWTs is their inherent non-revocable nature. Once issued, a JWT remains valid until its expiration. This poses a challenge for immediate revocation in scenarios like user logout or account compromise.
- To mitigate this, we implemented a token blacklisting mechanism, specifically targeting refresh token IDs for critical events like forced logout due to fraud or account blocking. This allows us to revoke access effectively when absolutely necessary.
- It is crucial to note that this blacklisting is not used for regular user logouts. Implementing full logout support on the backend would negate the performance benefits of JWTs, as it would require database or cache lookups for every validation.
- Standard user logouts are handled on the client-side by simply discarding the token.
Overall, JWT-based authentication provides the right balance between security, performance, and maintainability while aligning with our long-term scalability goals.
JWT Integration: Architecture and Details
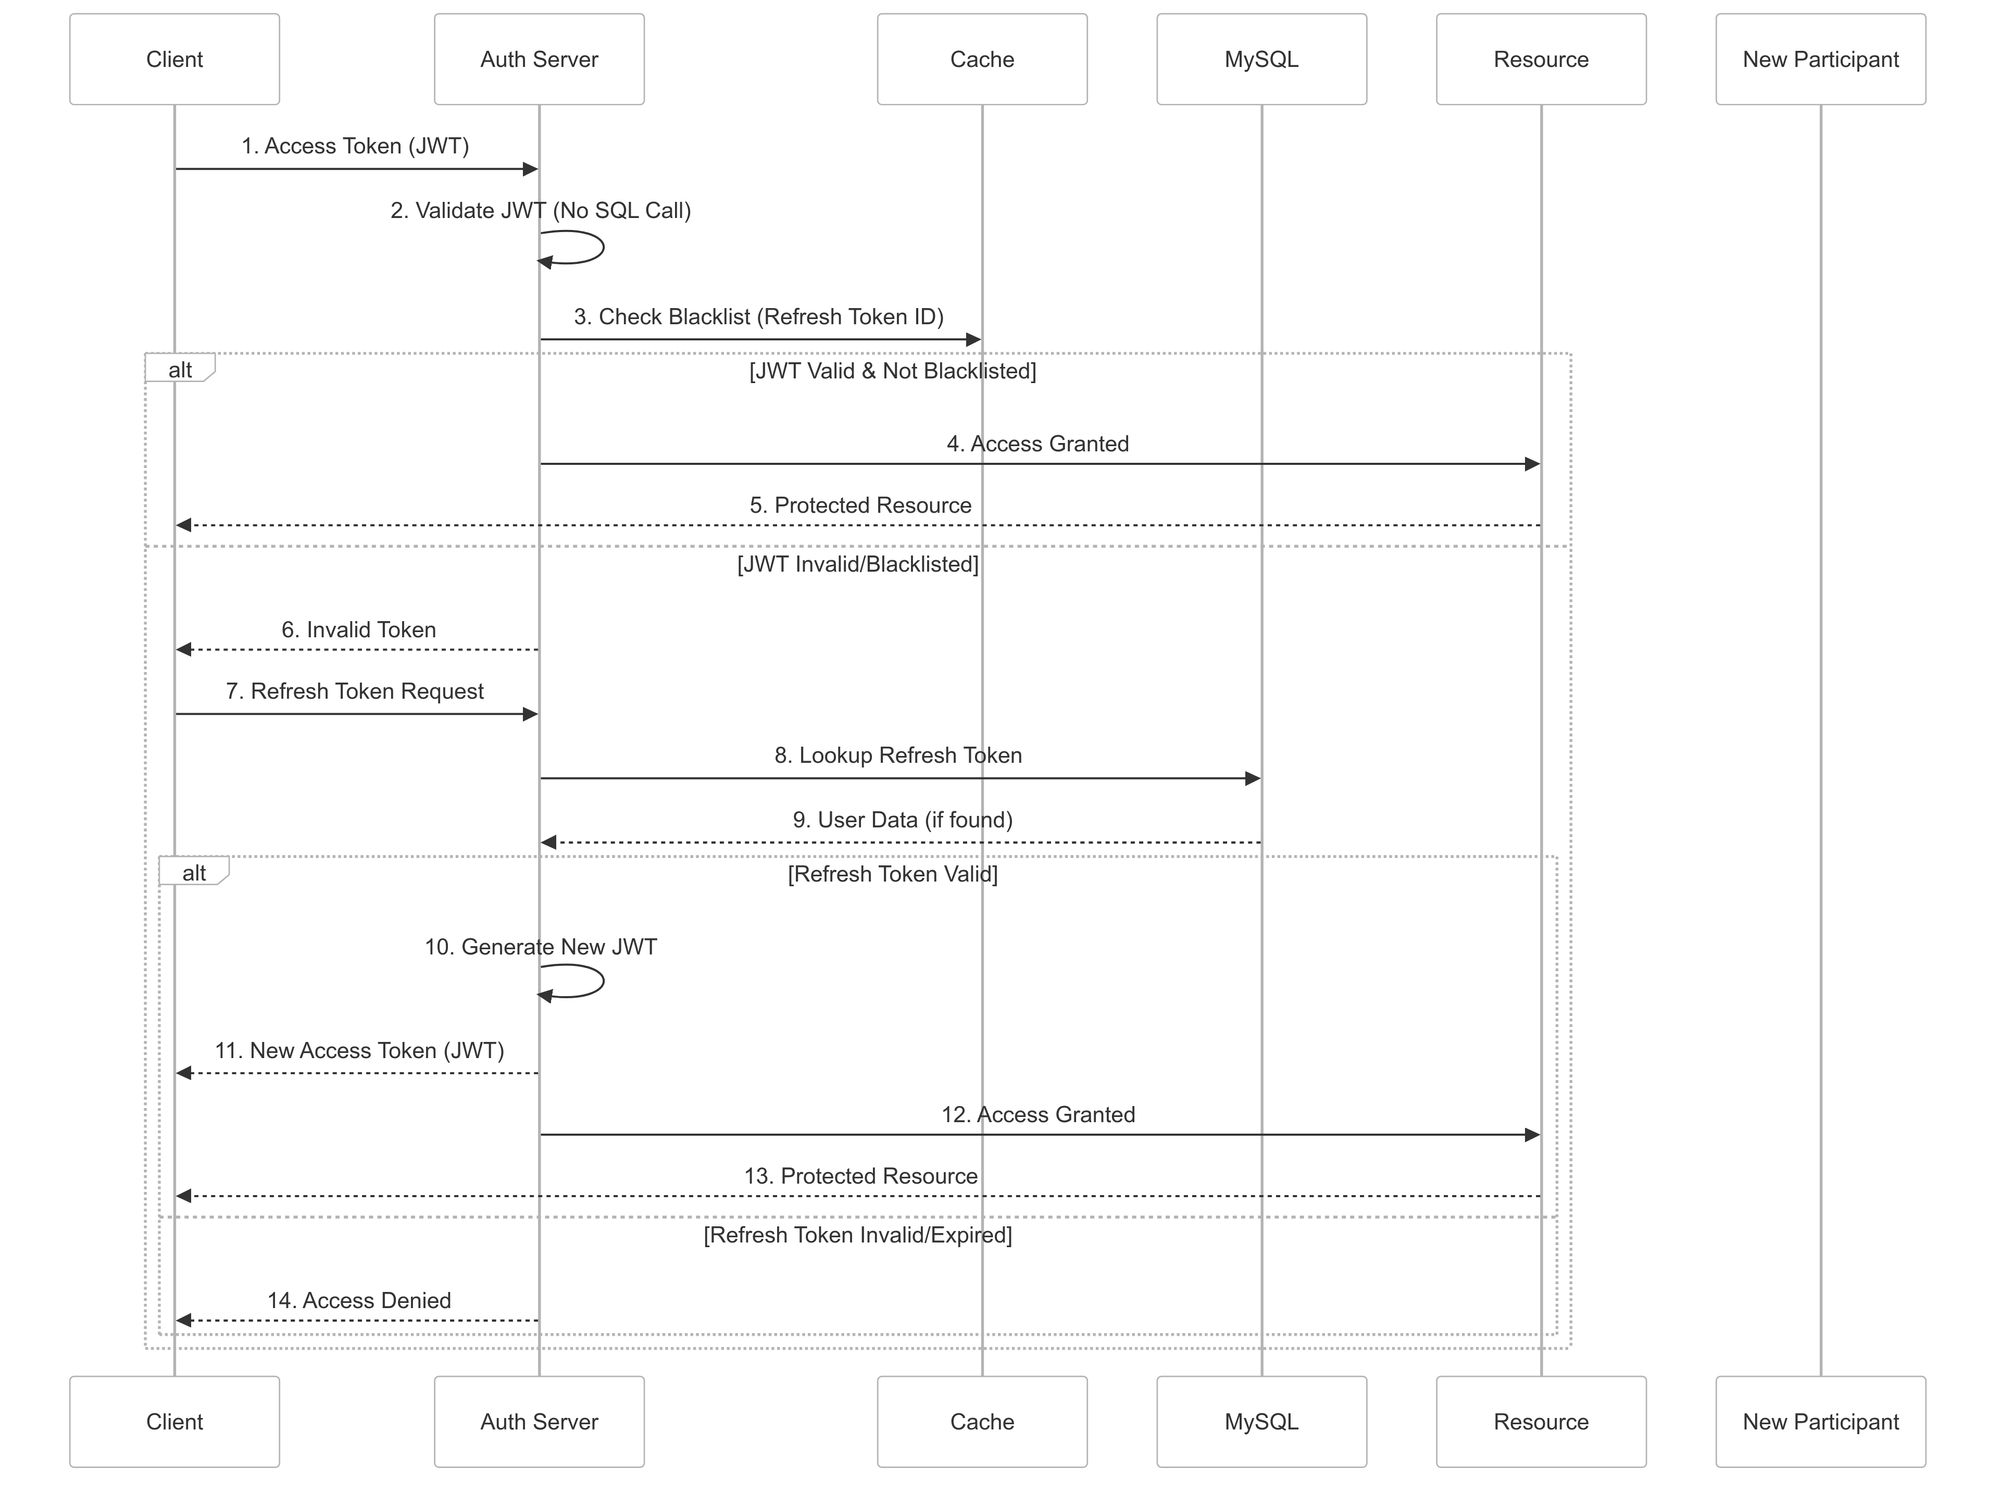
JWT's self-contained nature eliminates the need for database lookups during token validation, directly addressing the scalability bottleneck. By embedding user information and permissions within the token itself, we streamlined the authentication process. To manage token revocation and force logout, we implemented a token blacklisting mechanism. This combination of JWT and token blacklisting allowed us to build a highly scalable and efficient authentication system.
Understanding JWT Structure
Before diving into our implementation, it's essential to understand JWT and its structure.
JWT tokens, or JSON Web Tokens, are self-contained tokens used in authentication systems to securely transmit information between parties. These tokens include a payload that carries claims, such as the user’s ID, roles, or other relevant details about the user’s data, and are signed using a secret key.
The signed JWT is then sent to the client and used in subsequent requests, typically passed in the Authorization header.
A JWT consists of three parts, separated by dots (.):

Header: The header typically contains two parts: the type of the token, which is JWT, and the hashing algorithm used, such as HMAC SHA256 or RSA.
Example:
{
  "kid": "k_3",
  "typ": "JWT",
  "alg": "HS256"
}
This header is then Base64Url encoded.
Payload: The payload contains the claims. Claims are statements about an entity (e.g., a user) and additional data. There are three types of claims: registered, public, and private. Registered claims are predefined (e.g., iss, exp, sub, aud). Public claims can be defined by JWT users. Private claims are custom claims created to share information between applications. Example:
{
  "sub": "1234567890",
  "name": "John Doe",
  "iat": 1516239022
}
This payload is also Base64Url encoded.
Signature: The signature is used to verify that the message wasn't changed along the way, and, in the case of tokens signed with a private key, it can also verify that the sender of the JWT is who it says it is. To create the signature part you have to take the encoded header, the encoded payload, a secret, the algorithm specified in the header, and sign that.
The final JWT is formed by concatenating the Base64Url encoded header, payload, and signature with dots (.). This structure allows the authentication server to validate the token without needing to query a database, significantly improving performance.Here’s an example of a complete JWT token:
eyJhbGciOiJIUzI1NiIsInR5cCI6IkpXVCJ9.eyJzdWIiOiIxMjM0NTY3ODkwIiwibmFtZSI6IkpvaG4gRG9lIiwiYWRtaW4iOnRydWV9.SflKxwRJSMeKKF2QT4fwpMeJf36POk6yJV_adQssw5c
Implementation Details
Now that we understand JWT’s structure, let’s look at how we implemented it at Halodoc.
Token Generation
- During generation, we carefully selected claims to be included in the payload, ensuring they were relevant and token size was minimized.
- We also included the key ID (
kid) in the header. Thekidclaim allows us to identify which key was used to sign the JWT, which is crucial for key rotation (will be discussed in later section) - For the signature, we chose HS256 because both signing and verification occur within the authentication server, minimizing the risk of key exposure. If verification were handled by individual resource servers, RS256 would have been a more suitable choice.
- For better Security, Secret key/Signing key is stored in AWS vault.
public String generateToken(String user_id) {
    return JWT.create()
        .withSubject(user_id)
        .withKeyId(key_id)
        .withIssuedAt(new Date())
        .withJwtId()
        .withExpiresAt(new Date(System.currentTimeMillis()+ expiry)
        .sign(Algorithm.HMAC256(SECRET)); // Signing the token with secret
  }
Token Validation
- Decode the token: As mentioned, the tokens are Base64URL-encoded, which means we need to decode the token before validating it.
DecodedJWT decodedJWT = JWT.decode(token);- Verify claims: We verify certains claims from JWT headers:
- alg
We check the value of the alg claim against a positive-list of algorithms our system accepts. This helps prevent potential attacks where someone manipulates the token to make you use a different, probably less secure algorithm for signature verification. There is also a known attack vector that exploits the "none" value in the alg claim. - kid
Claims pointing to public keys also require special attention. If these claims are spoofed, they can direct your service to forged verification keys, tricking it into accepting malicious tokens. We double-check that the keys (or any URLs) in the header correspond to the values you expect.
- Verify the signature: The digital signature is verified by trying an appropriate public key from the set of keys stored in server. The key is typically selected by the kid (key ID) header parameter.
JWTVerifier verifier = JWT.require(Algorithm.HMAC256(yoursecretKey)).build();
verifier.verify(decodedJWT);
Refresh Token Workflow
Upon successful user login, our system generates two distinct tokens: a short-lived JWT access token and a longer-lived refresh token. The JWT access token is used for authenticating API requests, while the refresh token is used to obtain new access tokens without requiring the user to re-authenticate. The refresh token itself is a randomly generated, unique identifier, and is stored securely in our MySQL database.
When a client's JWT access token expires, they initiate a refresh token request. This request includes the refresh token. The authentication server then performs the following steps:
- Refresh Token Validation: The server queries the MySQL database to verify the existence and validity of the provided refresh token. This includes: * Checking if the refresh token exists in the database. * Verifying that the refresh token has not expired. * Ensuring the refresh token is associated with a valid user account.
- New Access Token Generation: If the refresh token is valid, the server generates a new JWT access token. This new access token typically includes the same user claims as the previous access token.
The newly generated JWT access token is returned to the client. The refresh token ID is included as a custom claim within the JWT access token's payload. This design choice enables us to efficiently check if the refresh token associated with a given access token has been blacklisted during token validation.
Key Rotation and Management
To ensure security, we adopted a robust key management strategy:
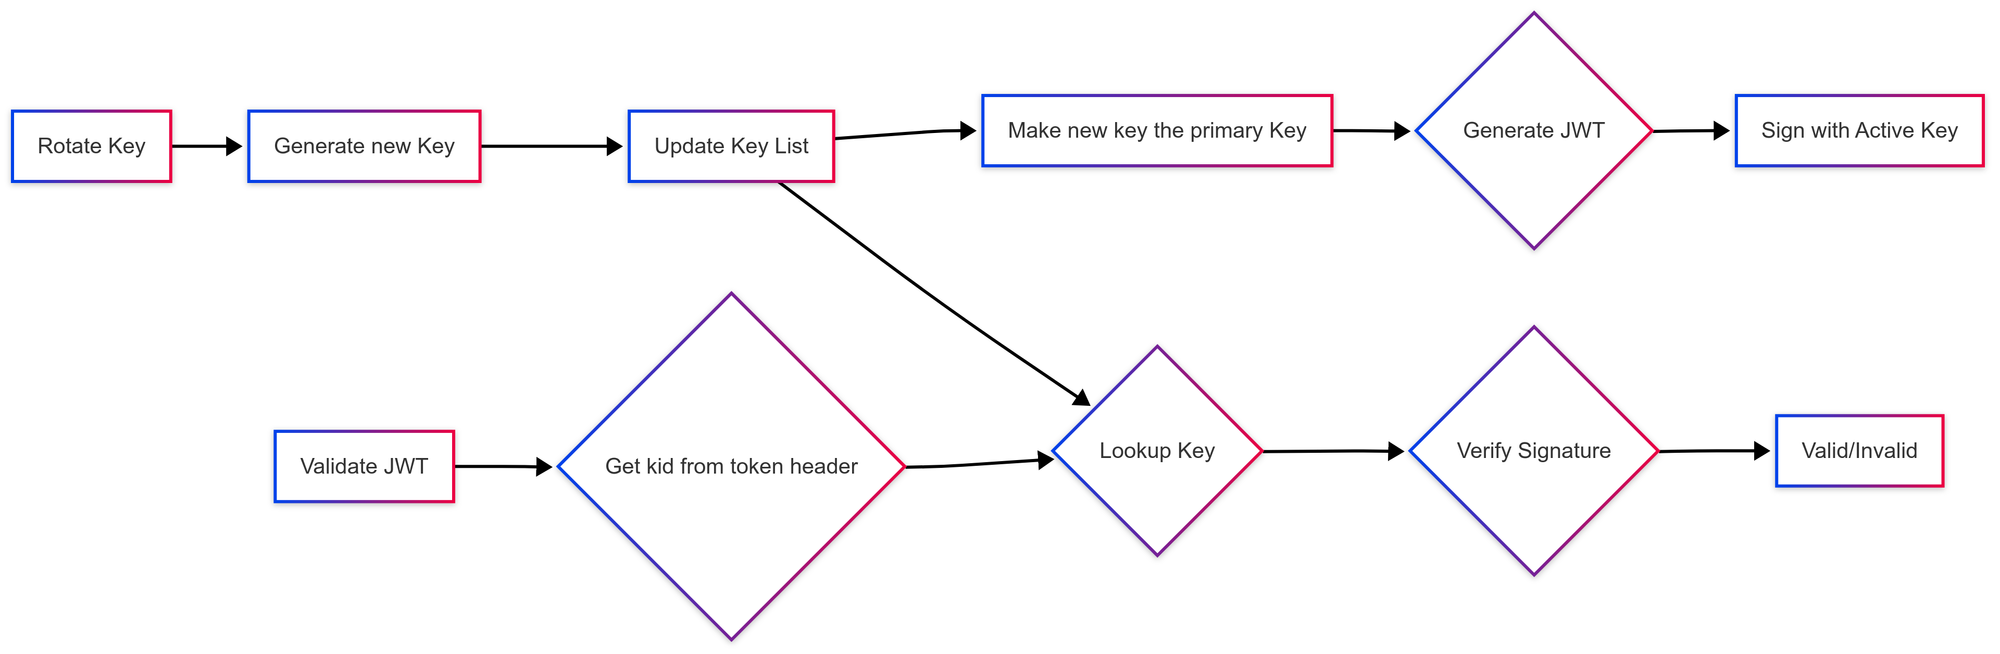
- Multiple Active Keys: We maintain multiple signing keys, allowing us to rotate keys without service disruptions. The primary key is the one which is used for signing newly generated token.
secret_key_mappings:
  key_1: ${SECRET_KEY_1},
  key_2: ${SECRET_KEY_2},
  key_3: ${SECRET_KEY_3}
primary_secret_key: key_1- Backward Compatibility with Older Token: Tokens signed using older keys remain valid during verification because each token contains a
kid(key ID) in the header. This allows our system to look up the correct key for validation, ensuring seamless authentication even after key rotations. - Secure Key Storage: All these keys are in AWS vault to prevent unauthorized access.
Addressing JWT’s Non-Revocable Nature
JWTs, by design, are self-contained and cannot be revoked before their expiration time. To address this limitation and enable immediate revocation for scenarios like user force logout or account blocking, we implemented a token blacklisting mechanism.
The core principle involves blacklisting the refresh_token_id. This refresh_token_id is a unique identifier associated with the refresh token stored in our MySQL database, and it's also included as a custom claim within the JWT access token's payload.
Here's how the process works:
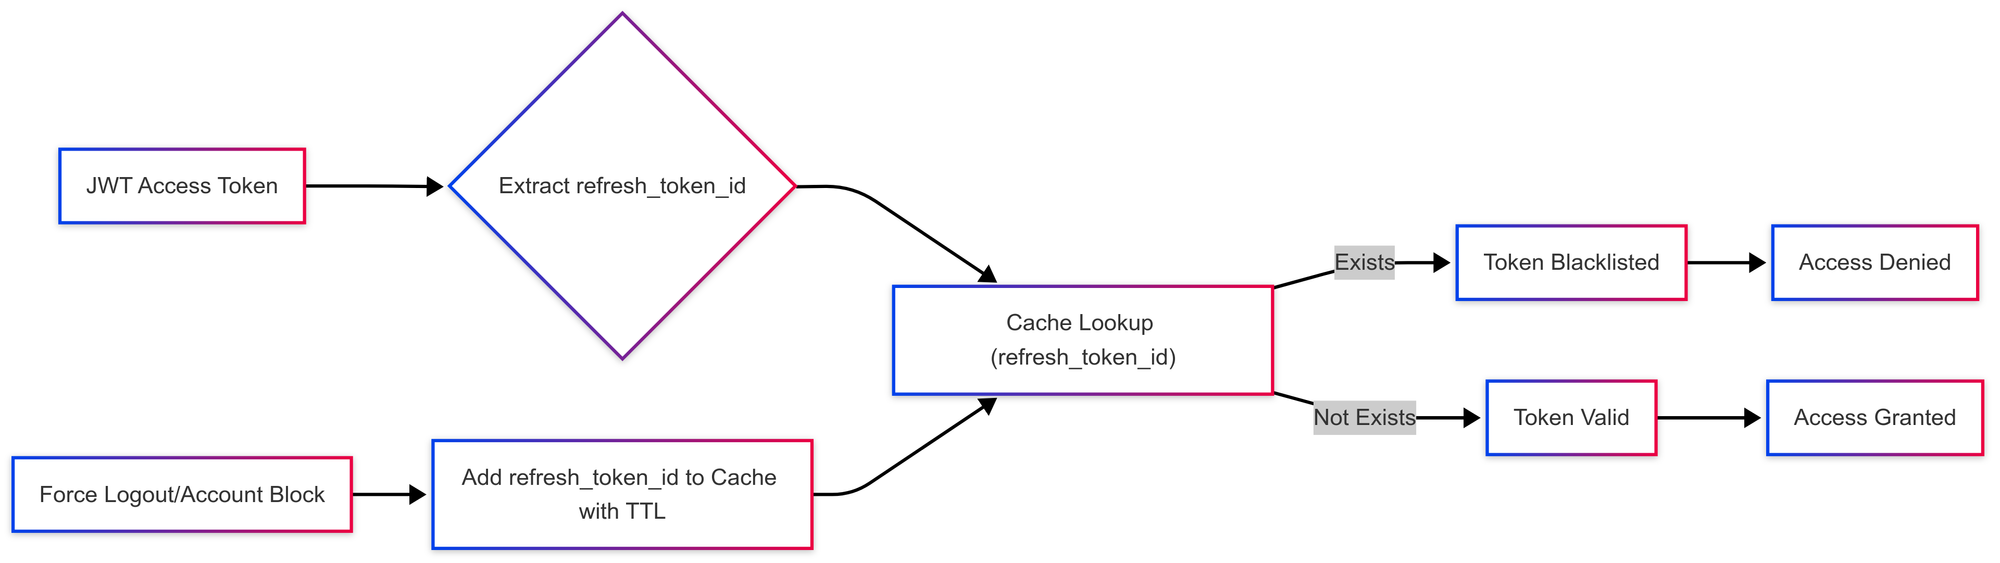
- Blacklisting: When a user is forced to log out or their account is blocked, the
refresh_token_idassociated with their refresh token is added to a blacklist stored in cache. The blacklist maintains a Time-To-Live (TTL) for each entry, mirroring the expiration time of the corresponding access tokens. - Token Validation with Blacklist Check: During the validation of a JWT access token, after verifying its signature and claims, the authentication server retrieves the
refresh_token_idfrom the JWT's payload. - Lookup: The server then queries the blacklist to check if the retrieved
refresh_token_idexists. - Access Denial: If the
refresh_token_idis found in the blacklist, the server denies access, even if the JWT access token itself is otherwise valid. - Access Grant: If the
refresh_token_idis not found in the blacklist, the server grants access, assuming the JWT access token passes all other validation checks.
Key Considerations:
- We only blacklist
refresh_token_idvalues associated with explicit logout or account blocking events. - Normal user logouts do not result in blacklisting.
- The TTL in cache ensures that blacklisted
refresh_token_idvalues eventually expire, aligning with the lifespan of the corresponding access tokens, optimising cache storage. - This design ensures that even if a JWT access token is valid, if its associated refresh token has been revoked, access will be denied.
By using the refresh_token_id as the blacklisting key, we effectively extend the revocation capabilities of our JWT-based authentication system, providing a balance between performance and security.
Results and Impact
The migration to JWT yielded significant improvements across the board
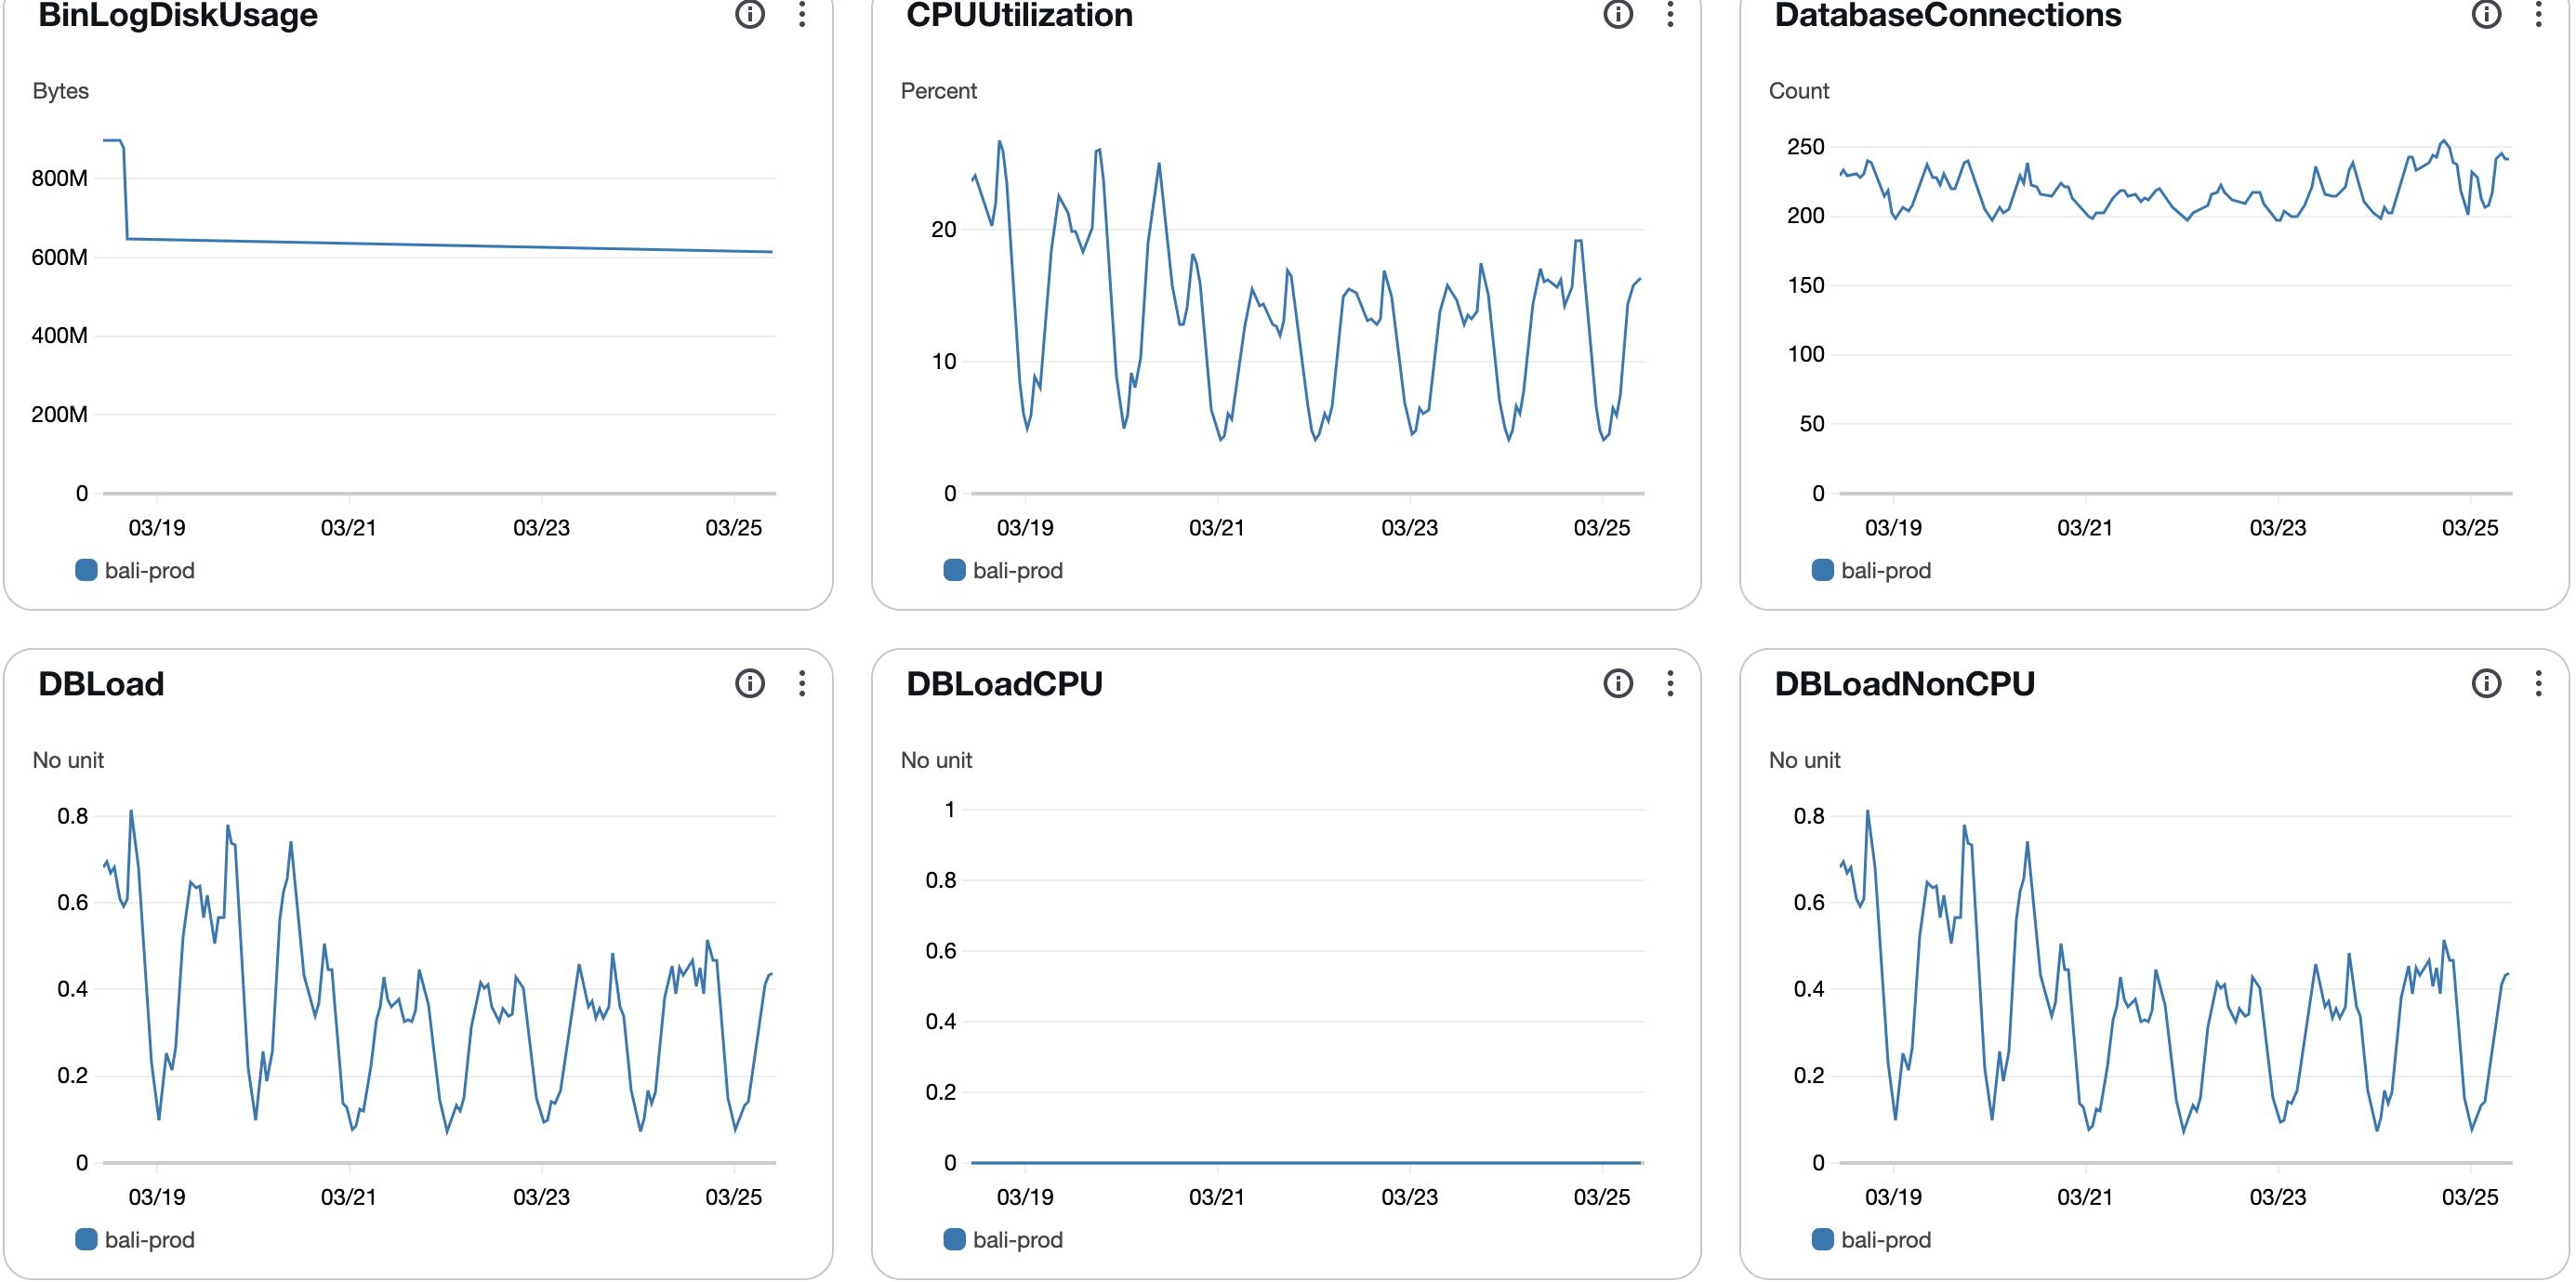
- No Database Calls in Token Validation: We eliminated 30,000 RPM calls to both MySQL and DynamoDB during token validation, drastically reducing database load. There was 30% reduction in RDS CPU utilisation:
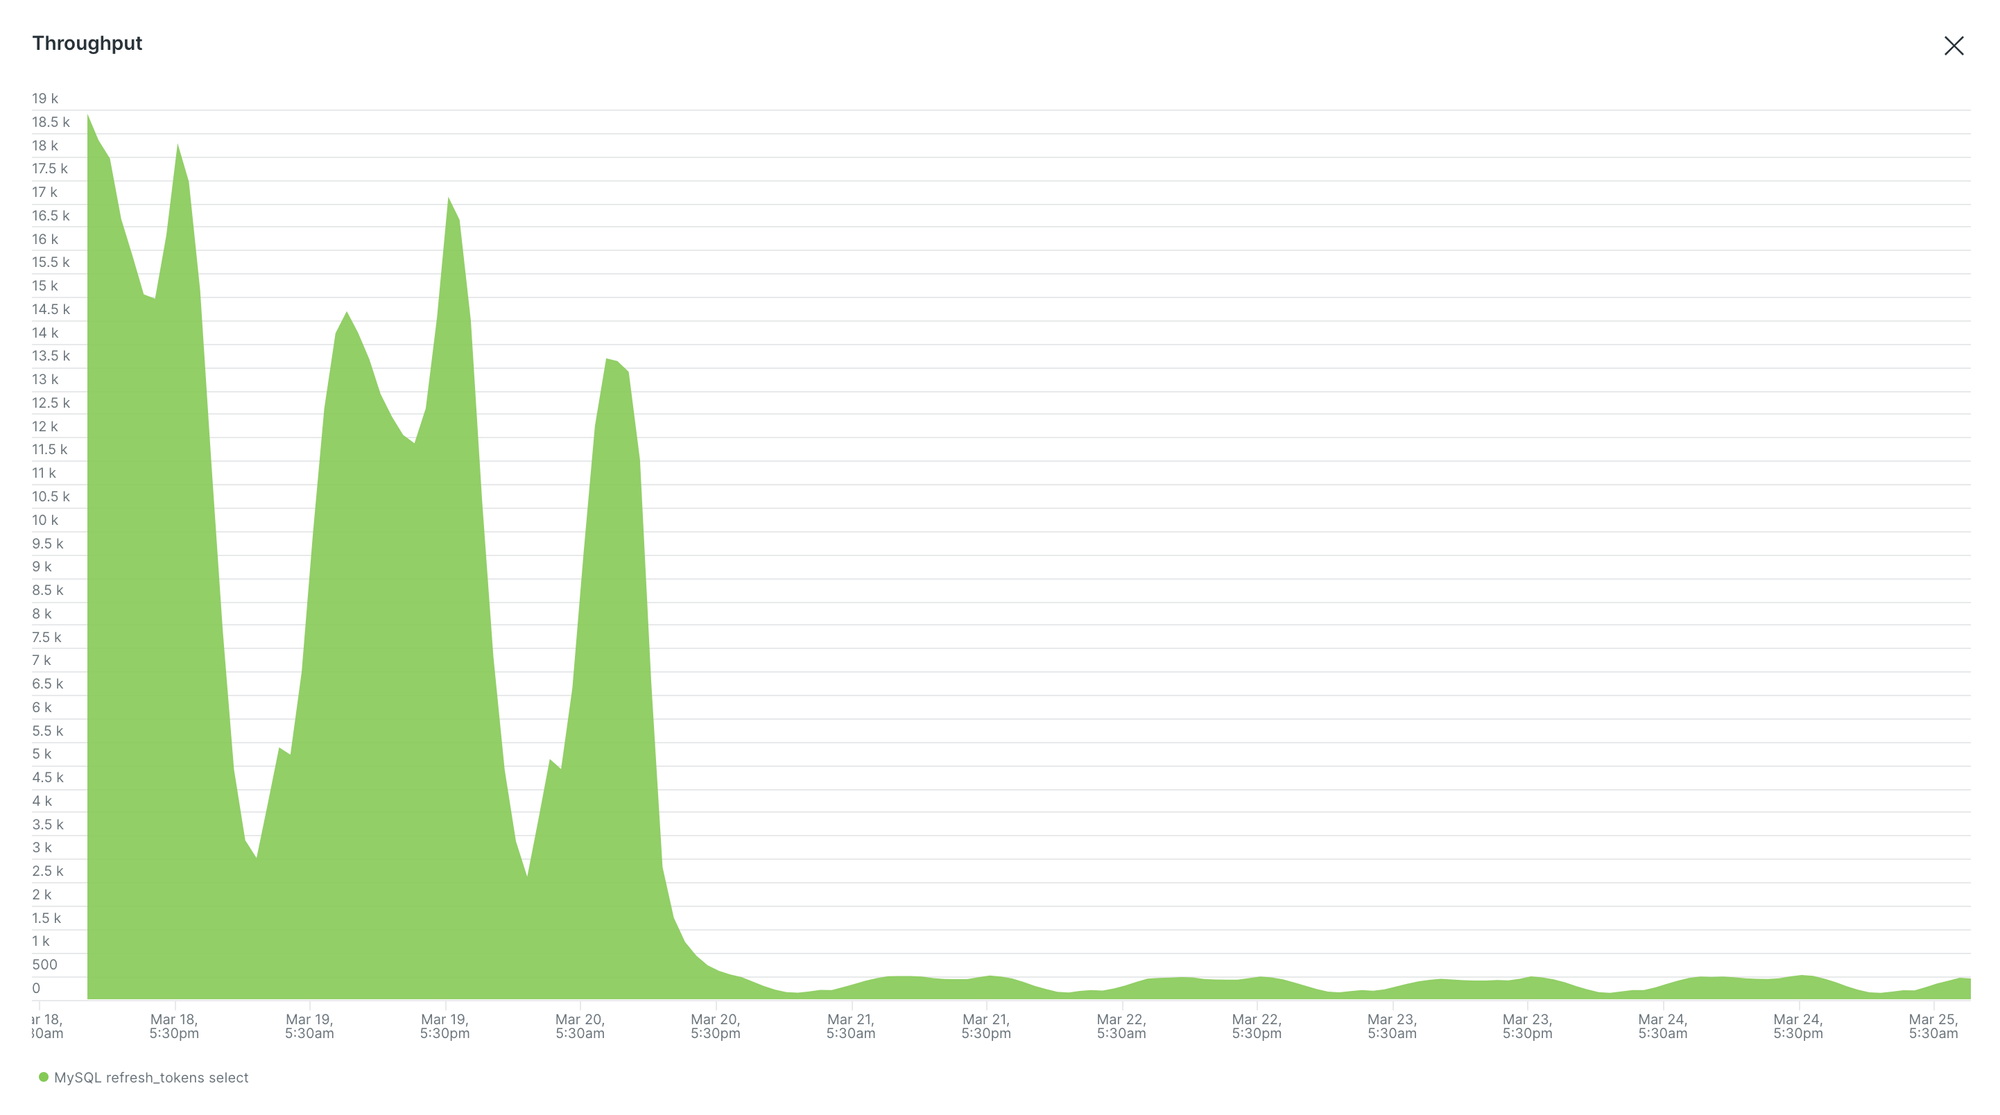
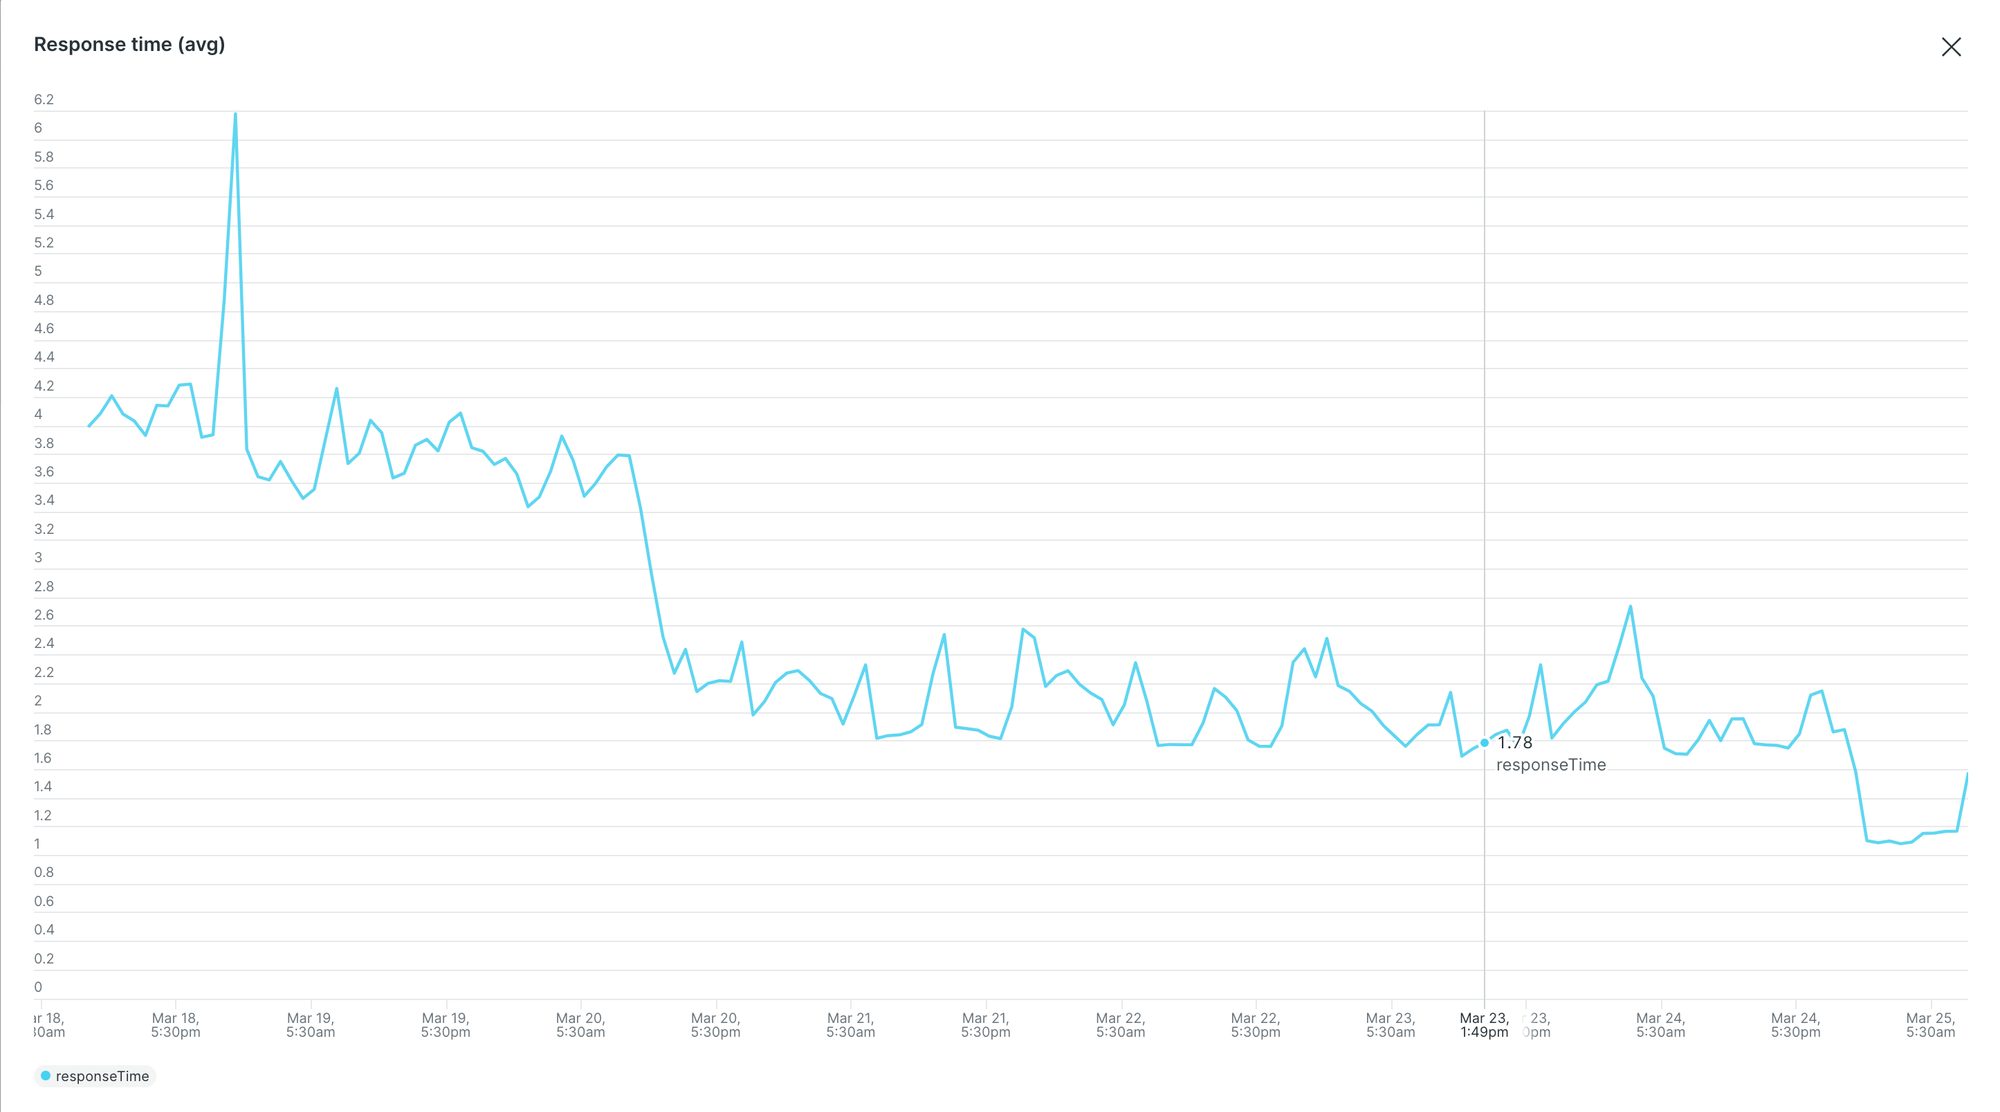
- 80%+ Reduction in Response Time: Token validation latency decreased by over 80%, resulting in a much faster and smoother user experience.
- ~60% Reduction in Login and Refresh Calls Latency: The latency of login and refresh token calls saw a reduction of around 60%.
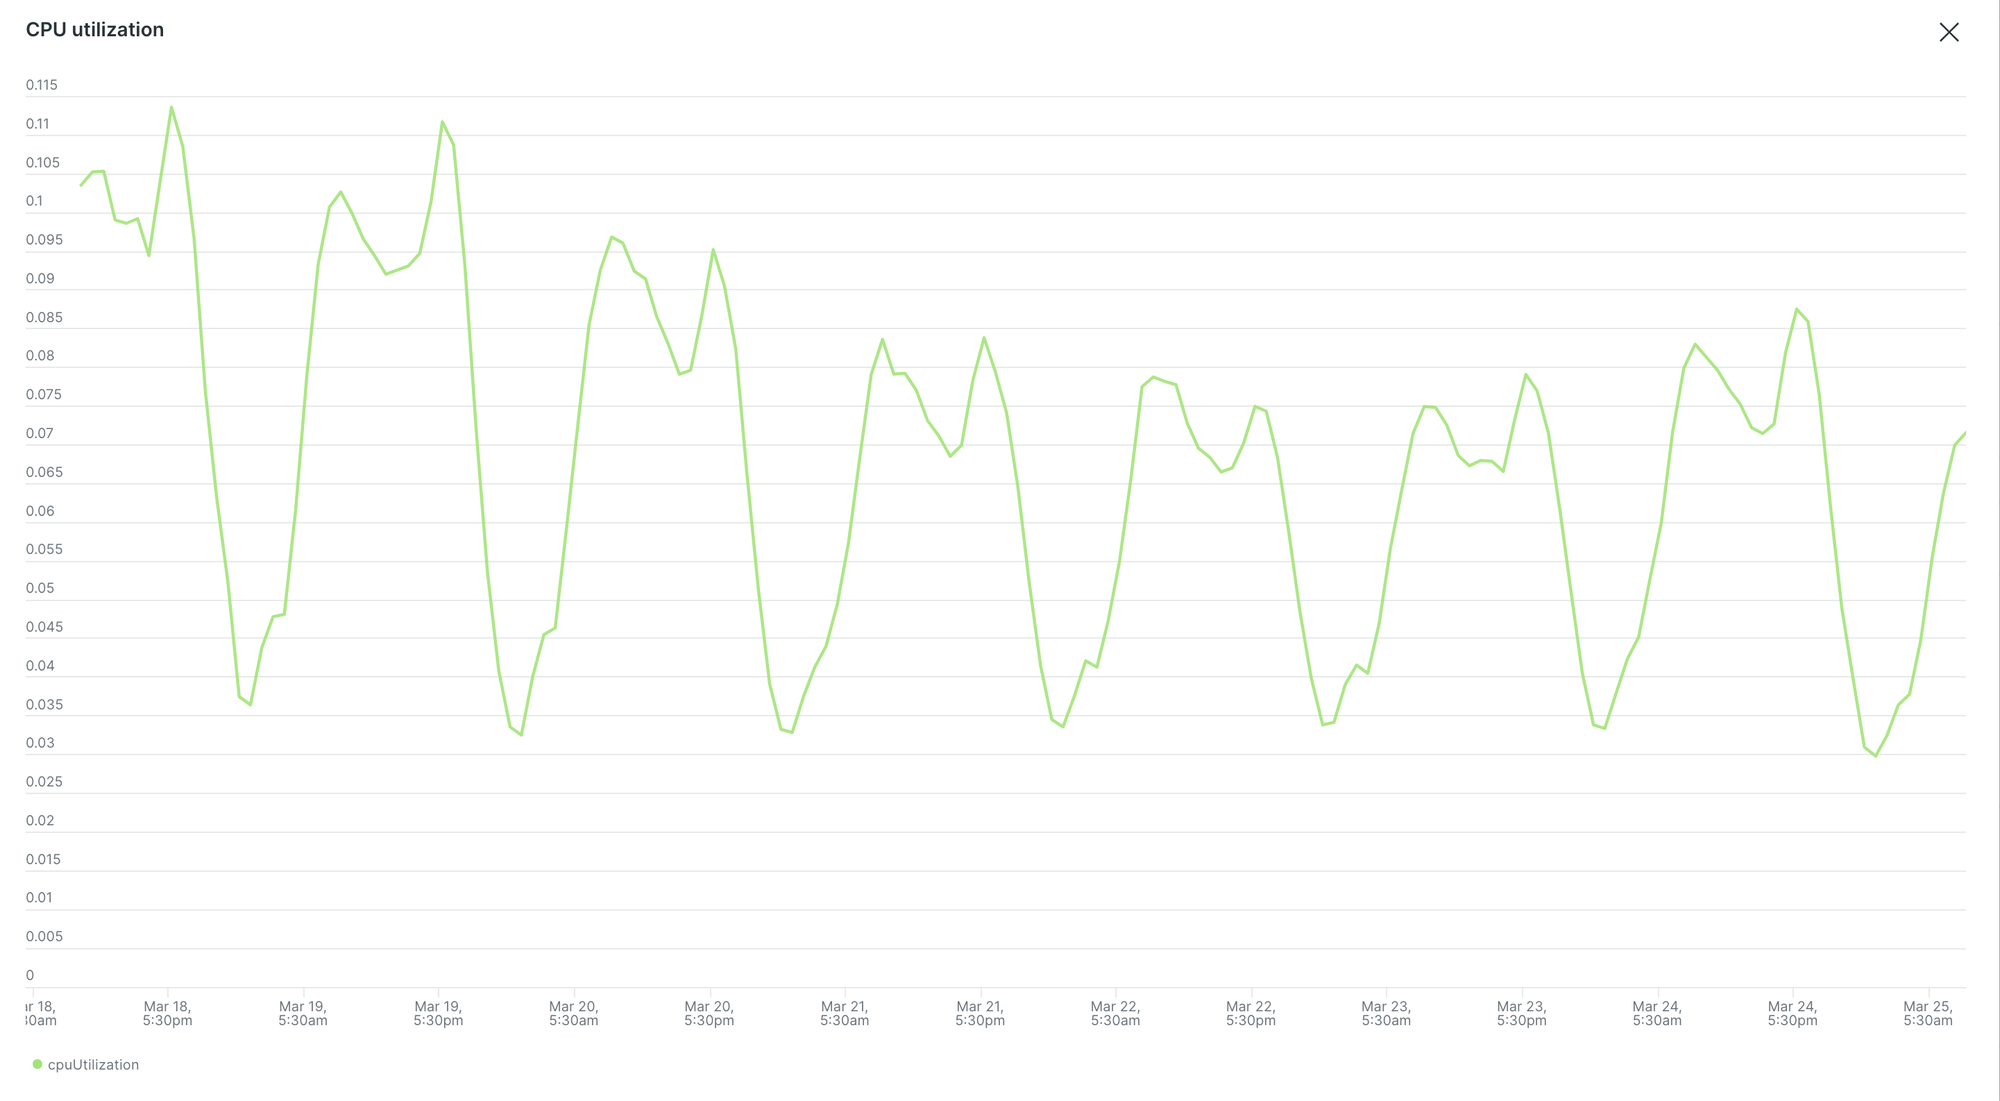
- 30%+ Reduction in Authentication server CPU Usage: The CPU usage in authentication server reduced by 30%, indicating improved efficiency, giving us a scope of service downscale.
- Complete Removal of DynamoDB: We successfully removed DynamoDB, leading to a significant cost saving. This also simplified operations and reduced complexity.
Conclusion
Migrating to JWT not only improved performance and scalability but also simplified authentication logic and reduced costs. While JWT has inherent challenges, such as revocation, our combination of JWT with blacklisting provided a secure and efficient solution.
Join Us
Scalability, reliability and maintainability are the three pillars that govern what we build at Halodoc Tech. We are actively looking for engineers at all levels, and if solving complex problems with challenging requirements is your forte, please reach out to us with your resumé at careers.india@halodoc.com.
About Halodoc
Halodoc is the number 1 Healthcare application in Indonesia. Our mission is to simplify and bring quality healthcare across Indonesia, from Sabang to Merauke. We connect 20,000+ doctors with patients in need through our Tele-consultation service. We partner with 3500+ pharmacies in 100+ cities to bring medicine to your doorstep. We've also partnered with Indonesia's largest lab provider to provide lab home services, and to top it off we have recently launched a premium appointment service that partners with 500+ hospitals that allow patients to book a doctor appointment inside our application. We are extremely fortunate to be trusted by our investors, such as the Bill & Melinda Gates Foundation, Singtel, UOB Ventures, Allianz, GoJek, Astra, Temasek, and many more. We recently closed our Series D round and In total have raised around USD$100+ million for our mission. Our team works tirelessly to make sure that we create the best healthcare solution personalised for all of our patient's needs, and are continuously on a path to simplify healthcare for Indonesia.