Web push notifications using Firebase Cloud Messaging
Push notifications are a great way to take a web application like Halodoc one step closer to native desktop and mobile apps. Push notifications enable us to bring relevant information about our users even when they are not using our website.
There are several ways to implement web push notifications, from low-effort implementation to building from scratch. If we build push notifications from scratch, we need to manage many aspects, especially in setting up and maintaining the server for push notifications, for example generating the VAPID key (application server key), managing push service encryption, setting up expiration for push notifications, managing backend and push service communication using Web Push Protocol, etc. Don't get it wrong, implementing push notifications from scratch definitely has advantages, especially if we need to customize some scenarios. But if we don't have any custom use cases, better to use any platform to make us easier to implement push notifications.
There are many platforms for web push notifications out there. One of the most popular is Firebase Cloud Messaging (FCM). At Halodoc, we use Firebase Cloud Messaging (FCM) to make us easier to implement web push notifications. FCM is a service offered by Google for sending single or multiple push notifications across client applications (Web, Android, and iOS).
Push notification implementation using Firebase
We only need to manage our front end and back end if we use a push notification platform like Firebase. As seen in the following diagram, we only need a small effort to implement push notifications.
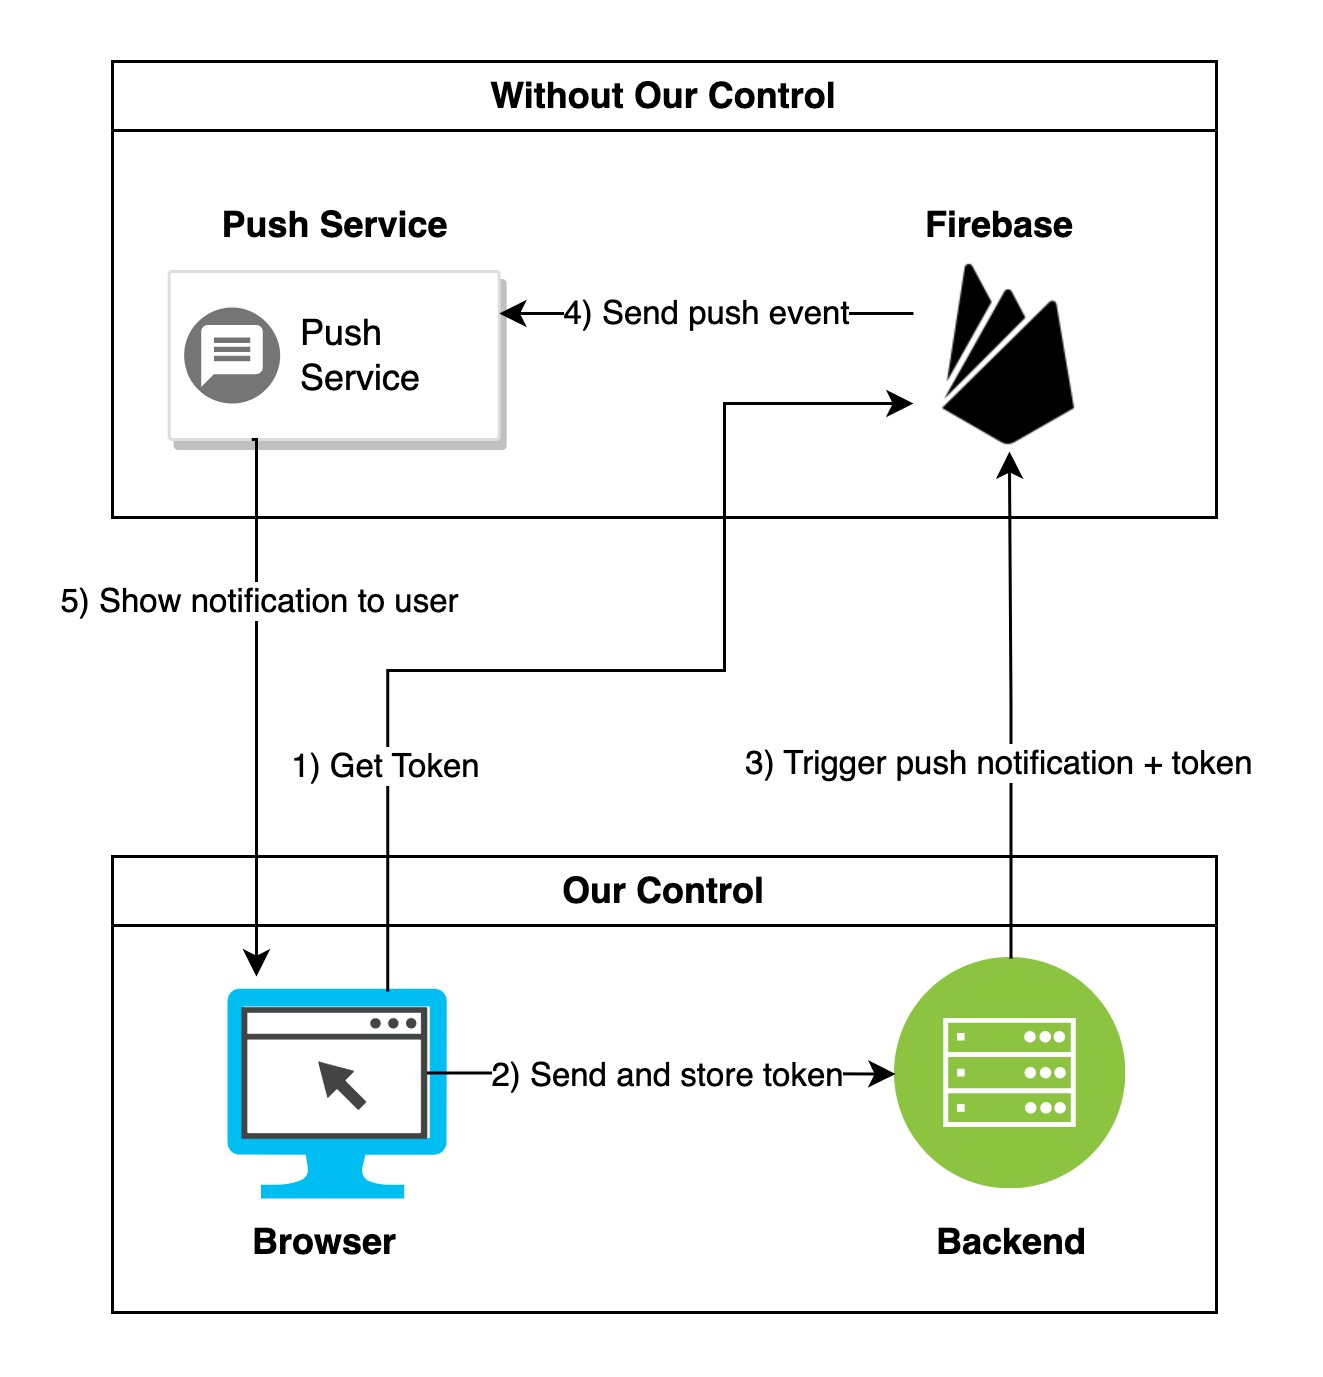
At the high level, we only need to fetch the token from Firebase, store the token in our database, and trigger push notifications with the token. Obviously, there are a few other steps to make it done. But for this we will cover in the next section.
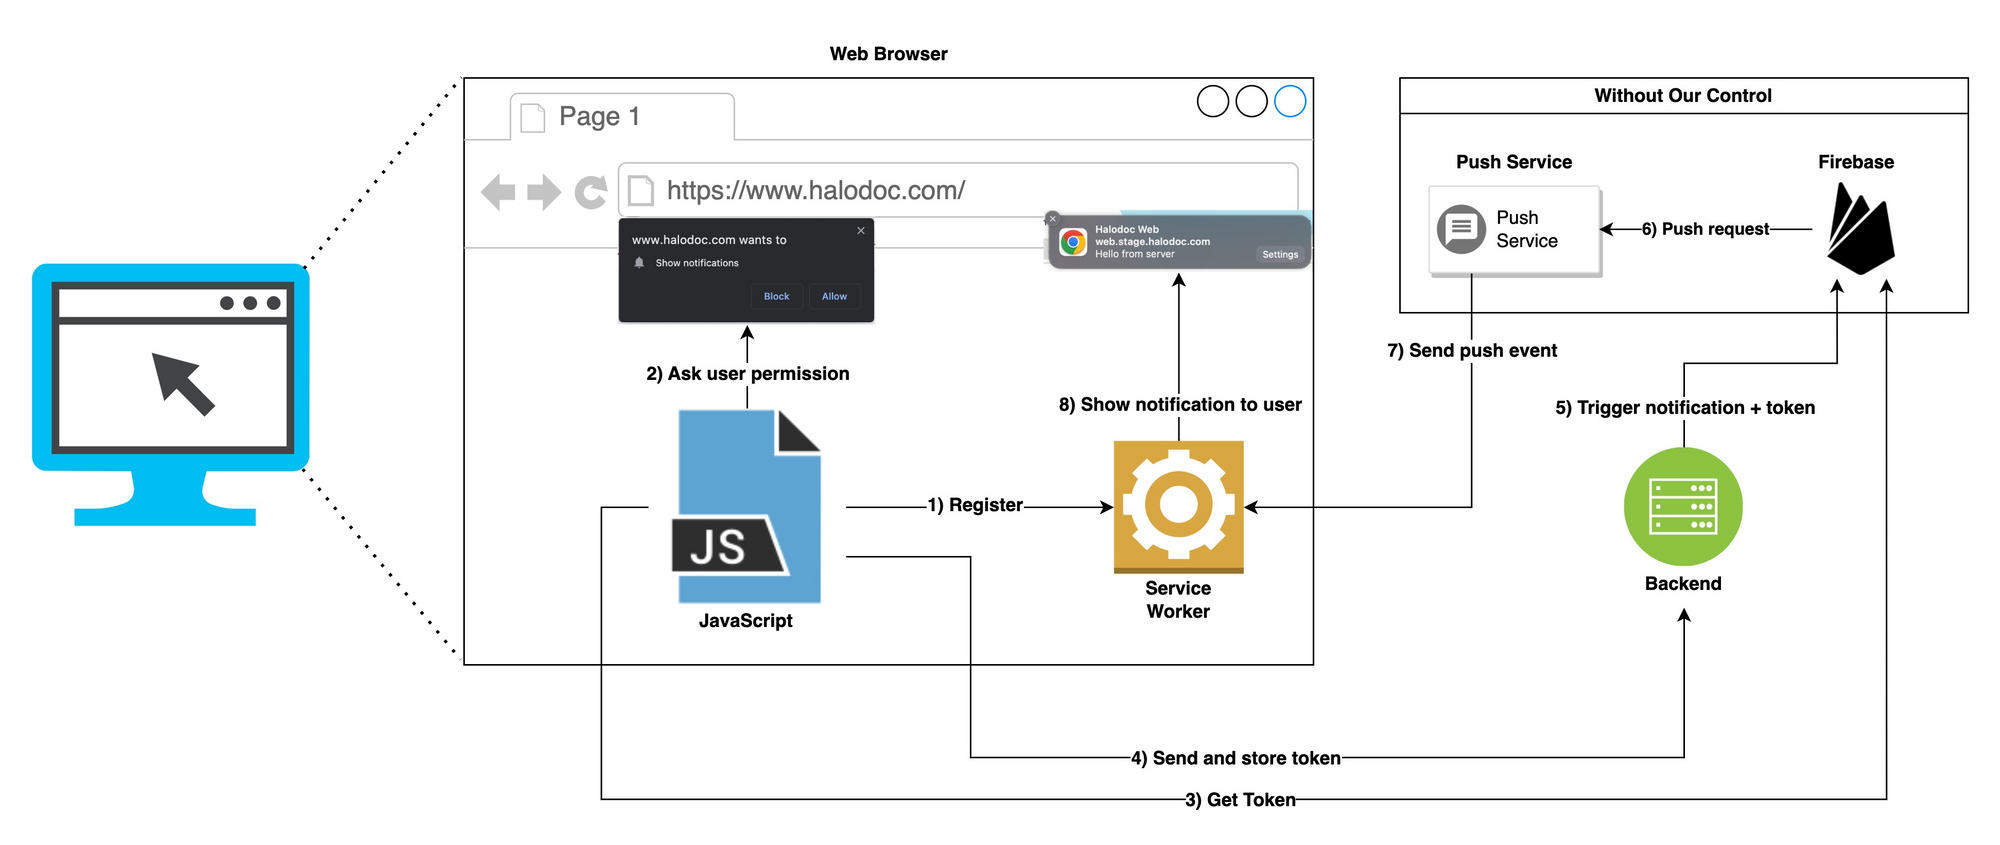
At the detailed level, as seen in the above diagram, a few steps must be taken to implement the push notification. In the next section, we will break down the detailed explanation for each of the steps.
Before going through the detailed steps, since we are using Firebase, we need to set up the Firebase first. You can refer to the Firebase web setup for Firebase setup in your web project. Once finished the setup, then we can go to the next step :)
1) Register service worker
We need a service worker to send notifications. Service worker is JavaScript code that can execute in the background even if your browser is closed. In push notifications, the service worker manages the push events when a message is received from the server, which we will discuss later. For now, let's discuss how to register a service worker in our JavaScript code.
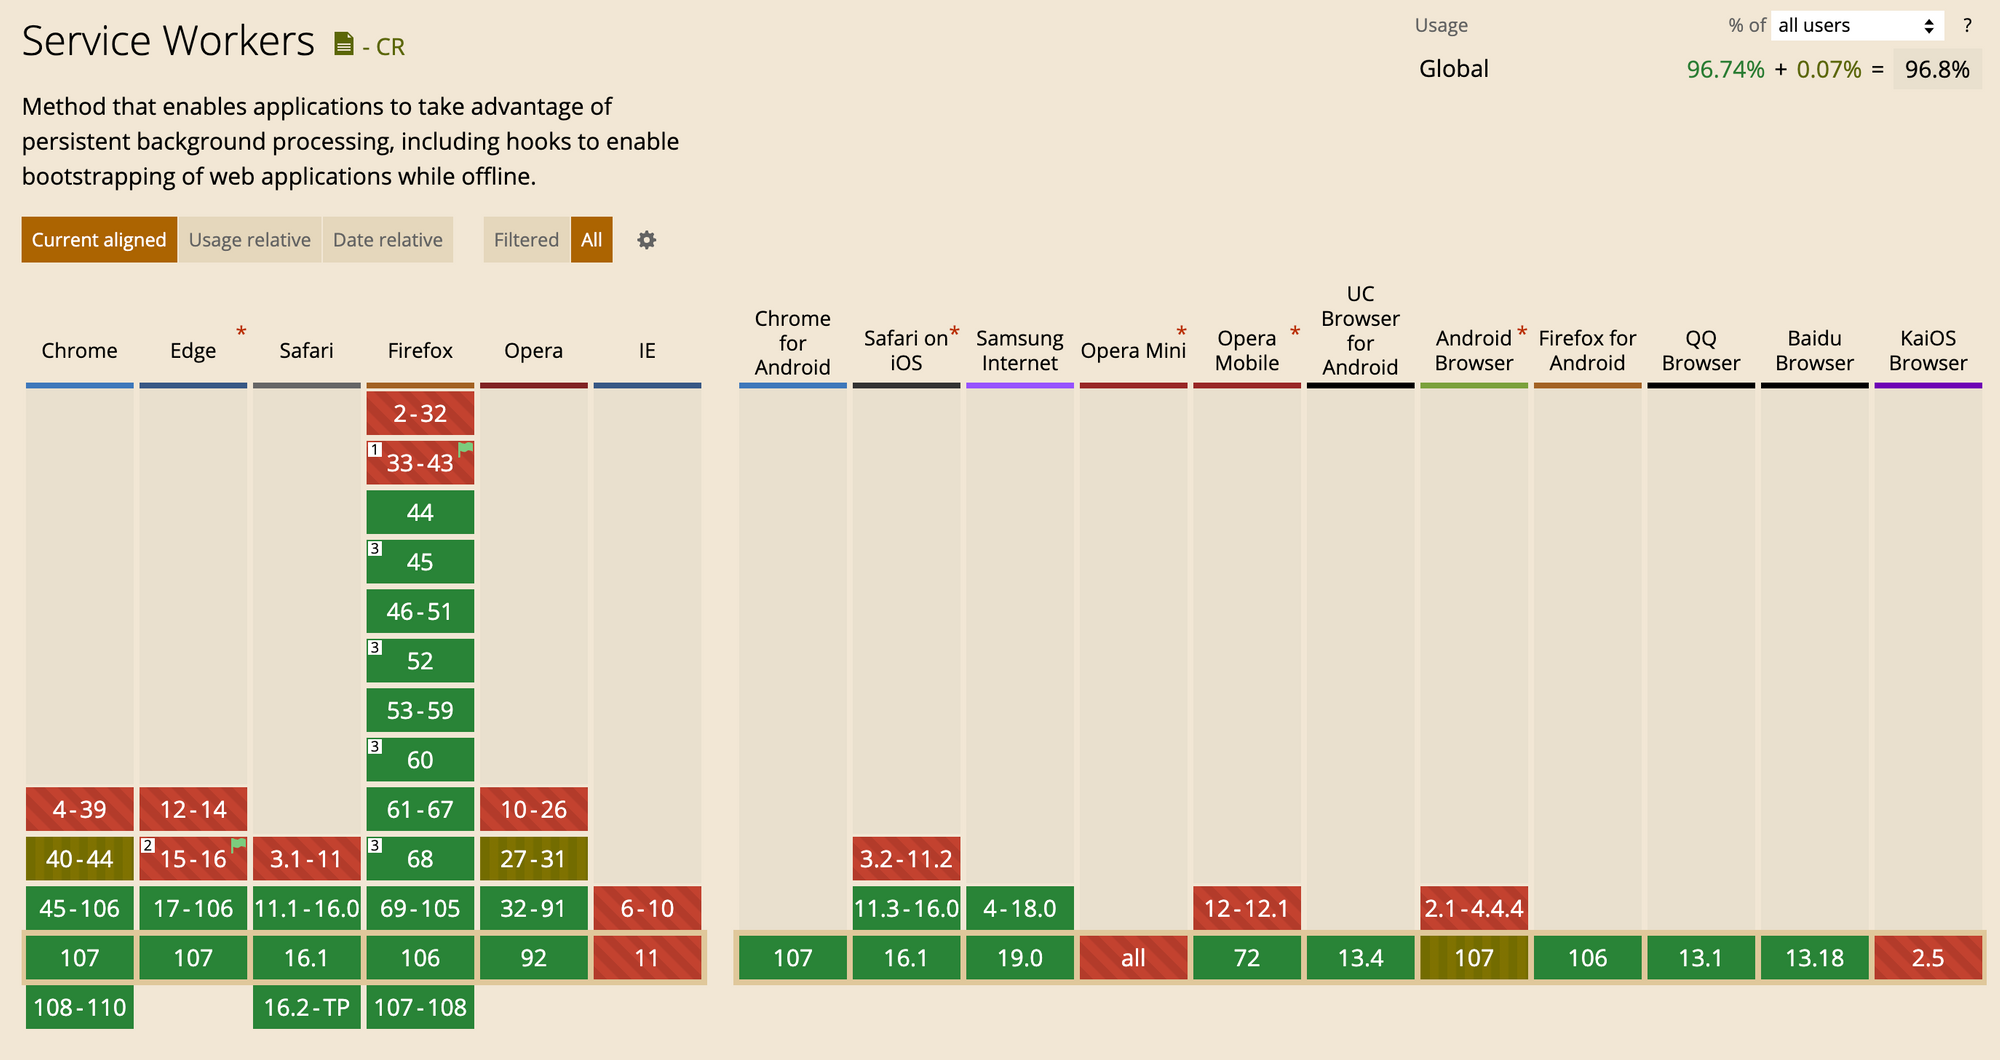
Not all browsers support service workers. If we check the support on Caniuse, we can see that service worker is widely supported in most browsers (96.8%). Even though, before registering a service worker, we must check service worker support first. Fortunately, it's easy to check service worker support in a single if statement.
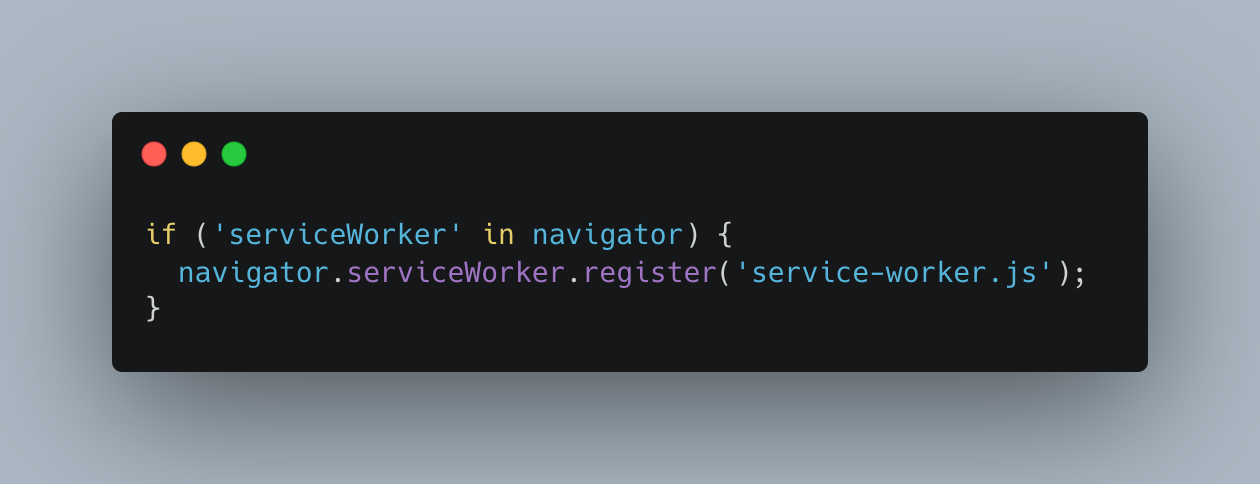
After we ensure that the browser supports the service worker, we can use navigator.serviceWorker.register to register the service worker.
2) Get user permission to send push notification
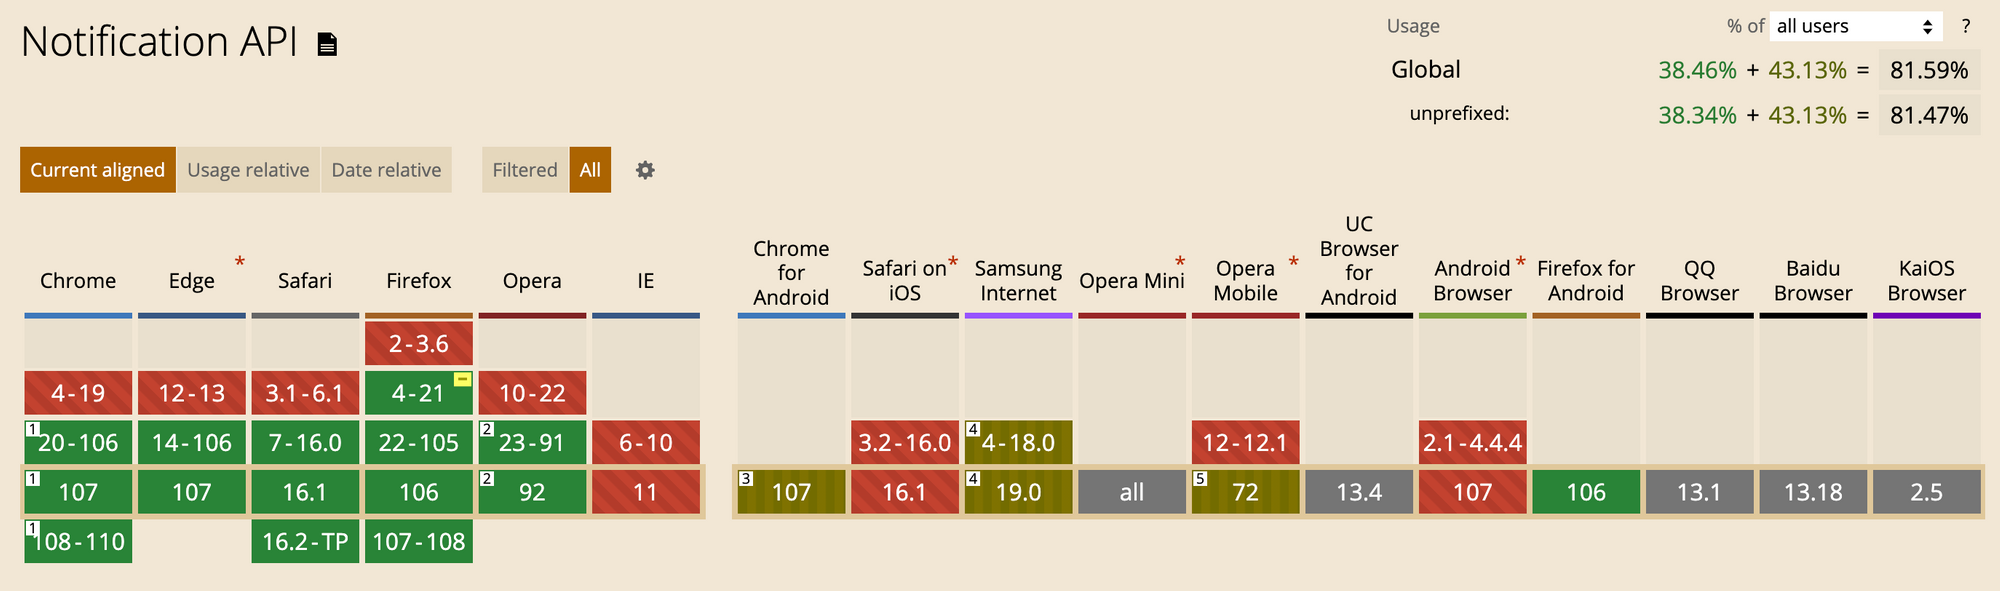
We need to get the user's permission to send push notifications. Otherwise, we are not able to subscribe to the push service. To get user permission, we should ensure the browser supports notification API. Again, we can see from Caniuse that the notification API support has not yet been widely adopted. It's currently sitting at 81%.
We also need to check whether the browser supports Notification API. It's also easy to check notification API support:
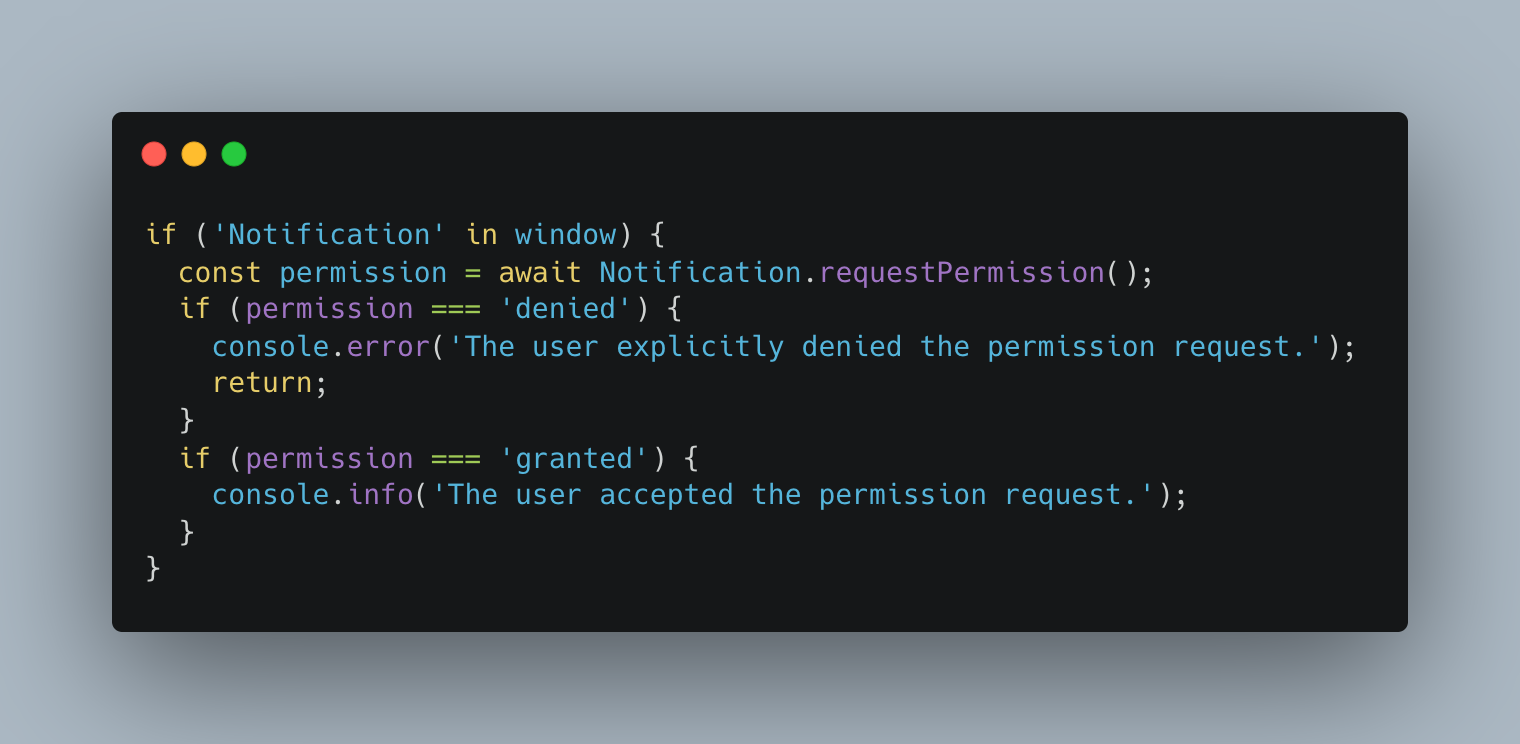
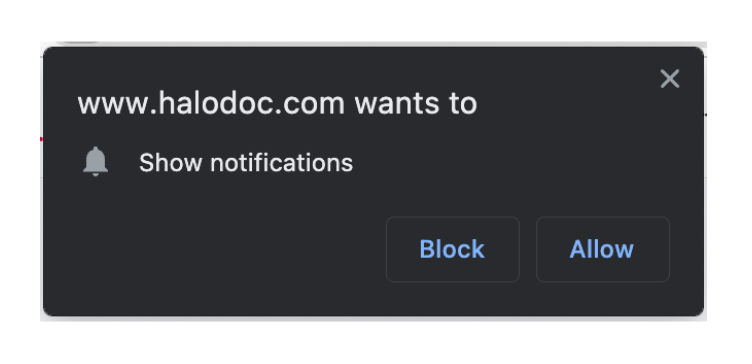
After we make sure that the browser supports notification API, we can use Notification.requestPermission to ask user permission. When the code is executed, it will display the prompt in the browser, like the following image. The UI varies across platforms based on the operating system or browser.
Notification.requestPermission returns Promise. If the return is denied, the user denies the permission request. Otherwise, if the return is granted, the user accepts the permission request.
3) Get token from Firebase
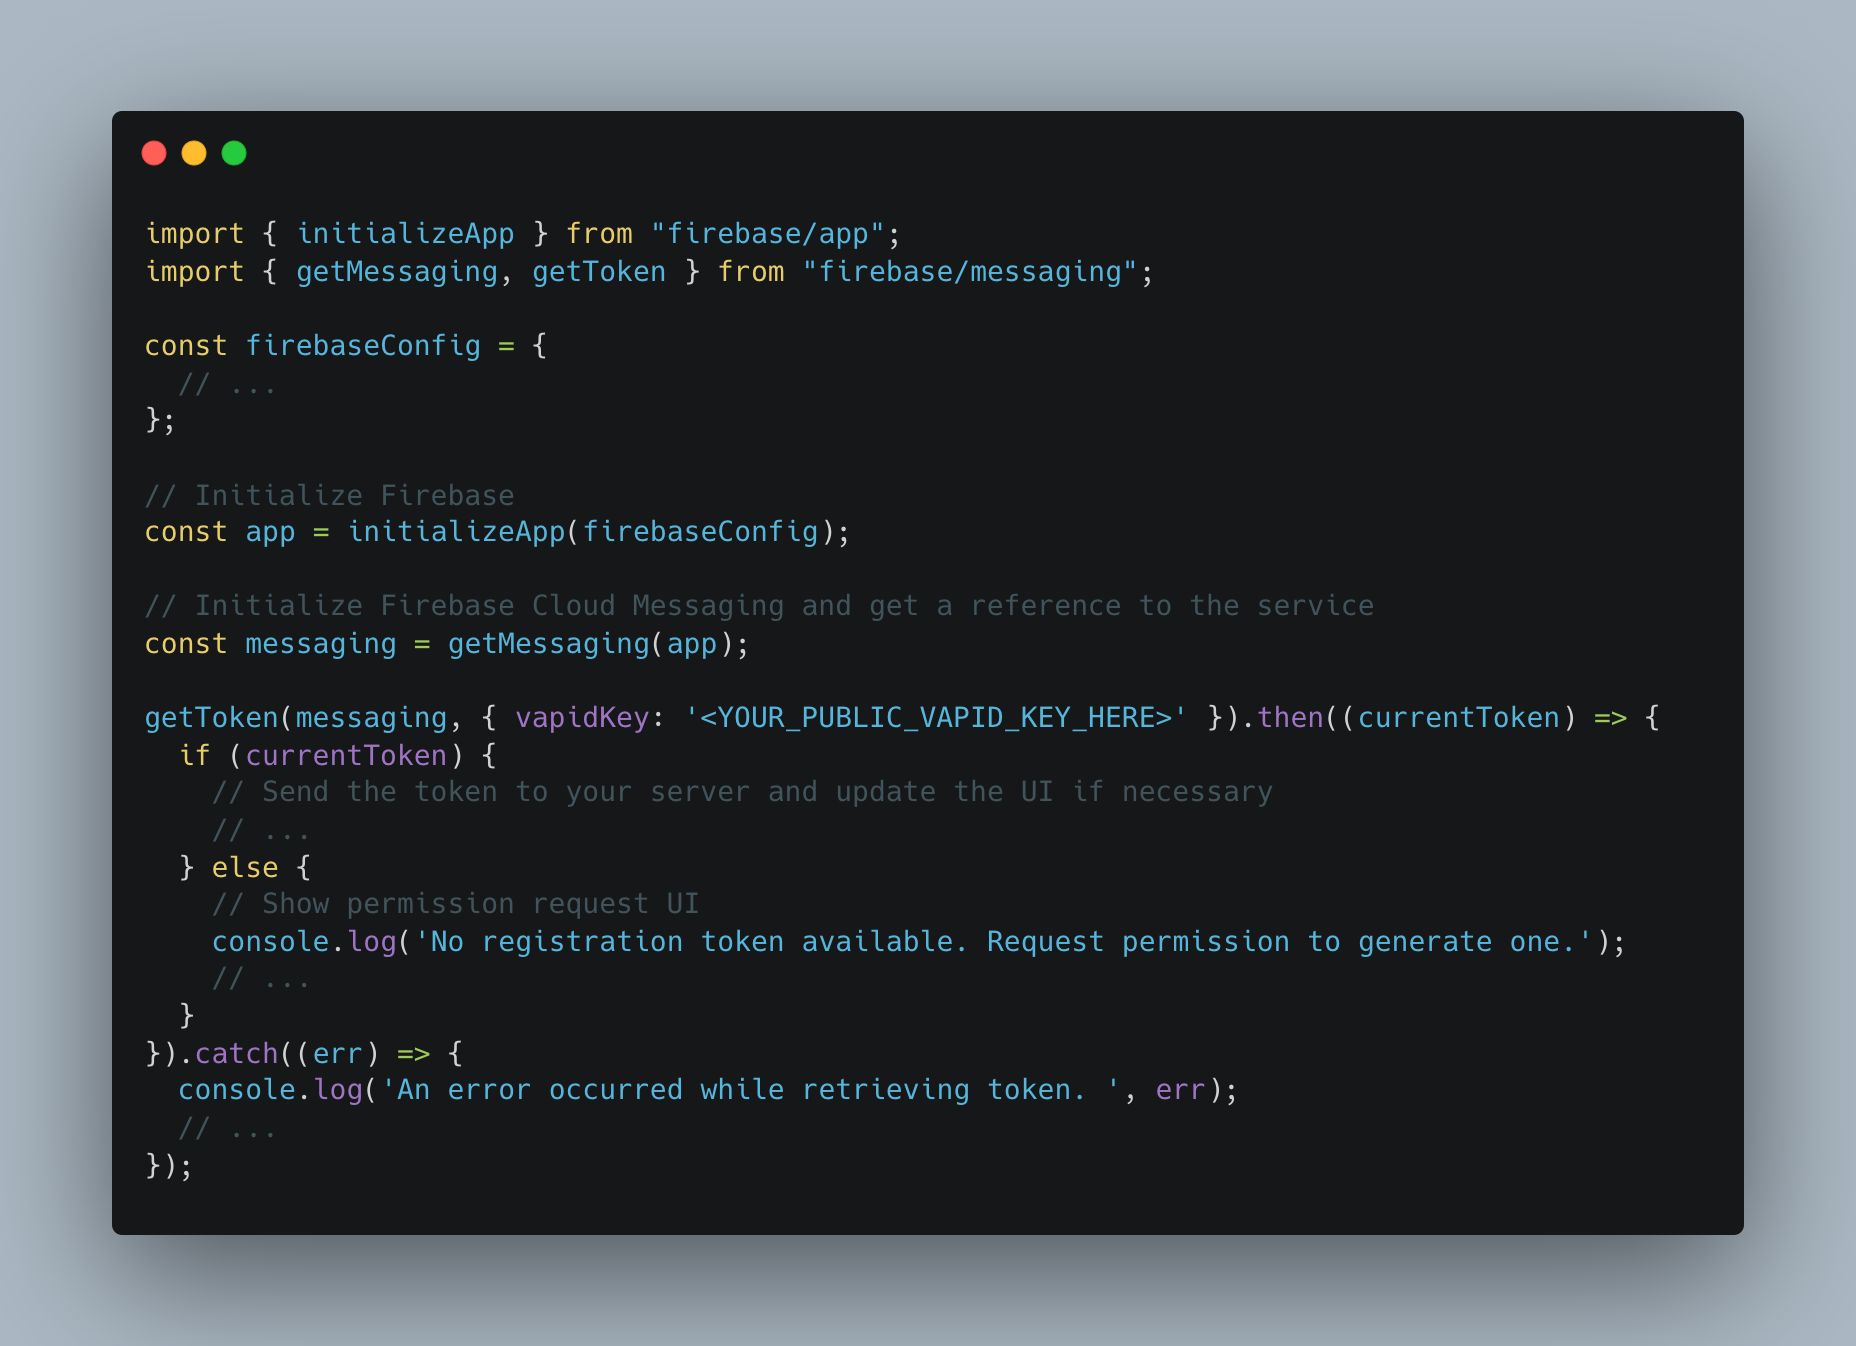
After the user grant permission for us to send the notification, we can fetch the Firebase registration token that can be used to send push messages to this user. We need to use Firebase SDK to get the registration token as seen in the above code snippet.
4) Send registration token data to backend
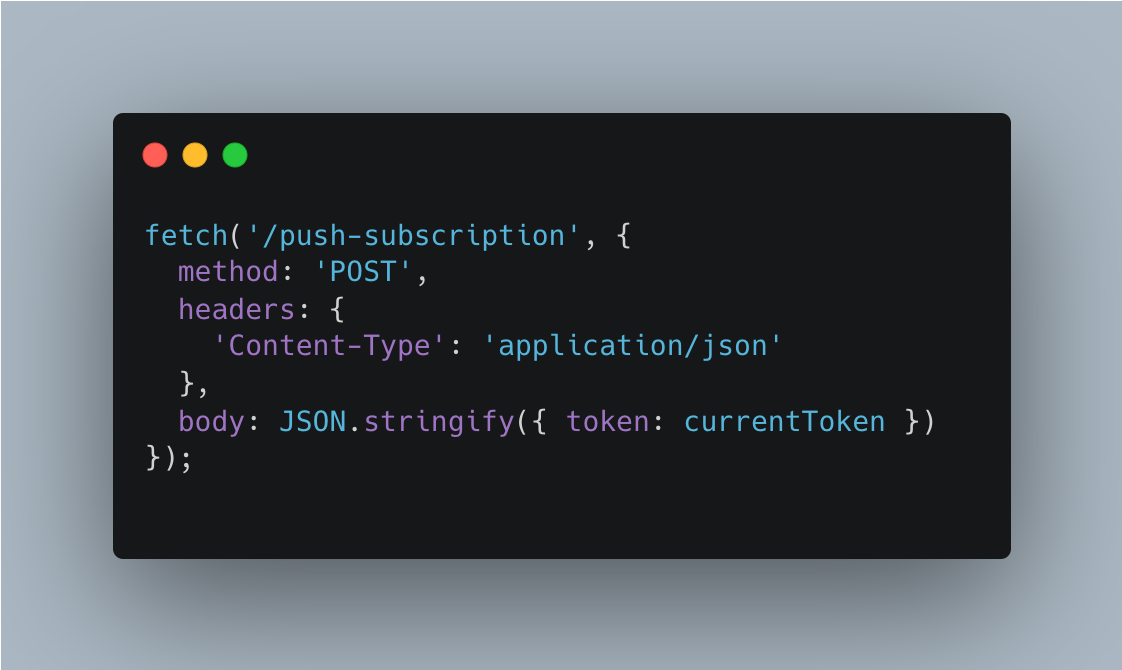
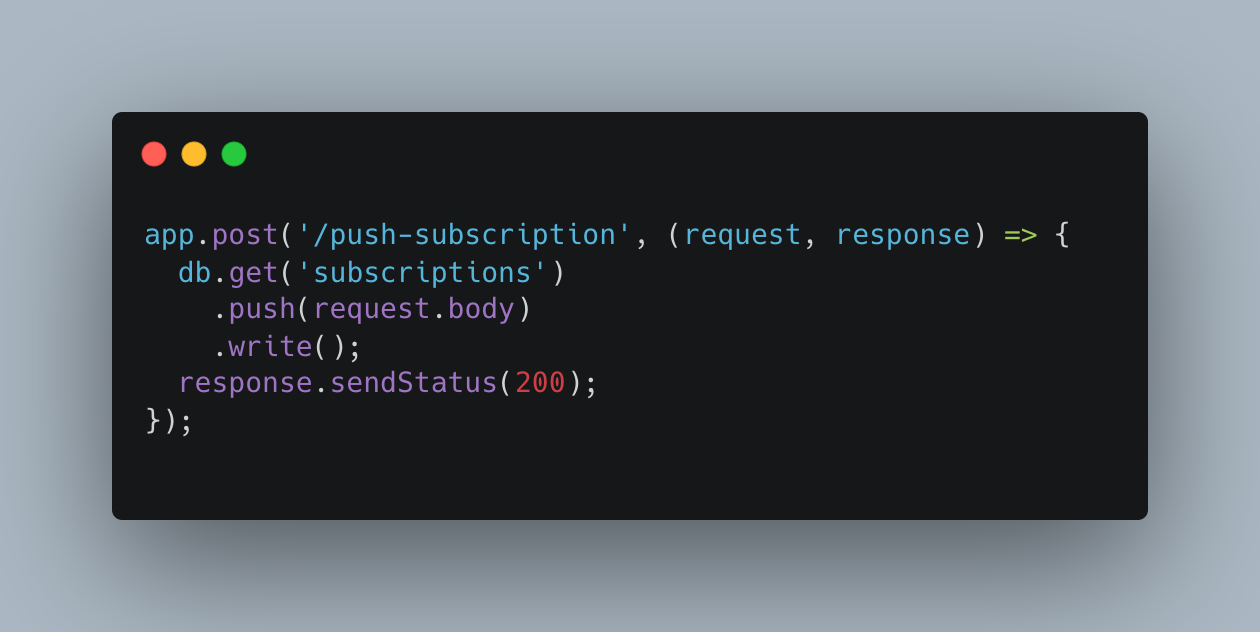
We need registration token as a client identifier to trigger push notifications from our backend. To send the registration token, we need to make a simple HTTP request to backend as seen in the above code. Then, in the backend, we need to store that subscription data in our server database:
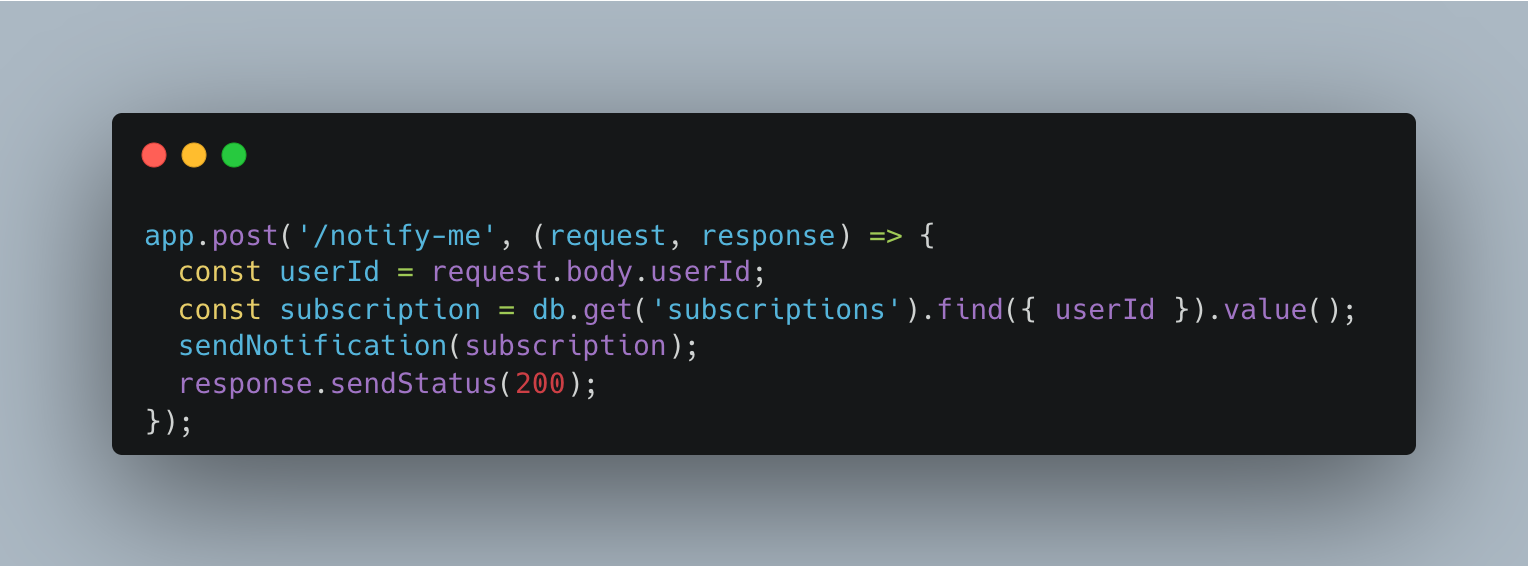
5) Trigger push notification requests
We need some events to trigger the push notifications to the users. The trigger depends on the business's needs. For example, in a chat application, it can be a new chat notification. For e-commerce applications, the notification can be require payment. But for this example, let me create a simple endpoint to trigger push notifications:
Then, the logic of sending the push notification to Firebase can be seen at sendNotification function in the following code:

As we can see in the above code, for the demo purpose, we use NodeJS. Other libraries/languages will have differences, but they won't be too dissimilar. Regardless of your backend (Java, Go, Node, PHP, Python, etc.), the steps for implementing push will be the same.
6) Send push request from Firebase
Firebase's requests to push service is out of our control. But behind the scene, Firebase sends the push request to the push service. Then the push service receives the request from Firebase, authenticates it, and routes the push message to the appropriate client. If the client's browser is not connected to the internet, the push service queues the push message until the browser reconnects. When a browser receives a push message, it decrypts the data and sends a push event to our service worker.
7) Receive push event from push service in the service worker
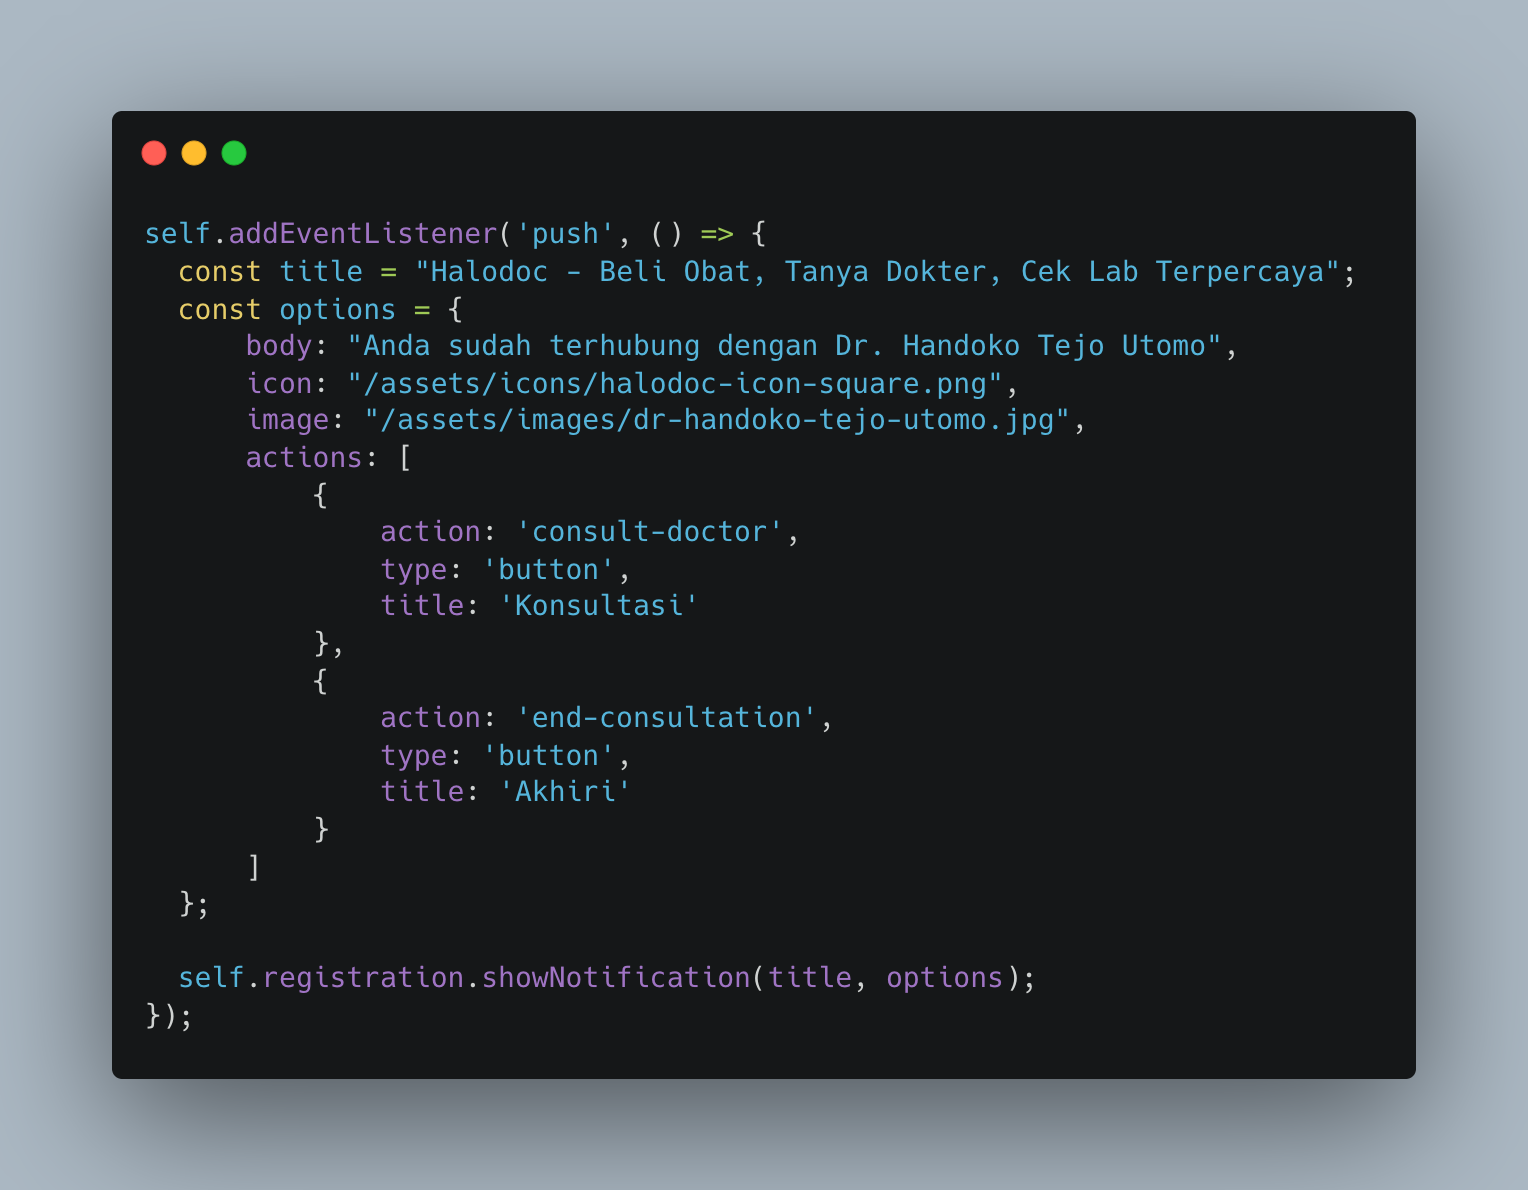
The code for setting up a push event listener should be pretty similar to any other event listener we'd write in JavaScript:
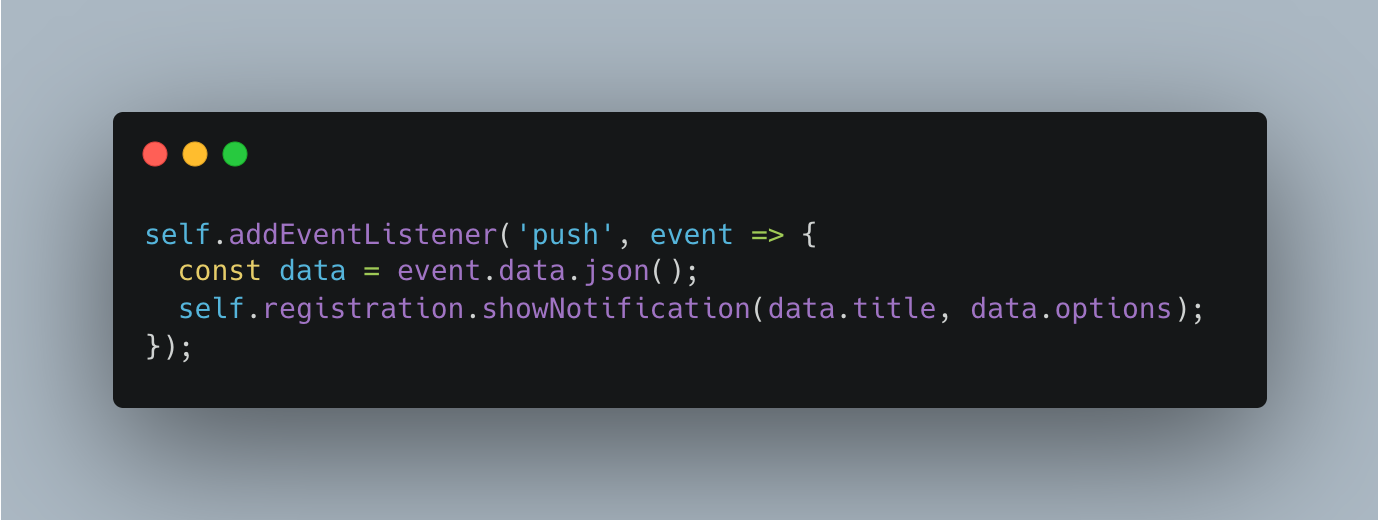
The weirdest bit of this code to most developers new to service workers is the self-attribute. self is commonly used in a service worker that refers to the worker. In the example above, self.addEventListener() can be thought of as adding an event listener to the service worker.
showNotification is the method that displays a notification to the user and returns a promise that will resolve once the notification has been displayed.
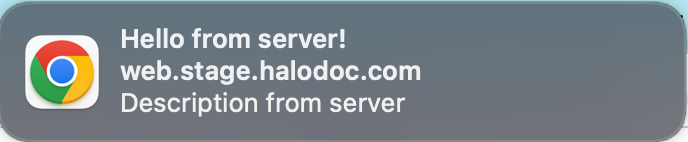
8) Display the push notification to the user
After the above steps have been executed, then it will display the push notification like this:
By default, calling showNotification() is just a visual appearance. When the user clicks on the notification, it does nothing. So, we also need to handle the notificationClick event in our service worker to perform some logic when the user clicks on the push notification.
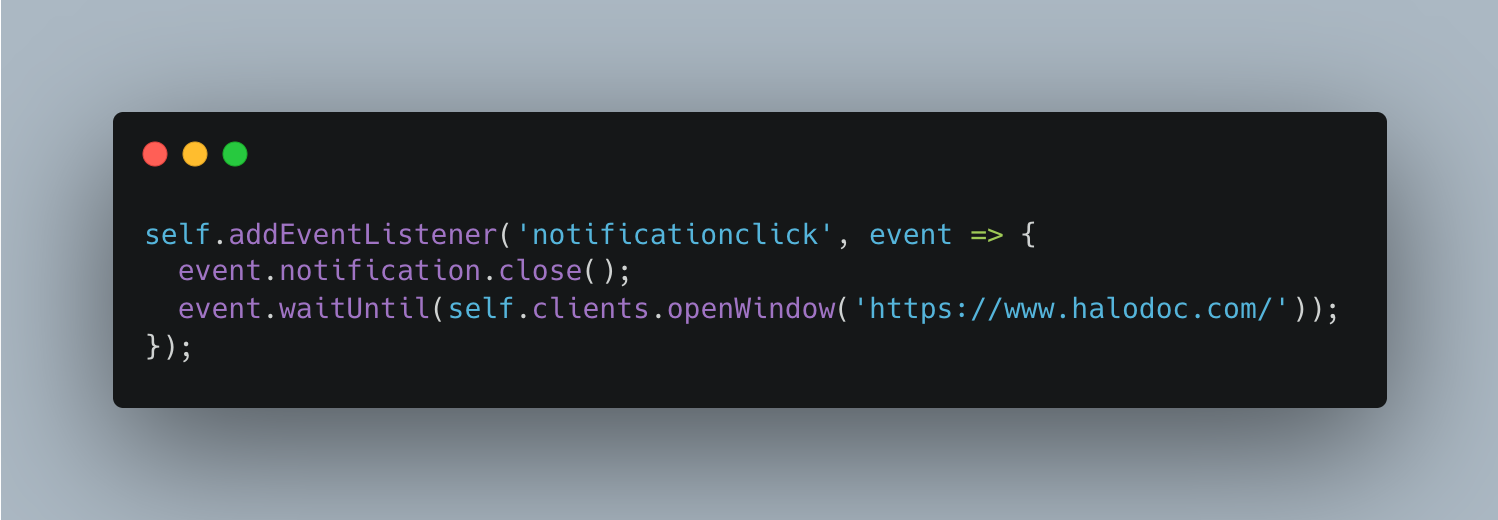
As we can see in the above code, when the user clicks on the push notification, the code will close the notification and open https://www.halodoc.com in the browser.
Now, hopefully, you know about the web push notification behind the scenes. Let's move on to other important things about web push notifications.
Best practices of asking for user's notification permission
The bad UX for asking permission is to request permission as soon as a user lands on a website. This approach provides no context for why notifications are needed or applicable to the user. Most users will block the notification if that is the case.
And you know? If the user blocks the permission request, your website can't ask for permission again. To get permission after being blocked, the user has to change the permission in the browser's settings, and doing so is not easy, apparent, or fun for the user.
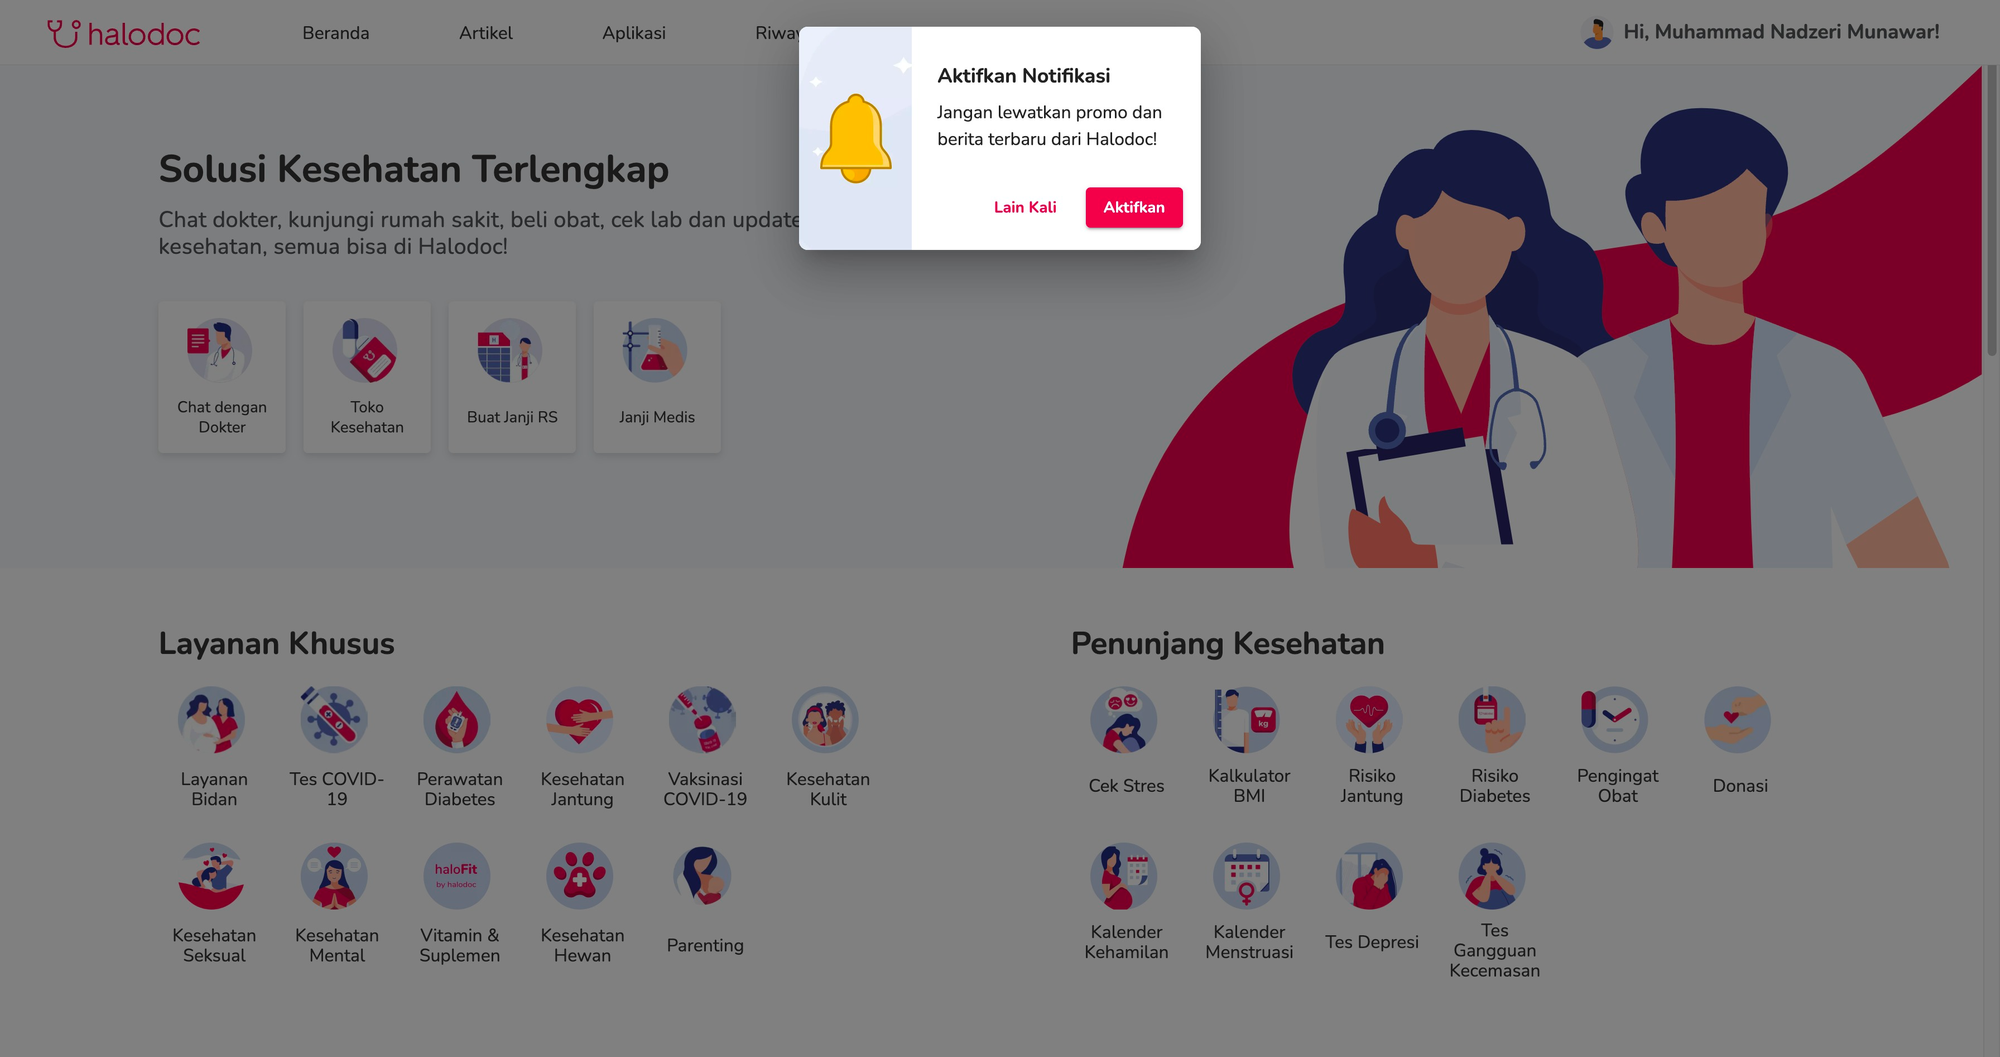
Halodoc implements a double permission mechanism to tackle this issue, as shown in the above image. First, show a custom permission prompt that our website controls. Then the website triggers the real browser permission prompt if the user clicks on allow permission. Otherwise, hide the custom prompt and ask for some other time.
At Halodoc, we show the custom permission prompt once the user has signed in to our web. By doing this, the user can choose to disable notifications without our website running the risk of being permanently blocked.
Customize push notification display
As explained earlier, displaying push notifications is simple:
<ServiceWorkerRegistration>.showNotification(<title>, <options>);
But, we can provide the notification options to customize the push notification display. Let's take a look at the following custom push notification display as an example:
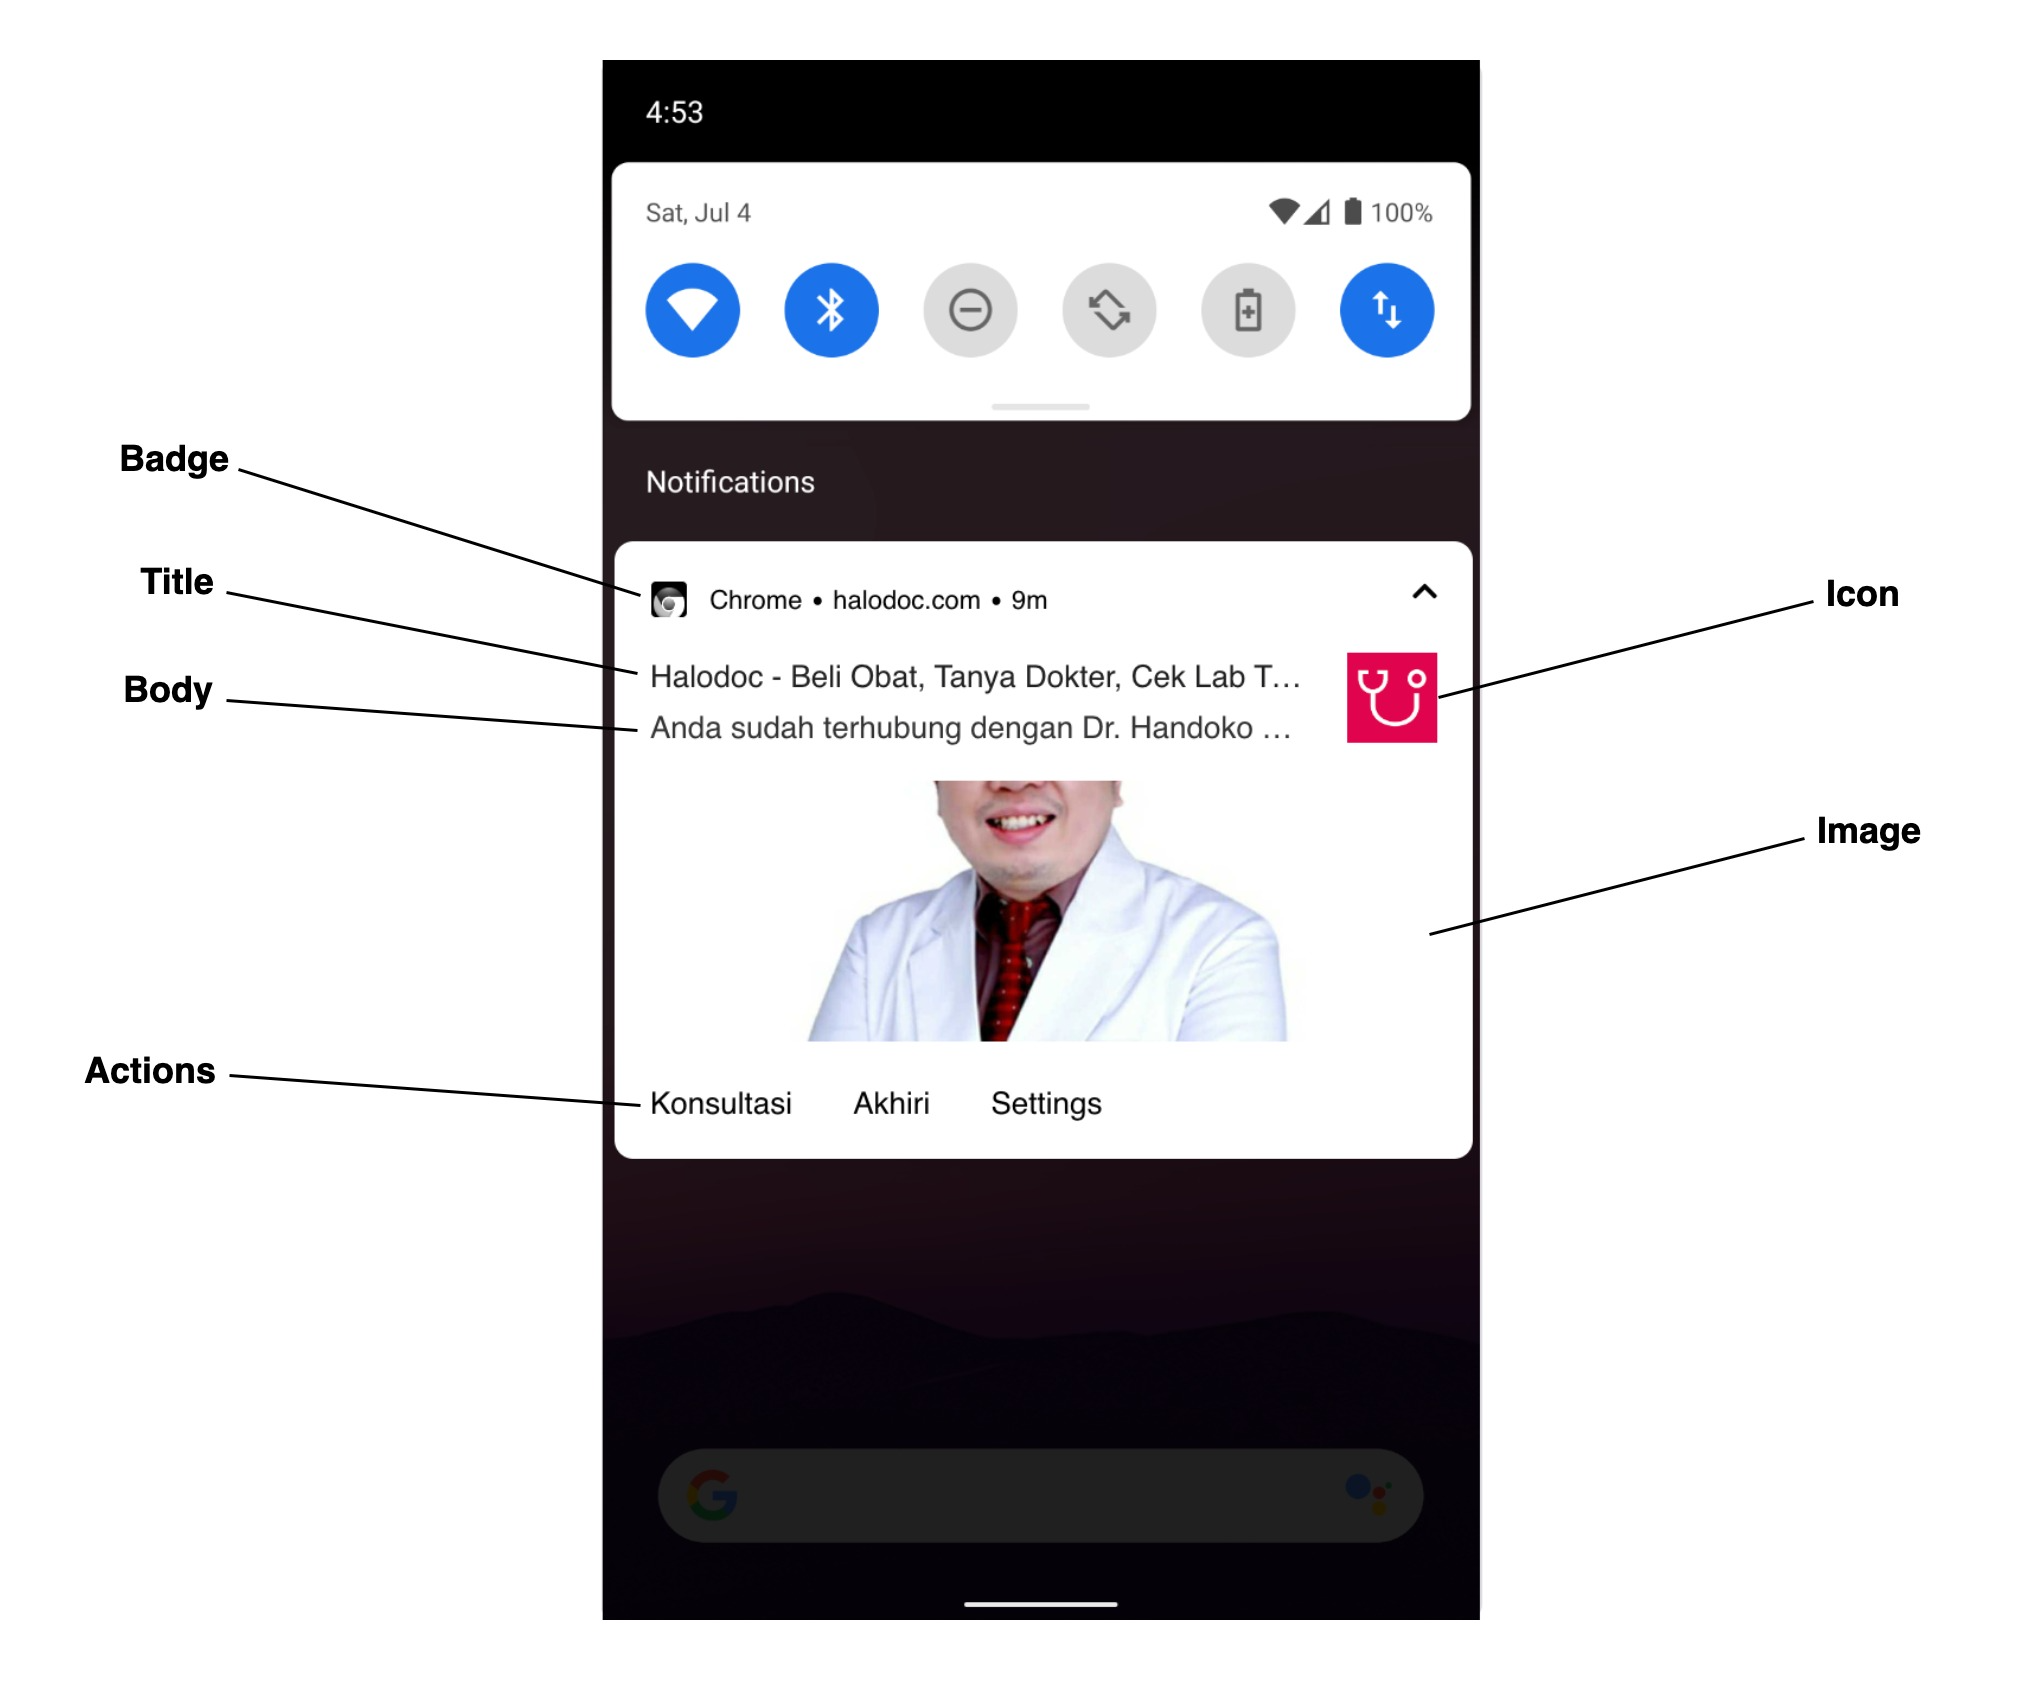
To implement the above push notification, we need to provide the following options:
If we refer to showNotification documentation, other options are available for displaying the push notification.
Summary
Push notification is a great way to keep in touch with our users, increase engagement, and deliver relevant information to the user's devices. The hard part is determining what, when, and how to make business decisions. What you should notify users about, when you should notify them, and how frequently you should notify them. The answers to these questions will vary depending on the application. As seen in this article, implementing push notifications is not hard. Moreover, we can use platform like Firebase Cloud Messaging (FCM) to make us easier to implement and manage web push notifications.
Join us
Scalability, reliability and maintainability are the three pillars that govern what we build at Halodoc Tech. We are actively looking for engineers at all levels and if solving hard problems with challenging requirements is your forte, please reach out to us with your resumé at careers.india@halodoc.com.
About Halodoc
Halodoc is the number 1 all around Healthcare application in Indonesia. Our mission is to simplify and bring quality healthcare across Indonesia, from Sabang to Merauke. We connect 20,000+ doctors with patients in need through our Tele-consultation service. We partner with 3500+ pharmacies in 100+ cities to bring medicine to your doorstep. We've also partnered with Indonesia's largest lab provider to provide lab home services, and to top it off we have recently launched a premium appointment service that partners with 500+ hospitals that allow patients to book a doctor appointment inside our application. We are extremely fortunate to be trusted by our investors, such as the Bill & Melinda Gates Foundation, Singtel, UOB Ventures, Allianz, GoJek, Astra, Temasek and many more. We recently closed our Series C round and In total have raised around USD$180 million for our mission. Our team works tirelessly to make sure that we create the best healthcare solution personalised for all of our patient's needs, and are continuously on a path to simplify healthcare for Indonesia.