
Continuous code inspection with SwiftLint for iOS Apps
Halodoc started with a mission of simplifying healthcare across Indonesia. Starting with few people and an ambitious destination, executing quickly was the choice we took. This needed a lot of code to churn out every release. Saving the time of the developer and the reviewer was of paramount importance.
The code review plays a vital role in
- Discovering the bugs early before the deployment stage, can save both time and money.
- Maintain consistent coding style across all company applications.
- Equip the team members with a greater knowledge of each other’s skill-sets and weaknesses, becoming more responsive to greater issues and discrepancies.
Automating the code review will help both the developer and the reviewer to save his/her time, which helps in delivering the product faster, while maintaining the higher coding standards.
Static code analyzer to the rescue
The first step was to create one consistent code style that will be accepted by your team. And use the static code analyzers to handle style checks by making the code review process easier.
Static code analysis tools can check for a broad range of common programming errors, in-line comments and documentation, complexity, code styling, and more. Static code analysis can be done manually during a code review, or using a tool such as CI tools like Jenkins.
- Be compliant with industry security standards
- Integrate with your IDE for continuous protection
- Target the most important threats first
- Code smells could be removed at the early stage
- Code review requires less time
- Compliance to the code style is verified objectively
- Project maintenance is easier
- Style checks can be part of the CI process
- The code is more readable by using unified code style
At Halodoc, we use SwiftLint in 3 stages

SwiftLint
SwiftLint is an open-source tool to enforce Swift style and convention. SwiftLint allows us to enforce code style rules and stick to it during the development of iOS apps.
You can integrate SwiftLint into the development process and show you how to set up in your local machine and Jenkins server to run the SwiftLint automatically.
Installation
There are many methods to install SwiftLint, It’s important to select the method of installation on CI server as each of them has its own pros and cons. I will show you two of the best methods:
1. Homebrew
SwiftLint can be easily installed using Homebrew package manager without touching the iOS project code and also easy to install with one command
- If you don't have home-brew installed on your machine, do the below commend else skip 1 and move to step 2
ruby -e "$(curl -fsSL https://raw.githubusercontent.com/Homebrew/install/master/install)"
2. Once Homebrew setup, install the SwiftLint
brew install swiftlint
This seems to be the easiest method of installing SwiftLint on any CI server. Some of the cloud CI servers like TravisCI has SwiftLint pre-installed in the macOS images. There are some pros and cons to this method of installation, as follows:
Pros
- Easy to install with one command
- Some Cloud CI servers have a pre-installed version of SwiftLint using Homebrew
- No need to make any changes in the application code
- A script can run independently on CI server without making any changes in the Xcode project
Cons
- Homebrew installs the latest version of SwiftLint every time we run $ brew install
SwiftLintcommand. It’s hard to go back to previous versions if needed - There might be a different version of
SwiftLintrunning on the local machine and CI server. In this case, the users would need to stick to the version of SwiftLint installed on CI server. For example, TravisCI hasSwiftLintversion 0.17.0 installed in Xcode 8.3 macOS image. The latest version of SwiftLint at the time writing this post isSwiftLint0.21.0 and it can be difficult to return to the old version using Homebrew
2. CocoaPods
SwiftLint can also be used as CocoaPods and you can find detailed instructions on how to install SwiftLint using CocoaPods here.
To summarise, we need to get the SwiftLint pod by adding pod ‘SwiftLint’ into Podfile and installing SwiftLint using pod install command. This will create an executable binary inside ./Pods/SwiftLint/swiftlint which can be added to build phases of the target.
This is the recommended approach of installation in the SwiftLint readme file but it also has some pros and cons.
Pros
- We can install a specific version of SwiftLint rather than simply the latest
- Versions are locked inside Podfile.lock file so everyone in the team will be using the same version of SwiftLint including CI
- We can execute SwiftLint using binary located at ./Pods/SwiftLint/swiftlint
Cons
- We have to add another dependency in our application source code
- It will add dependencies and binaries inside Pods/ directory which needs to be checked into the SCM.
There are other methods of SwiftLint installation such as compiling from source and downloading pre-built packages.
Configuration
In addition to applying best practices individually, we want to make the codebase consistent. Make it easier to apply custom rules. These rules should fit best practices, though. Configuring linting is handled from the .swiftlint.yml file. This file sits in project’s main path. We can enable, disable or write custom rules in this YML file. Let’s take a look at some examples.
Create .swiftlint.yml and place it under root directory of your project, as shown below.
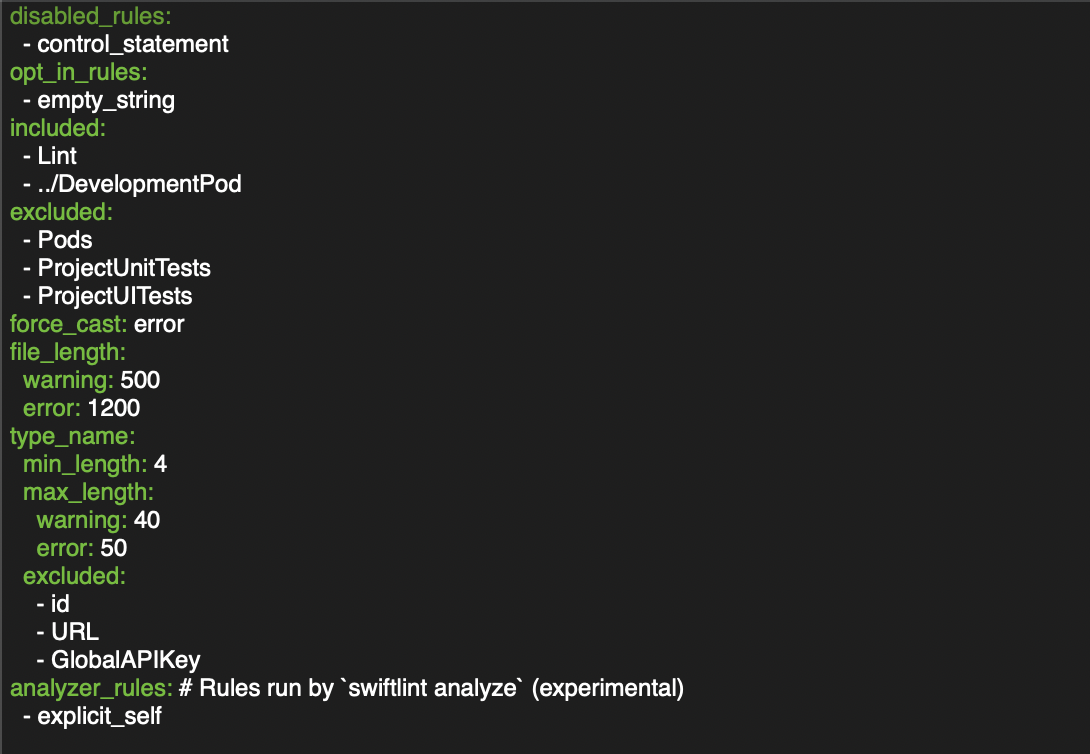
This is an example of a .swiftlint.yml configuration file based on the official SwiftLint documentation. Here are more rules.
It consists of the following sections:
- disabled_rules: Disables rules which are enabled by default
- opt_in_rules: Enables Opt-In rules
- included: List of included directories
- excluded: List of excluded directories
- force_cast: Binary rule that raises either warning or error
- file_length: Rule that can raise both, warning and error depending on a parameter (file length) value
- type_name: The Naming rule that can set minimum and maximum length that raises warning or error. It has also a list of excluded names that, for some important reason, shouldn’t comply with this rule.
- analyzer_rules: This is an entirely separate list of rules that are only run by the analyze command. All analyzer rules are opt-in, so this is the only configurable rule list (there is no disabled/whitelist equivalent).
Nested Configurations
SwiftLint supports nesting configuration files for more granular control over the linting process.
- Include additional .swiftlint.yml files where necessary in your directory structure.
- Each file will be linted using the configuration file that is in its directory or at the deepest level of its parent directories. Otherwise, the root configuration will be used.
- included is ignored for nested configurations.
Auto-correct
SwiftLint can automatically correct certain violations. Files on disk are overwritten with a corrected version.
Please make sure to have backups of these files before running swiftlint autocorrect, otherwise important data may be lost.
Standard linting is disabled while correcting because of the high likelihood of violations (or their offsets) being incorrect after modifying a file while applying corrections.
It’s only a brief overview of available rules configurations but covers most of the popular cases. I suggest you visit the official documentation GitHub page where you can find more sophisticated examples such as creating your own custom rule using a regular expression.
Useful rules
As I’ve stated before, this tool should be used for enforcing an already established code style. However, some of those rules are so helpful on the daily basis that I can’t help myself to suggest you use them :
- Force Try, Force Cast, Force Unwrapping – detects those nasty exclamation marks from your optional values
- Line Length – warns if a line is too long (no more horizontal scrolling during code review!)
- Todo – I don’t know why it isn’t the basic Xcode functionality, but thanks to that rule you won’t miss any TODO anymore
- Large Tuple – helps you avoid passing multiple parameters instead of creating a custom type
- File Length – eliminates all of "God objects" by raising a warning or even an error if the file grows too big
Usage
Integrate SwiftLint into an Xcode scheme to get warnings and errors displayed in the IDE. Just add a new "Run Script Phase":
- Open Xcode project and select the main target → go to Build Phases
- Tap on + to add new run script and name it “Run Script - Swiftlint“
- Add the below script in the script window
if which swiftlint >/dev/null; then
swiftlintelse
echo "warning: SwiftLint not installed, download from https://github.com/realm/SwiftLint"fi - Run build
After the build phase is added, SwiftLint rules are checked at every build of the application. Moreover, after a build is finished you will see every warning and error next to your code in the IDE. It is very useful because you don’t have to leave your workspace anymore and worry about running rules check.
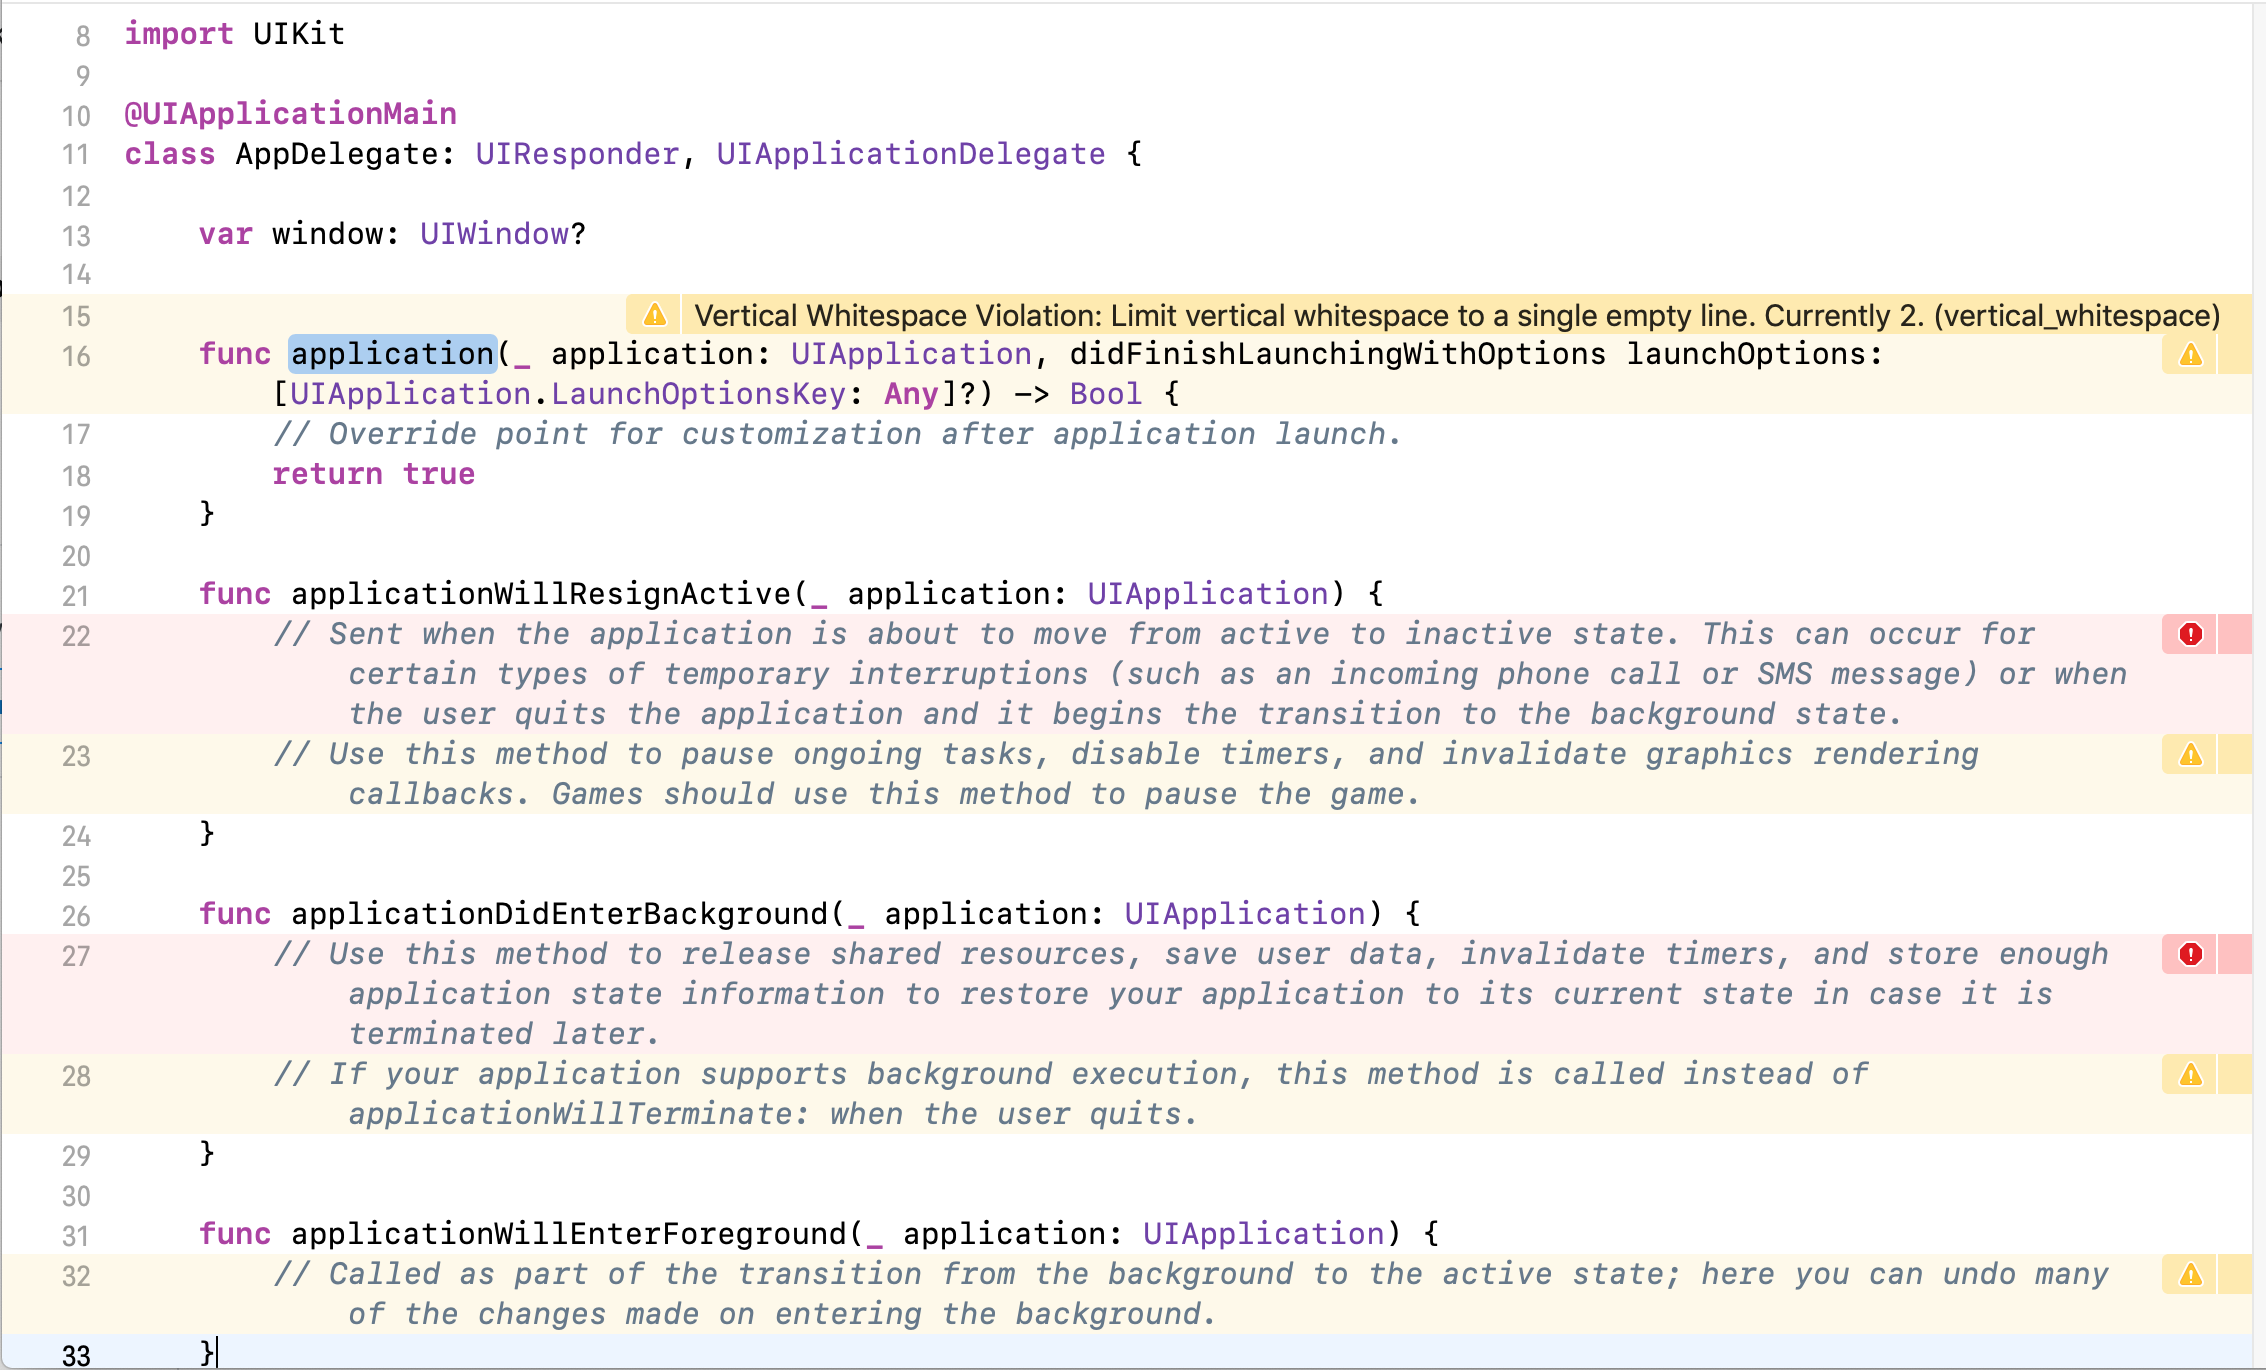
At first sight, it looks pretty bad, but most of these warnings are easy to fix by removing unnecessary spaces, newlines, and comments. After the quick cleanup, almost every warning is gone except one – line length violation caused by UIApplicationDelegate didFinishLaunchingWithOptions method. That’s a great example because it’s quite a common situation when we don’t have full control over the code that is not compliant with the rules.
Disable rules in code
In order to get rid of the warning or error, you can use a comment with syntax shown above which consist of:
swiftlintkeyword- enable or disable the action
Rules can be disabled with a comment inside a source file with the following format:// swiftlint:disable <rule1> [<rule2> <rule3>...]
The rules will be disabled until the end of the file or until the linter sees a matching enable comment:// swiftlint:enable <rule1> [<rule2> <rule3>...]
For example:// swiftlint:disable colonlet noWarning :String = "" // No warning about colons immediately after variable names!// swiftlint:enable colonlet hasWarning :String = "" // Warning generated about colons immediately after variable names
Including the all keyword will disable all rules until the linter sees a matching enable comment:// swiftlint:disable all let noWarning :String = ""// swiftlint:enable all
the scope of action – „next”, „previous”, „this” or blank which applies the rule for all lines of the file below comment// swiftlint:disable:next force_castlet noWarning = NSNumber() as! Intlet hasWarning = NSNumber() as! Int// swiftlint:disable:previous force_cast
You must keep in mind that it is a double-edged sword and it can either help you with 3rd party API’s or be used by lazy developers to remove warnings for a non-compliant code. It is crucial to check if the rule is disabled due to the important reason during the code review process.
Smart Reporting
SwiftLint has different reporting types including xcode, json, csv, checkstyle, junit, html and emoji. The default reporter type is ‘xcode’. It’s a good idea to keep the Xcode reporting for the local execution and generate fancy reports using html or junit on the CI server.
We can change the reporter style using:swiftlint lint --reporter html > swiftlint.html
Pros
- Its open-source tool, so available free of cost
- Very easy to set up and run both locally and CI servers
- Easy to enable or disable the rules, exclude third party libraries using .swiftlint.yml
- Provides many types of reports (xcode, json, csv, checkstyle, junit, html, emoji, sonarqube, markdown)
- Automatically correct certain violations
- Allows developers to add custom rules
Cons
- Creating a unified set of rules for many different projects can take a significant amount of time at the initial stage
- Not each rule from your code style can be checked by SwiftLint
- Does not provide fancy reports.
Rules used at Halodoc
excluded: # paths to ignore during linting. Takes precedence over `included`. - Pods - UITestsincluded: - ../SDKs/DevelopmentPod1 - ../SDKs/DevelopmentPod2 - ../SDKs/DevelopmentPod3 - ../SDKs/DevelopmentPod4 - ../SDKs/DevelopmentPod5disabled_rules: - line_length - type_body_length - identifier_nameopt_in_rules: - closure_spacing - closure_end_indentation - closure_body_length - collection_alignment - conditional_returns_on_newline - contains_over_filter_is_empty - contains_over_filter_count - contains_over_first_not_nil - contains_over_range_nil_comparison - convenience_type - discouraged_object_literal - discouraged_optional_boolean - empty_count - empty_string - fallthrough - file_name_no_space - first_where - flatmap_over_map_reduce - force_unwrapping - function_default_parameter_at_end - implicit_return - implicitly_unwrapped_optional - joined_default_parameter - last_where - literal_expression_end_indentation - multiline_function_chains - no_extension_access_modifier - operator_usage_whitespace - private_action - private_outlet - redundant_optional_initialization - redundant_set_access_control - redundant_type_annotation - sorted_first_last - switch_case_on_newline - unneeded_parentheses_in_closure_argument - unowned_variable_capture - unused_declaration - unused_import - vertical_whitespace_opening_braces - discouraged_optional_collection - enum_case_associated_values_counts - legacy_multiple - legacy_random - indentation_widthforce_cast: error # [NG] as!force_unwrapping: error # [NG] value!indentation: 2file_length: - 2500 - 3000large_tuple: - 5 - 6
SwiftLint provides a default set of rules enabled, we thought those default rules won't be enough, so we have set up our own rules by enabling/disabling the default settings so that we can follow maximum of SwiftLint rules.
There are many rules by default are disabled which actually improves the performance if you follow very strictly,
for example: [].count == 0
We tend to use .count on collections or strings but .isEmpty is the best to check array or dictionary has any items or not.
Another example of a rule to improve performance is: filter { }.last
instead of this, we could use .last(where:), which directly returns the expected results than the filter which might have to loop 2 times to get the result.
We strictly say no to force unwrapping or force cast, so we treat them as "errors" instead of default settings warnings, so that developers won't be ignoring those.
There are many rules like closure_body_length, multiline_function_chains are disabled by default but give you more readability, to structure your code properly.
We have also enabled unused_import, unused_declaration to get rid of unused imports and declarations.
These are few to mention, you can have a look at all the rules enabled/disabled mentioned above.
Conclusion:
SwiftLint is open-source tools, which enforce developers to have strict code styles and guidelines. SwiftLint is simpler and easy to setup and completely free to use in swift project. It seems that SwiftLint with 12.9K GitHub stars and 1.5K forks on GitHub has adopted.
So I recommend SwiftLint for those who want to write a better & easy to maintain swift code. SwiftLint also, help new team members to learn and adapt to coding standards of your team.
We are always looking out to hire for all roles for our tech team. If challenging problems that drive big impact enthral you, do reach out to us at careers.india@halodoc.com
About Halodoc
Halodoc is the number 1 all around Healthcare application in Indonesia. Our mission is to simplify and bring quality healthcare across Indonesia, from Sabang to Merauke. We connect 20,000+ doctors with patients in need through our Tele-consultation service. We partner with 1500+ pharmacies in 50 cities to bring medicine to your doorstep. We've also partnered with Indonesia's largest lab provider to provide lab home services, and to top it off we have recently launched a premium appointment service that partners with 500+ hospitals that allow patients to book a doctor appointment inside our application. We are extremely fortunate to be trusted by our investors, such as the Bill & Melinda Gates Foundation, Singtel, UOB Ventures, Allianz, Gojek and many more. We recently closed our Series B round and In total have raised USD$100million for our mission. Our team works tirelessly to make sure that we create the best healthcare solution personalized for all of our patient's needs, and are continuously on a path to simplify healthcare for Indonesia.