Deep linking using URL scheme in iOS
The ability to launch an app from a URL is a significant iOS feature. It attracts people to your app and allows you to establish shortcuts to certain functions. We'll look at deep linking on iOS and how to make an app's URL scheme.
When we talk about deep linking for mobile apps, we're referring to the process of creating a unique URL to launch a mobile app. It's split into two parts:
- a unique URL scheme registered by your app:
scheme://blogs - a universal link that opens your app from a domain that has been registered:
mydomain.com/blogs
On this blog, we'll concentrate on the first one. We will primarily focus on UIKit implementation code, but we'll also quickly discuss SwiftUI if that's what you're looking for.
Configuring a URL Scheme
Whether you're using SwiftUI or UIKit, setting up a custom URL scheme for iOS is the same. Select your target in Xcode's project setup and navigate to the Info tab. At the bottom of the page, you'll find a URL Types section.
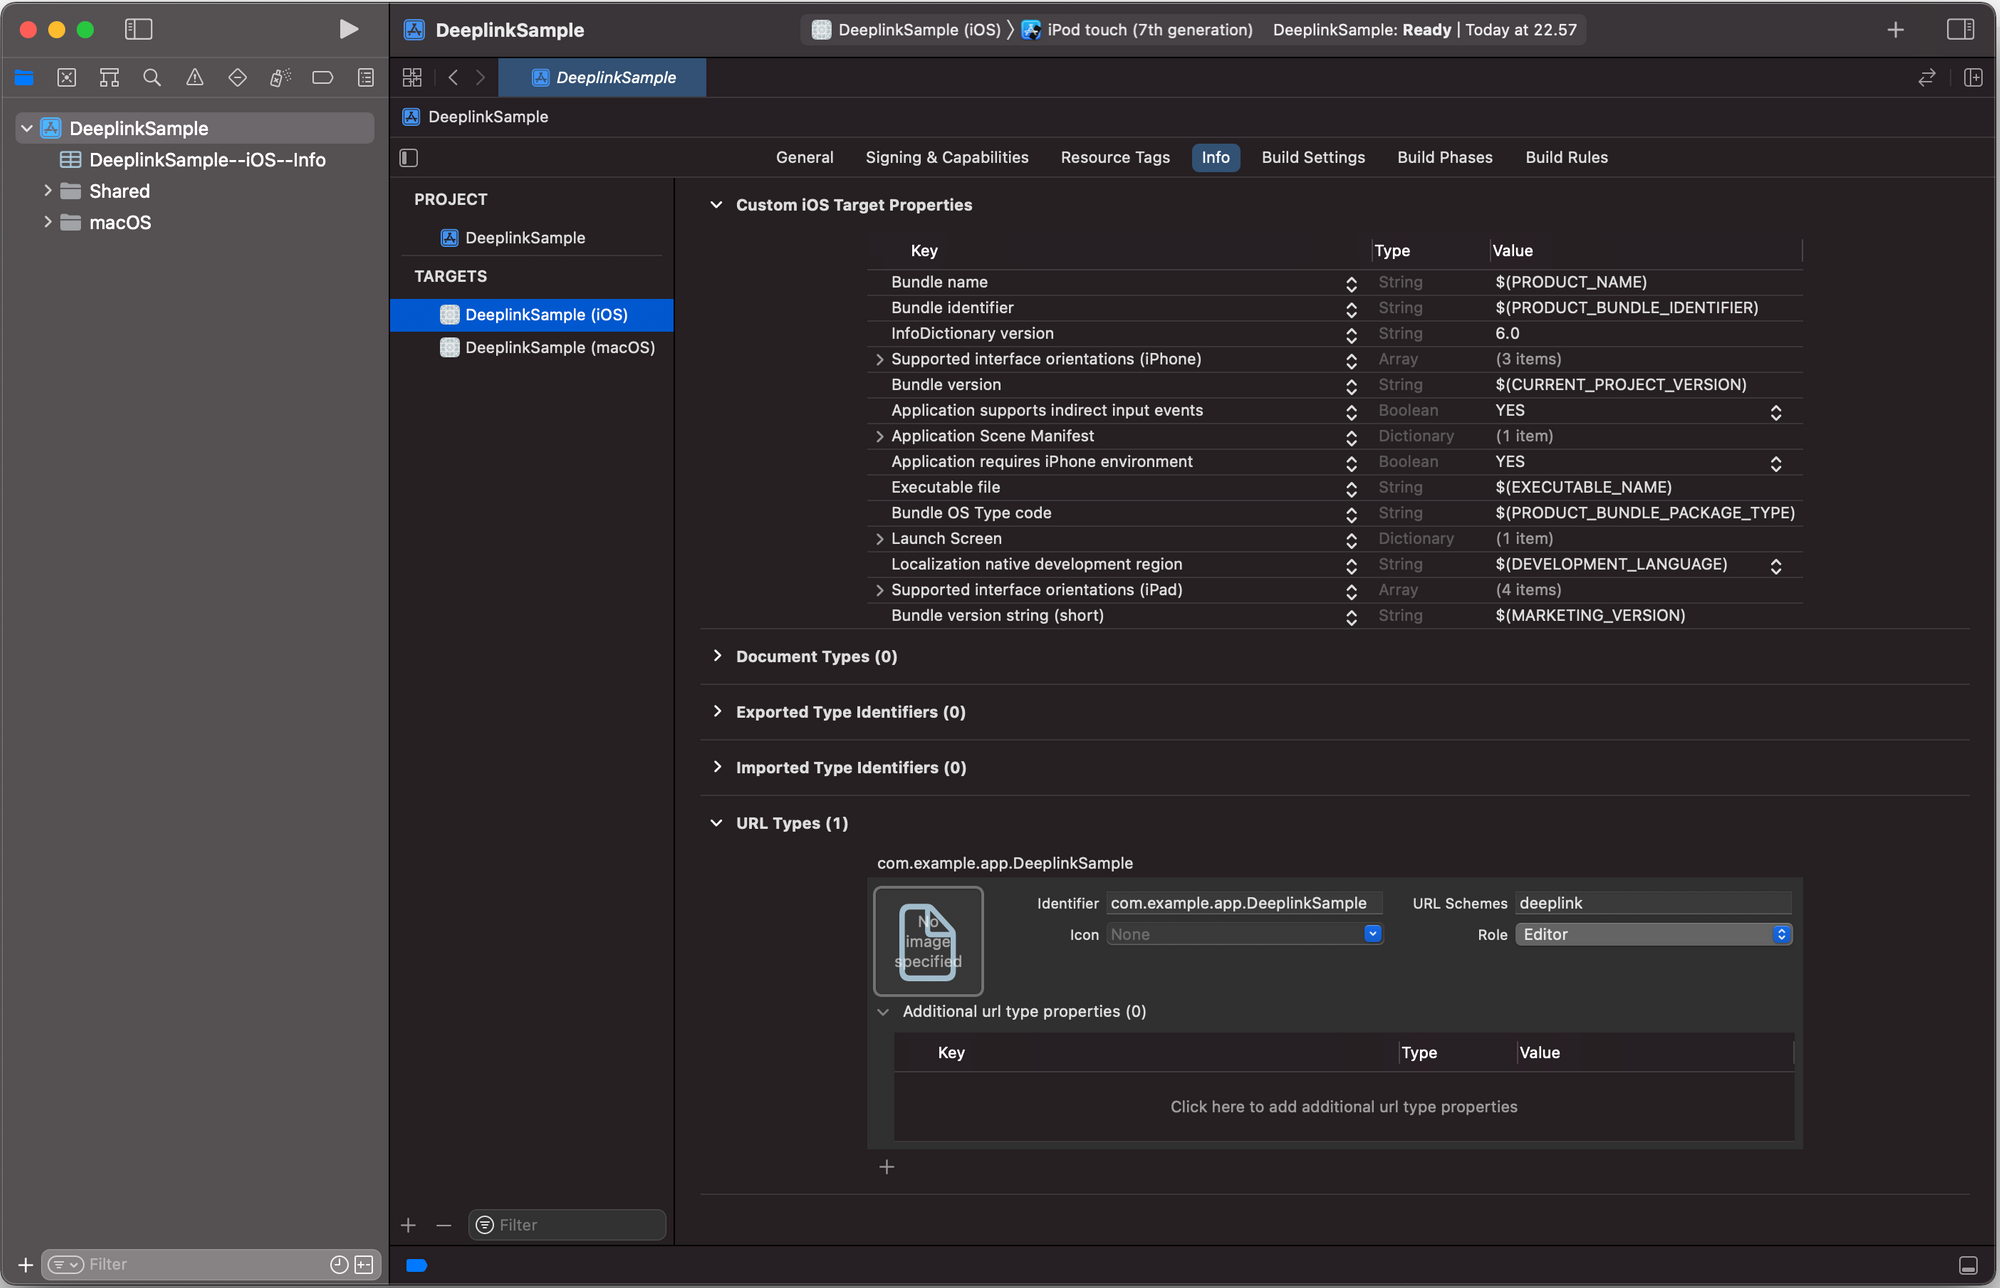
Clicking +, We can create a new type. For the identifier, people often reuse the app bundle. For URL Schemes, We recommend using the app name (or abbreviated) to keep things as brief as possible. There should be no custom characters in it. We'll use deeplink as an example.
That’s it. The app is ready to recognize the new URL, now we need to handle it when we receive one.
SwiftUI deep linking
If you don’t have any AppDelegate and SceneDelegate files, which is most of the case for SwiftUI implementation, we don’t have much work to do.
In the App implementation, we can capture the url open from onOpenURL(perform:) action.
import SwiftUI

@main
struct DeeplinkSampleApp: App {
    var body: some Scene {
        WindowGroup {
            ContentView()
                .onOpenURL { url in
                    print(url.absoluteString)
                }
        }
    }
}
To test it, we can install the app on a simulator and launch the given url from the Terminal app
xcrun simctl openurl booted "deeplink://test"It's really cool! Let's have a look at how the UIKit implementation differs.
UIKit deep linking
On paper, the way we handle deep linking should be the same whether we use UIKit or SwiftUI. However, having an AppDelegate or SceneDelegate, which are more frequent in UIKit apps, is the most common solution.
The app captures the deeplink opening from the following way in earlier apps that just have AppDelegate.
extension AppDelegate {

    func application(_ app: UIApplication, open url: URL, options: [UIApplication.OpenURLOptionsKey: Any]) -> Bool {

        print(url.absolueString)
        return true
    }
}
The function return a Boolean if the app can handle that given url.
For newer apps that includes SceneDelegate, the callback will be there. It’s important to note that the AppDelegate won’t get called, even if you implement it.
extension SceneDelegate {
    func scene(_ scene: UIScene, openURLContexts URLContexts: Set<UIOpenURLContext>) {
        guard let firstUrl = URLContexts.first?.url else {
            return
        }

        print(firstUrl.absoluteString)
    }
}
We can see that we don't need to return any results in this implementation. The parameter supplied is now a Set<> rather as a URL, and it's used to open one or more URLs. As we can't think of a scenario where we'd need more than one URL, so we'll simply retain one for now.
We may install the program on our simulator in the same way we did before to test if everything is working properly. Our deeplink URL should be printed.
xcrun simctl openurl booted "deeplink://test"Once it’s setup, the idea is to create routes to identify and open the right screen. Let’s dive in.
Deeplink handler implementations
The concept is simple: for each link, we must determine which user journey or page we should open. We'll be smarter and divide to conquer, because there could be many features across the app and we don't want to deal with a large switch scenario.
Let's pretend we have a blogs editing program for this example. There are three primary tabs: one for editing a new blog, another for listing the blogs that have been modified, and a third for an account page containing other app and user information.
We can think of three main paths
deeplink://blogs/new- start a new blog edition journeydeeplink://blogs- lands on blogs listing tab screendeeplink://account- lands on account screen
First, we’ll create a protocol of deeplink handler to define the minimum requirements of any new handlers.
protocol DeeplinkHandlerProtocol {
    func canOpenURL(_ url: URL) -> Bool
    func openURL(_ url: URL)
}
We will also define a DeeplinkCoordinator that will holds on the handlers and find the right one to use. It also returns a Boolean like the AppDelegate has, so we can use in different implementations.
protocol DeeplinkCoordinatorProtocol {
    @discardableResult
    func handleURL(_ url: URL) -> Bool
}

final class DeeplinkCoordinator {

    let handlers: [DeeplinkHandlerProtocol]

    init(handlers: [DeeplinkHandlerProtocol]) {
        self.handlers = handlers
    }
}

extension DeeplinkCoordinator: DeeplinkCoordinatorProtocol {

    @discardableResult
    func handleURL(_ url: URL) -> Bool {
        guard let handler = handlers.first(where: { $0.canOpenURL(url) }) else {
            return false
        }

        handler.openURL(url)
        return true
    }
}
Now we can define separate handlers, one for each different path. Let’s start first with the Account journey, the simplest one.
final class AccountDeeplinkHandler: DeeplinkHandlerProtocol {

    private weak var rootViewController: UIViewController?
    init(rootViewController: UIViewController?) {
        self.rootViewController = rootViewController
    }

    // MARK: - DeeplinkHandlerProtocol

    func canOpenURL(_ url: URL) -> Bool {
        return url.absoluteString == "deeplink://account"
    }

    func openURL(_ url: URL) {
        guard canOpenURL(url) else {
            return
        }

        // mock the navigation
        let viewController = UIViewController()
        viewController.title = "Account"
        viewController.view.backgroundColor = .yellow
        rootViewController?.present(viewController, animated: true)
    }
}
To keep it simple, we only test for the matching url and navigate to the right screen. We will also set a background color to see what is our landing. In our case, we can just set the right UIViewController rather than an empty one.
We will do the same for the different blog journeys.
final class BlogsDeeplinkHandler: DeeplinkHandlerProtocol {

    private weak var rootViewController: UIViewController?
    init(rootViewController: UIViewController?) {
        self.rootViewController = rootViewController
    }

    // MARK: - DeeplinkHandlerProtocol

    func canOpenURL(_ url: URL) -> Bool {
        return url.absoluteString.hasPrefix("deeplink://blogs")
    }

    func openURL(_ url: URL) {
        guard canOpenURL(url) else {
            return
        }

        // mock the navigation
        let viewController = UIViewController()
        switch url.path {
        case "/new":
            viewController.title = "Blog Editing"
            viewController.view.backgroundColor = .orange
        default:
            viewController.title = "Blog Listing"
            viewController.view.backgroundColor = .cyan
        }

        rootViewController?.present(viewController, animated: true)
    }
}
Now we can inject them into the DeeplinkCoordinator and let it handle the right route. We’ll have two variations, the first one for AppDelegate.
class AppDelegate: UIResponder, UIApplicationDelegate {

    lazy var deeplinkCoordinator: DeeplinkCoordinatorProtocol = {
        return DeeplinkCoordinator(handlers: [
            AccountDeeplinkHandler(rootViewController: self.rootViewController),
            BlogsDeeplinkHandler(rootViewController: self.rootViewController)
        ])
    }

    var rootViewController: UIViewController? {
        return window?.rootViewController
    }

    // ...

    func application(_ app: UIApplication, open url: URL, options: [UIApplication.OpenURLOptionsKey: Any]) -> Bool {
        return deeplinkCoordinator.handleURL(url)
    }
}
And the second one for the SceneDelegate
class SceneDelegate: UIResponder, UIWindowSceneDelegate {

    lazy var deeplinkCoordinator: DeeplinkCoordinatorProtocol = {
        return DeeplinkCoordinator(handlers: [
            AccountDeeplinkHandler(rootViewController: self.rootViewController),
            BlogsDeeplinkHandler(rootViewController: self.rootViewController)
        ])
    }()

    var rootViewController: UIViewController? {
        return window?.rootViewController
    }

    // ...

    func scene(_ scene: UIScene, openURLContexts URLContexts: Set<UIOpenURLContext>) {
        guard let firstUrl = URLContexts.first?.url else {
            return
        }

        deeplinkCoordinator.handleURL(firstUrl)
    }
}
We can test it again the same way we did so far, hoping to land on the right screen (expecting orange background).
xcrun simctl openurl booted "deeplink://blogs/new"Conclusion
To conclude, we established a funnel to capture all deep links used to start the app and utilized protocol oriented programming to generate multiple implementations of handlers, one for each individual path, after the URL scheme was set up.
This approach is easily extendable for newer paths and can be unit tested to ensure that each component performs as expected.
However, for safer behavior, a few enhancements, such as checking the whole path rather than the relative one, could be made. The navigation is simply present to focus on the handler rather than the transition.
If you're passing parameters across your deeplink for security reasons, double-check the type and values expected. If we're not careful, it could reveal several injection issues.
From there, you should have a good understanding of how to use and handle deeplink to open your app and jump to a specific screen.
One thing we need to note, when people tap on deeplink, we are not opening or starting the app with that specific page. Instead, we will go through the application flow for that specific page.
Join us
Scalability, reliability, and maintainability are the three pillars that govern what we build at Halodoc Tech. We are actively looking for engineers at all levels and if solving hard problems with challenging requirements is your forte, please reach out to us with your resumé at careers.india@halodoc.com.
About Halodoc
Halodoc is the number 1 all-around Healthcare application in Indonesia. Our mission is to simplify and bring quality healthcare across Indonesia, from Sabang to Merauke. We connect 20,000+ doctors with patients in need through our Tele-consultation service. We partner with 3500+ pharmacies in 100+ cities to bring medicine to your doorstep. We've also partnered with Indonesia's largest lab provider to provide lab home services, and to top it off we have recently launched a premium appointment service that partners with 500+ hospitals that allow patients to book a doctor appointment inside our application. We are extremely fortunate to be trusted by our investors, such as the Bill & Melinda Gates Foundation, Singtel, UOB Ventures, Allianz, GoJek, Astra, Temasek, and many more. We recently closed our Series C round and In total have raised around USD$180 million for our mission. Our team works tirelessly to make sure that we create the best healthcare solution personalised for all of our patient's needs, and are continuously on a path to simplifying healthcare for Indonesia.