
Web Performance Budget Tracking Using Lighthouse
This blog is in continuation to my previous blog, where I mainly discussed about continuous monitoring of any website performance metrics. In this blog, I will be talking about, how we can track the performance budget of any webpage and integrate it with the CI/CD pipeline to prevent any performance deterioration due to newly added code.
To some of us it may look similar to the previous blog, but the use case we are trying to solve here is different. So, first let me briefly explain about why we needed this at Halodoc?
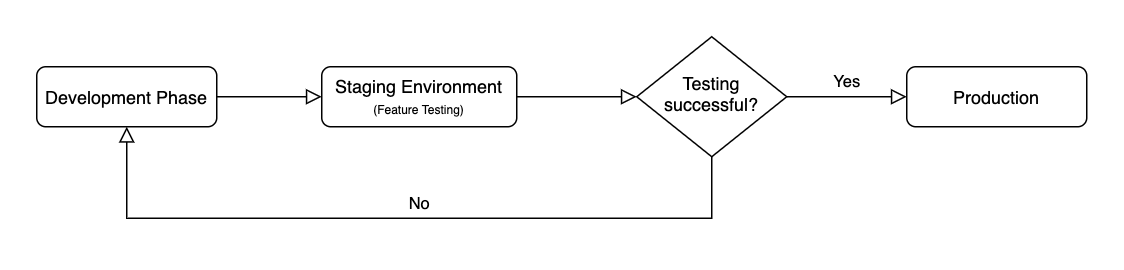
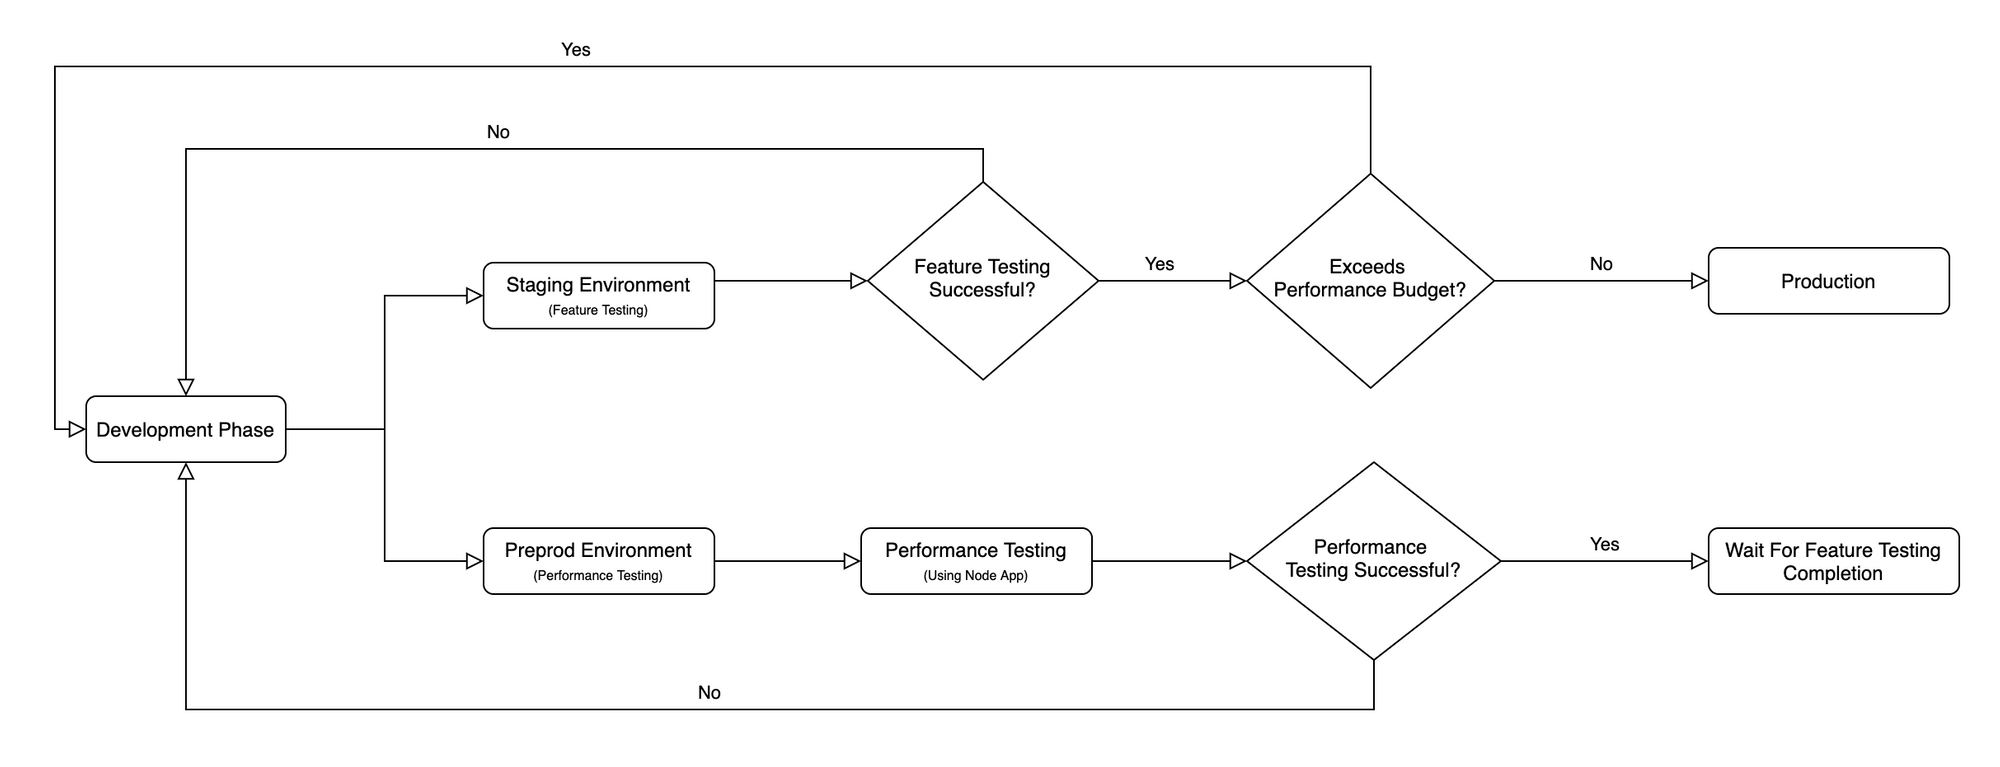
Monitoring the performance metrics for web pages was not enough as this was more of a reactive approach. We were able to act only after performance degraded. So, we decided to go for the proactive approach. In other terms, we will do the performance testing on to be deployed code rather than deployed code. So every release we will have performance testing on the web pages along with the feature testing. With this, any performance issue with the newly added code can be caught before hand.
Now, before I begin with the process, let me talk little bit about what does a budget actually mean for the web pages?
What is Web Performance Budget?
It's a set of limits to certain metrics that affect site performance. These limits should not be exceeded in the design and development of any web application. It could be the total size of a page, total size of images that a page has to load or even the number of HTTP requests that the webpage generates.
A budget exists to reflect reachable goals. It's a tradeoff between user experience, against other performance indicators (e.g. conversion rate). Metrics for the budget can include:
- Milestone timings: Timings based on the user's experience while loading a page like, Time to interactive (TTI), First contentful paint (FCP) etc.
- Quantity-based metrics: Based on raw values like, amount of JS files, total image size, number of HTTP requests etc.
- Rule-based metrics: Scores generated by tools such as Lighthouse or WebPageTest.
Now since we are clear with why & what. Let's talk about how. How do we achieve this?
The complete process has been broken down into four steps:
- Budget finalization
- Preprod environment setup
- Node app creation
- Production build configuration
Budget finalization
As a first step, we need to first choose the metrics and define a budget for them. There are many different website speed testing tools that can be used to analyse things like total page weight, number of HTTP requests, total blocking time etc. and define the web performance budget.
NOTE: The performance budget needs to be revisited periodically, once some improvement in seen in any of the metrics.
Preprod environment setup
Preprod environment is a production-like testing environment, which can be used for testing during development phase.
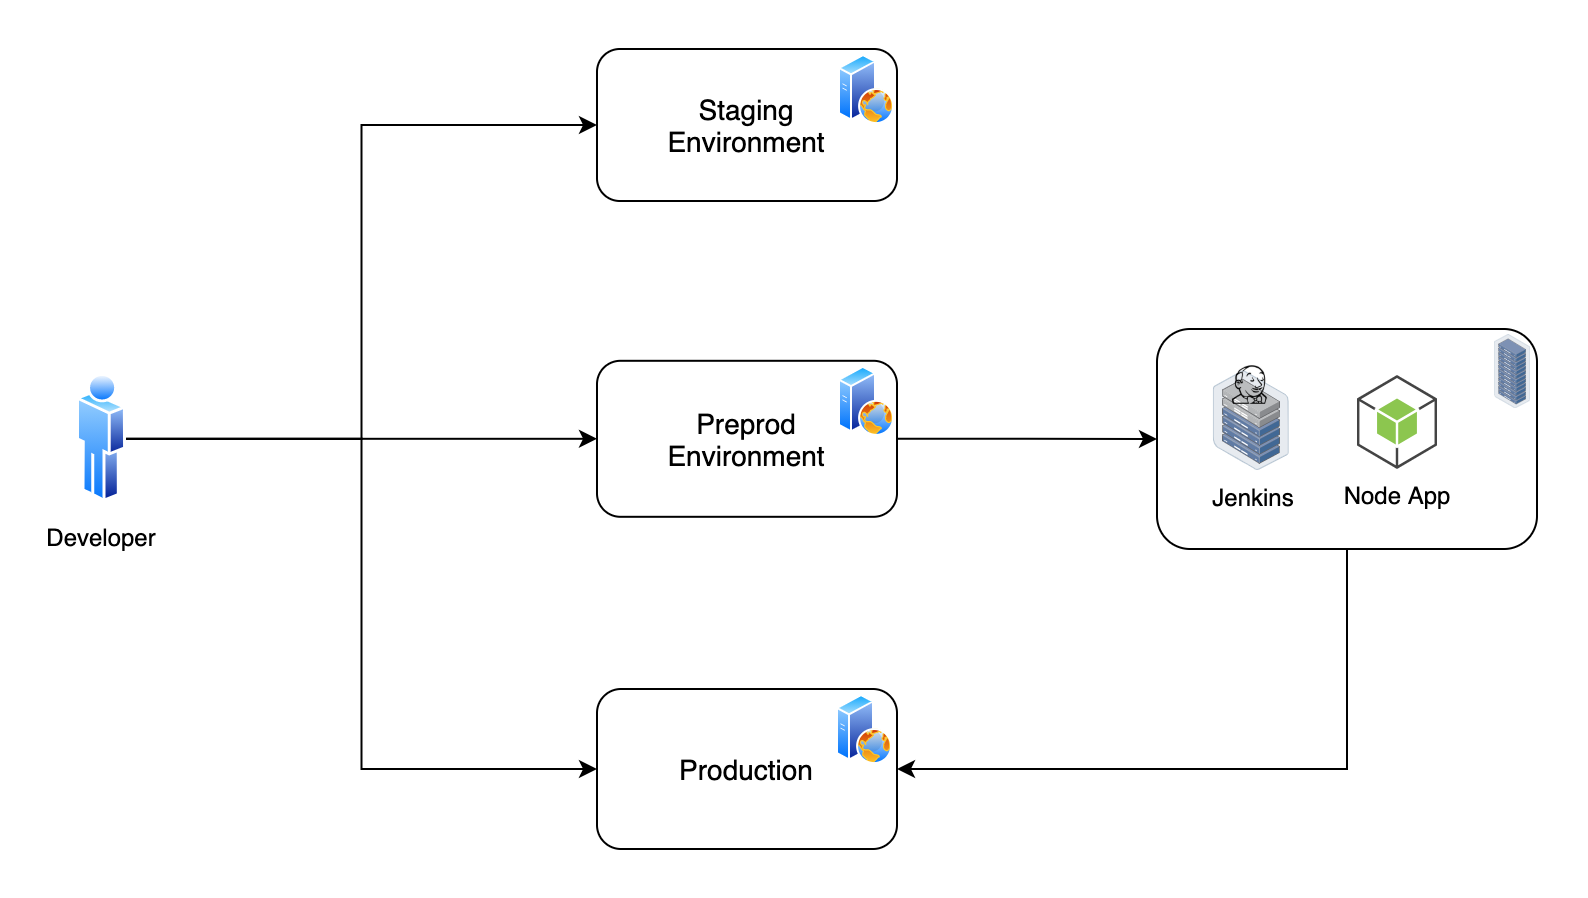
We need to host the web application in an environment that is similar to the production one. You may think, why do we need to setup a preprod environment and why not use the staging environment where the features get tested?
We wanted to run the test on an environment that is as close as possible to the production environment, so that we get more accurate numbers for all the testing metrics. Also, the staging environment didn't have the optimized code and right set of data for the web pages.
Node app creation
Once done with the preprod environment setup, create a small node application that can be used to run the performance analysis on the webpages. We used Lighthouse for this.
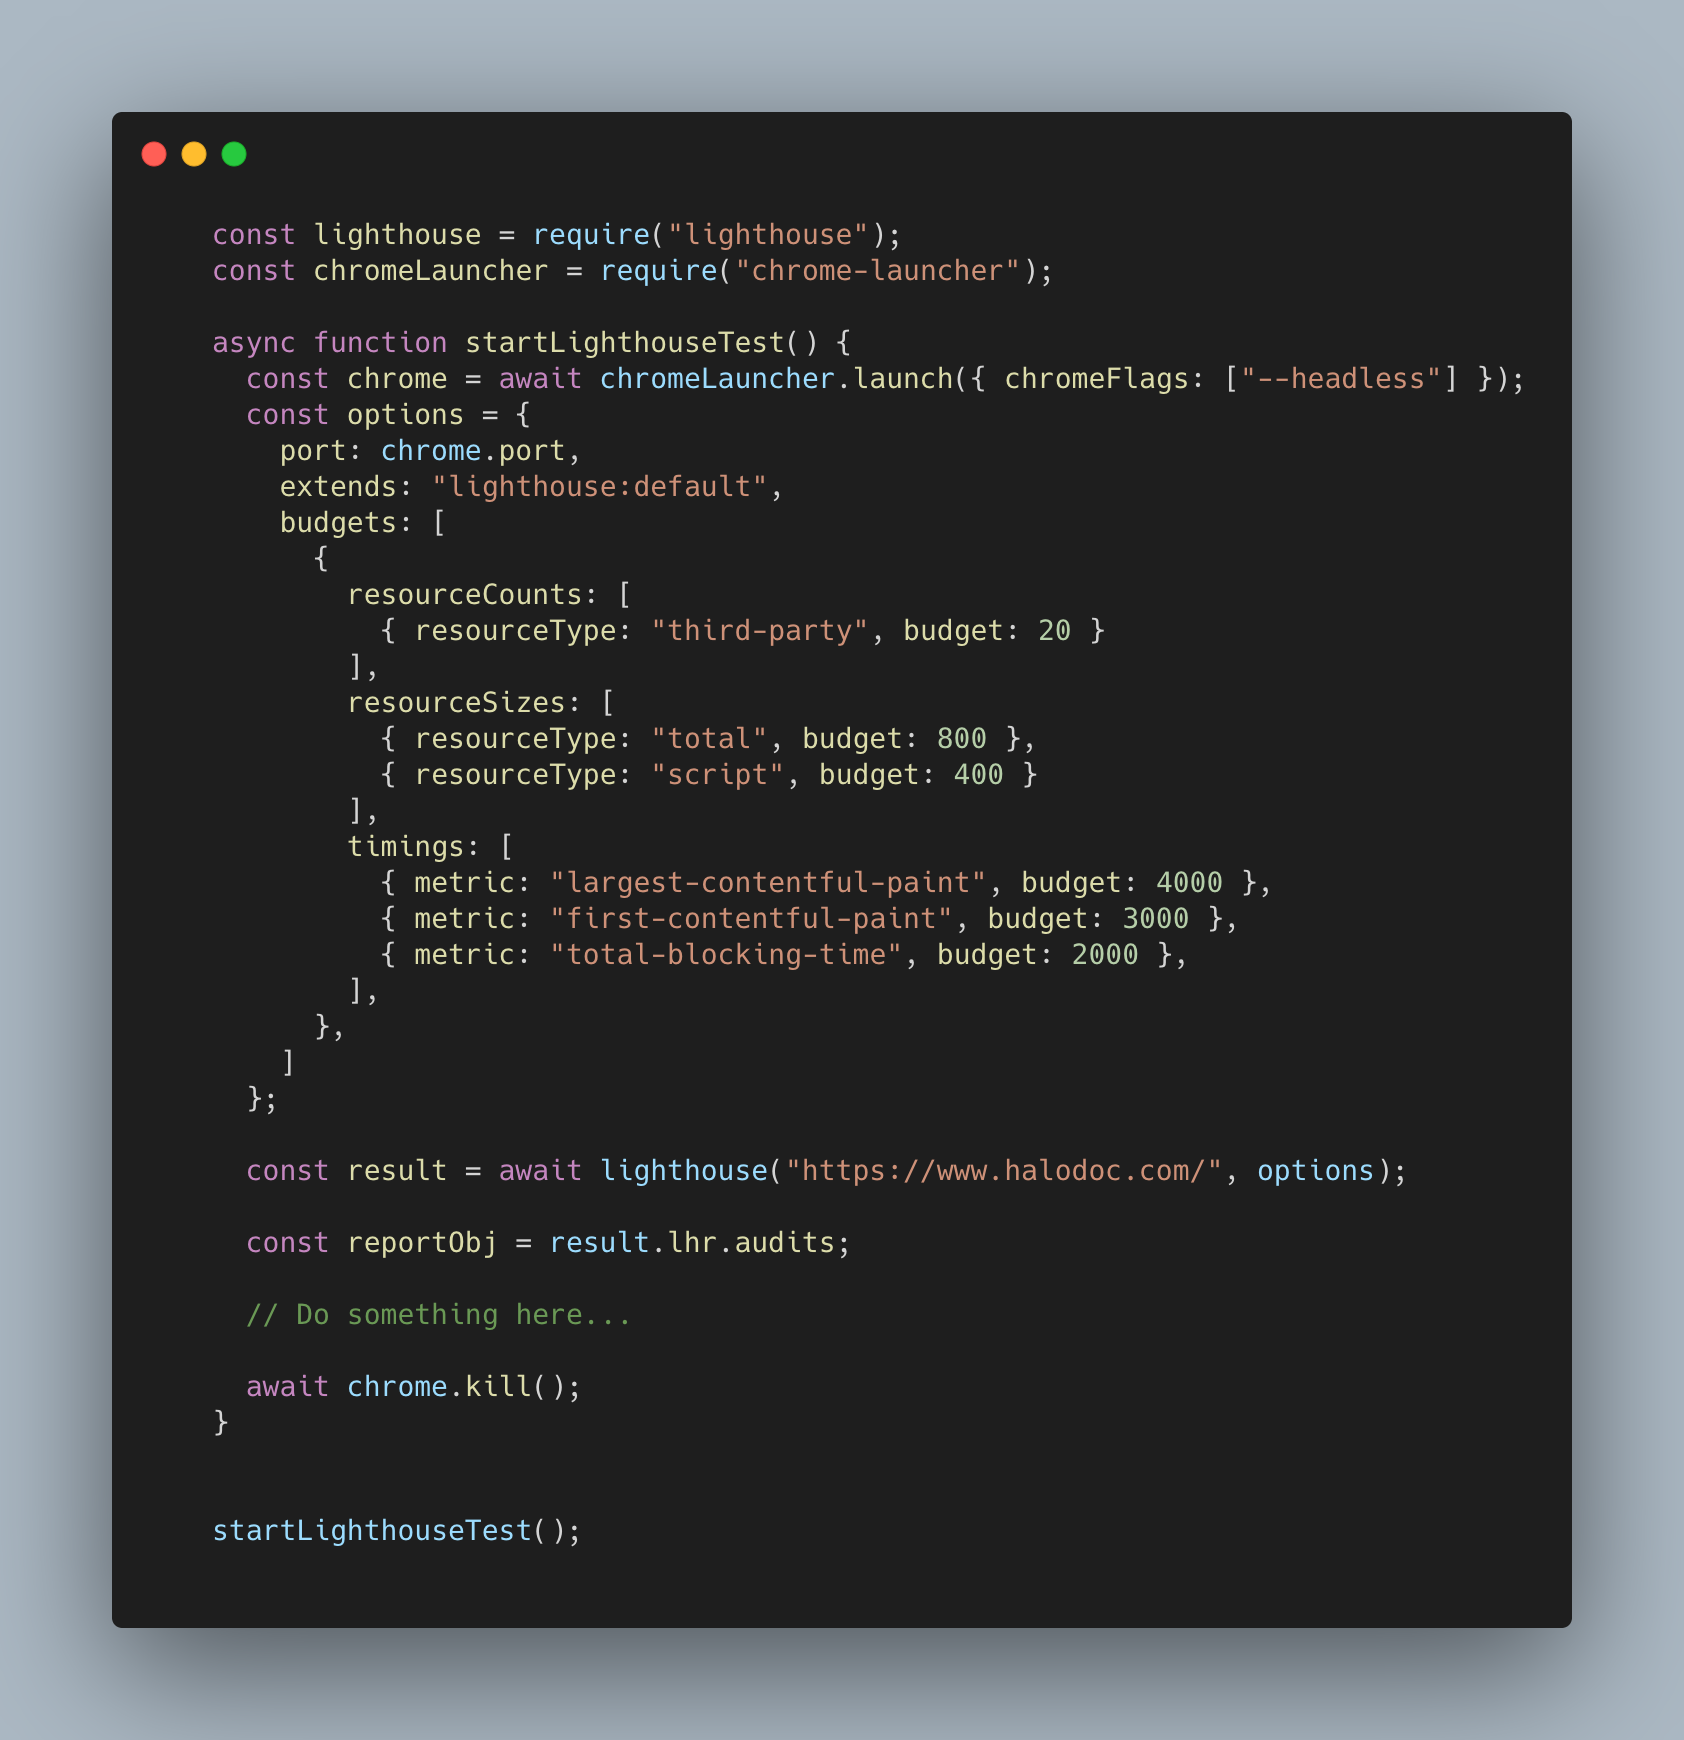
The result object that lighthouse API returns, can be compared with the budget that we defined in step one and generate a custom report for the over budget metrics.
Please refer this documentation link for more information on using Lighthouse programmatically with the Node module.
Once the app is ready, create a job on Jenkins (or any other automation server) to run the above application and create a report for you.
Production build configuration
This step is mainly about preventing the production deployment if there is any performance issue with the newly added code. The custom report that got generated in the previous step can be used in the CI/CD pipeline for production deployment. It can be configured to read the report and abort the deployment if the report has any over budget data.
Few additional things to note...
The existing feature deployment process for staging environment will remain as it is. We will not be touching the existing feature testing process. Some additional effort is needed during the development cycle.
- Parallel to the feature deployment for staging environment, the developer has to deploy the changes to the preprod environment for performance testing.
- It's not necessary to do a preprod deployment for every single stage deployment, as sometime stage deployment may be for some minor bug fixes. The developer needs to take a conscious decision on the preprod deployment. Ideally, recommended to go for the preprod deployment after all the major changes are ready for feature testing.
- Once the changes are deployed to preprod environment, run the performance test and check the report. If anything is over budget, revisit the deployed changes.
Conclusion
This process does add some overhead for a developer but at the same time if you look at the brighter side, its preventing the future rework and preventing the webpages from deteriorating in terms of performance. Also, It doesn't block the feature development cycle, so feature and performance testing can happen parallely. At the end, it's all about improving the webpage performance and hence the user experience.
Let's be Proactive rather than Reactive...
Join us
We are always looking out to hire for all roles in our tech team. If challenging problems that drive big impact enthral you, do reach out to us at careers.india@halodoc.com
About Halodoc
Halodoc is the number one all around Healthcare application in Indonesia. Our mission is to simplify and bring quality healthcare across Indonesia, from Sabang to Merauke.
We connect 20,000+ doctors with patients in need through our Tele-consultation service. We partner with 2500+ pharmacies in 100+ cities to bring medicine to your doorstep. We've also partnered with Indonesia's largest lab provider to provide lab home services, and to top it off we have recently launched a premium appointment service that partners with 500+ hospitals that allows patients to book a doctor appointment inside our application.
We are extremely fortunate to be trusted by our investors, such as the Bill & Melinda Gates foundation, Singtel, UOB Ventures, Allianz, Gojek and many more. We recently closed our Series B round and In total have raised USD$100million for our mission.
Our team work tirelessly to make sure that we create the best healthcare solution personalised for all of our patient's needs, and are continuously on a path to simplify healthcare for Indonesia.