
Android Regression Suite Optimization at Halodoc
At Halodoc, to ensure the stability of our Android app releases, we conduct weekly and daily scheduled regression testing, utilizing automated testing tools integrated into our continuous integration and deployment pipelines. Our comprehensive test suite covers critical paths, core functionalities and diverse usage scenarios, with a focus on both new and existing features.
Creating a Behaviour-Driven Development (BDD) framework for automated testing is an excellent way to ensure the quality of our app. The number of scenarios increases with the addition of new features. However, as your test suite grows, you might notice that the execution time becomes a bottleneck. To address this issue, you should consider implementing parallel test execution and optimizing your test suite. In this blog, we'll explain the steps to achieve parallel execution in a BDD framework at Halodoc.
Introduction
Building a BDD framework with parallel execution in mind from the beginning is a wise strategy. By designing your framework with parallelism in mind, you'll save yourself time and effort down the road and ensure that it can scale to accommodate a growing number of scenarios. Implementing parallel execution in the existing BDD framework might indeed require some initial time and effort, but it's a decision that can yield significant benefits in the long run and is often well worth the investment.
Here are some best practices to consider while creating a BDD framework that is parallel-execution friendly:
Step 1: Choose the right BDD Framework
Before implementing parallel execution, ensure you've chosen a BDD framework that supports parallelism. We assume the reader has good knowledge of BDD with the TestNG framework. Here at Halodoc, we are using Cucumber + TestNG and Appium Driver, pages were implemented in POM (Page Object Model is one of the best routes to choose, to create manageable and reusable tests, avoid code duplication, and make testing more simpler), using Gradle as the build tool and writing scripts in Java.
Step 2: Configure Your Test Environment
Ensure your test environment can support parallel execution. This typically involves setting up multiple test runners and ensuring they don't interfere with each other.
Test Data Management:
Managing test data inefficiently, such as reloading large datasets for each parallel thread, can slow down test execution and lead to data conflicts. Optimize your test data management to reduce the overhead of data setup and teardown. Use lightweight data where possible, shared data sources, or create separate data for each thread as needed and avoid reloading large datasets for each scenario.
Step 3: Appium Driver
Appium Driver is defined inside the 'DriverUtils' class, inside the DriverUtils class we should define all the desired capabilities related to accessing the Android device and Halodoc application and will return the Driver for using in other places.
Step 4: Create a Runner Configuration
In our existing framework, a runner file instance was created and is used by the entire framework at step definition files and page class files for instantiating user properties. This created a problem in implementing parallel execution as it requires multiple runner files. Whenever we execute another runner file, it will throw a null pointer exception as it tries to create an instance of the runner file that was not invoked. So have removed the runner file instance and have initialized the user properties in an alternate way. You'll need to create a multiple-runner configuration that specifies which features to run in parallel. Here's an example for Cucumber runner file:
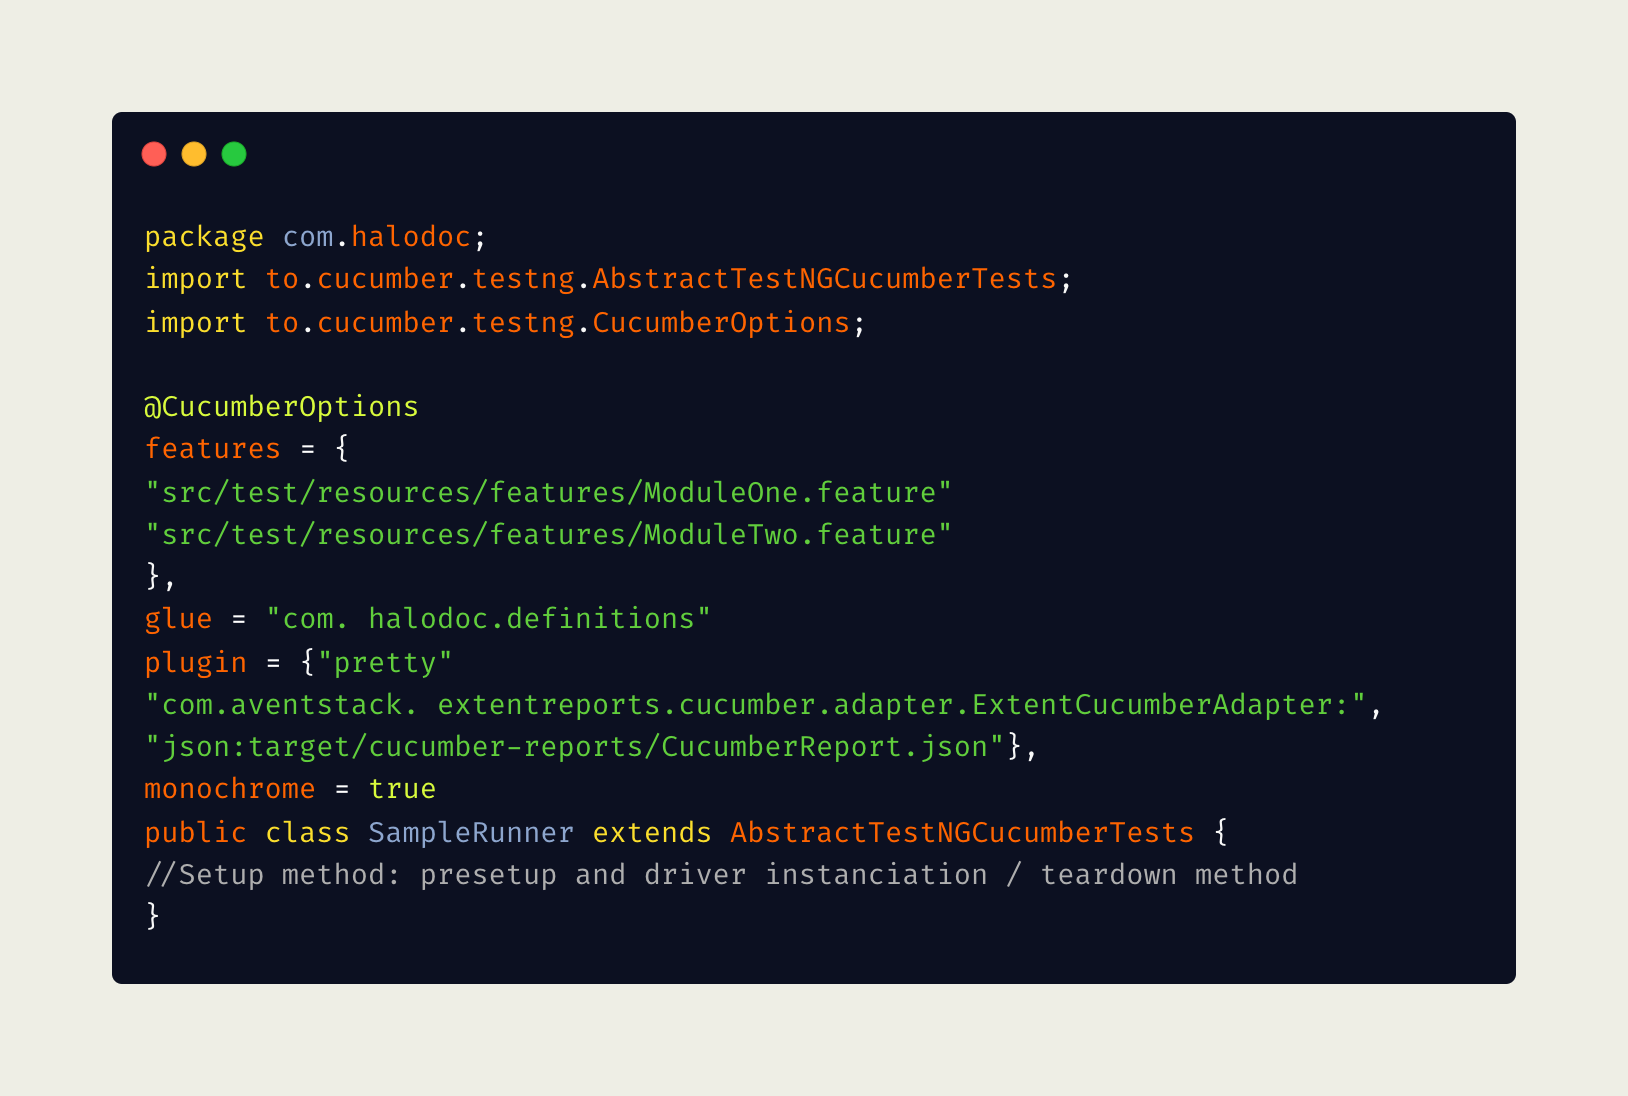
Like the above, you have to create multiple runner files, based on your need and test environment configuration in step 2.
Scalability:
Consider scaling your test environment horizontally to handle parallel execution. This might involve distributing your tests across multiple machines or using containerization technologies like Docker. This is what exactly we have done in our framework by creating different Instants to achieve the parallel execution.
Step 5: TestNG
In testNG, we can achieve parallel execution in two ways. One with TestNG.xml file and we can configure an independent test method to run in multiple threads. In this blog, we achieve parallel execution using a TestNG.xml file. Below is the simple TestNG.xml file where you observe two attributes 'parallel' and 'thread-count' at the suite level.
As we want runner files to be executed in parallel, we have provided parallel value as the 'tests' and 'thread-count' attribute is to be used to pass the number of maximum threads to be created. If you observe some parameters are defined under the test tag where connected device os versions are defined, device UDID which can be obtained from the adb devices command and Appium port with which different Appium servers are created and executed individually on different devices. These parameters are being passed in the runner file based on which driver is initialized.

This configuration is used to run the runner files in parallel. In our setup, this configuration is not required as we are using different machines, so the XML file with a single test tag is sufficient without parallel and thread-count attributes. In the future, if the setup is moved to a single machine or if we need to run more parallel runners on the same machine then this would be helpful with an extra test tag.
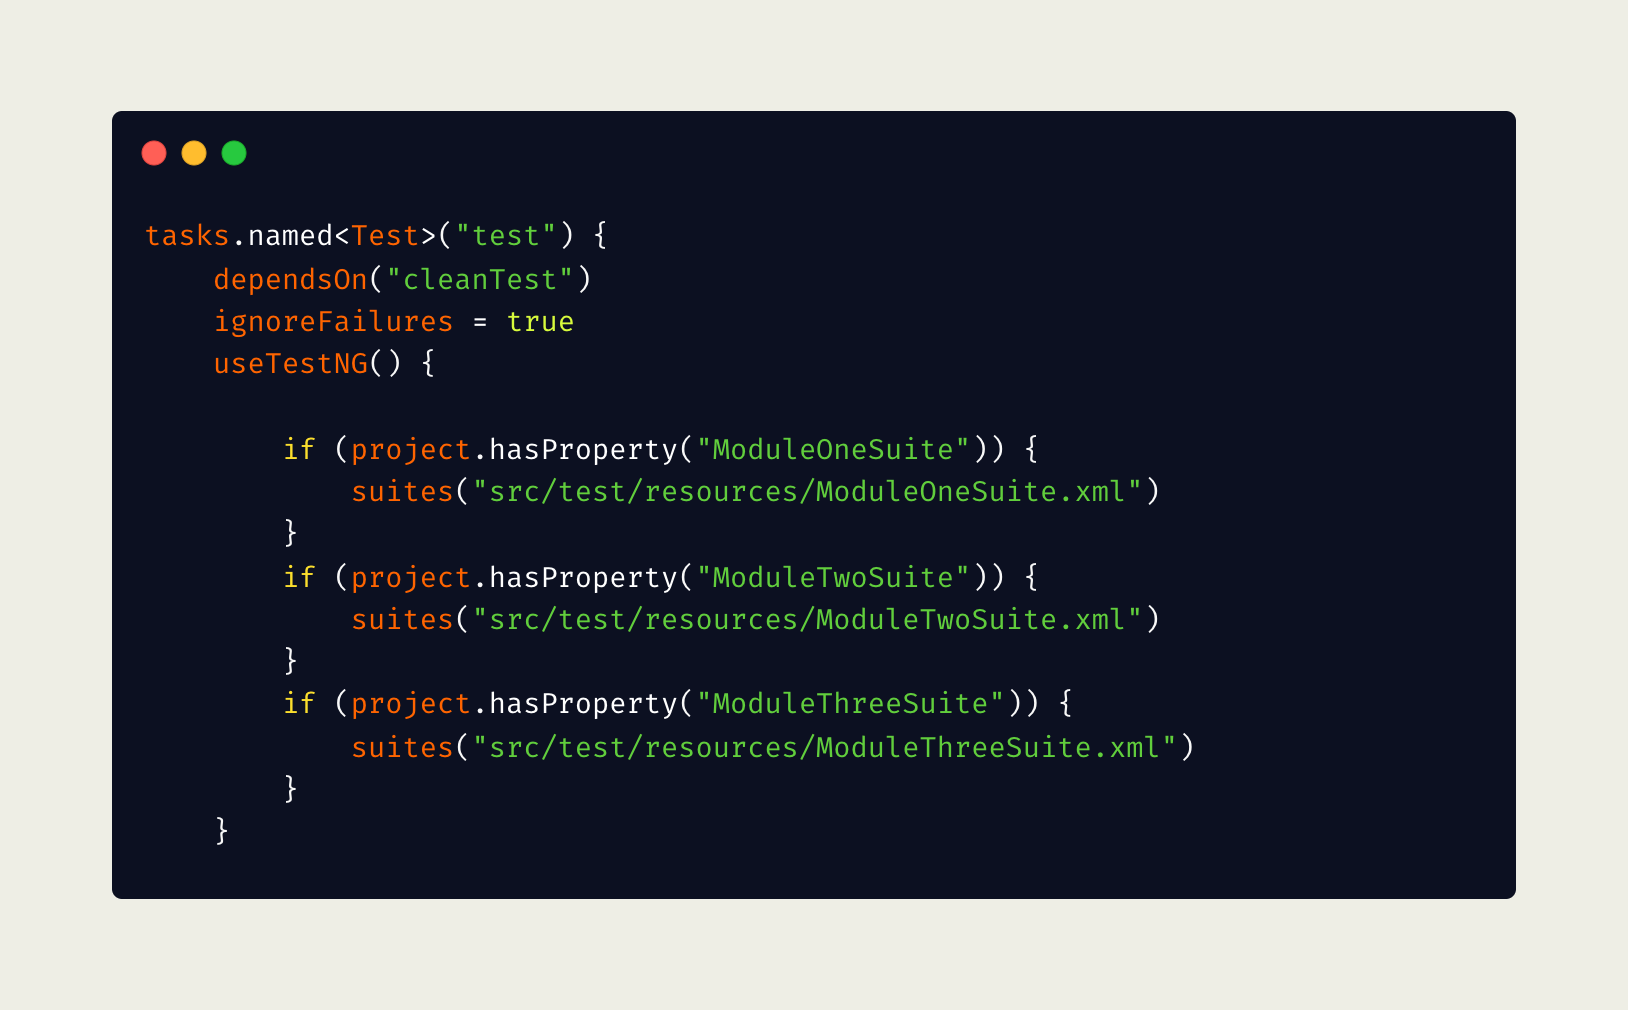
Step 6: Gradle
Gradle is the most popular build system for the JVM and is the default system for Android and Kotlin Multi-Platform projects. Project property can be set from the command line using the -P / --project-prop environment option. We have set the properties in the following code which are utilized while running the tests using the Gradle command.
We can use below Gradle command to run the suite parallel
./gradlew --no-build-cache clean test -PmoduleOneSuite && ./gradlew --no-build-cache clean test -PmoduleTwoSuite && ./gradlew --no-build-cache clean test -PmoduleThreeSuite
Step 7: Execute Tests in Local
There are multiple ways to execute the scenarios, here we are going to discuss using run configuration and Gradle commands from the terminal.
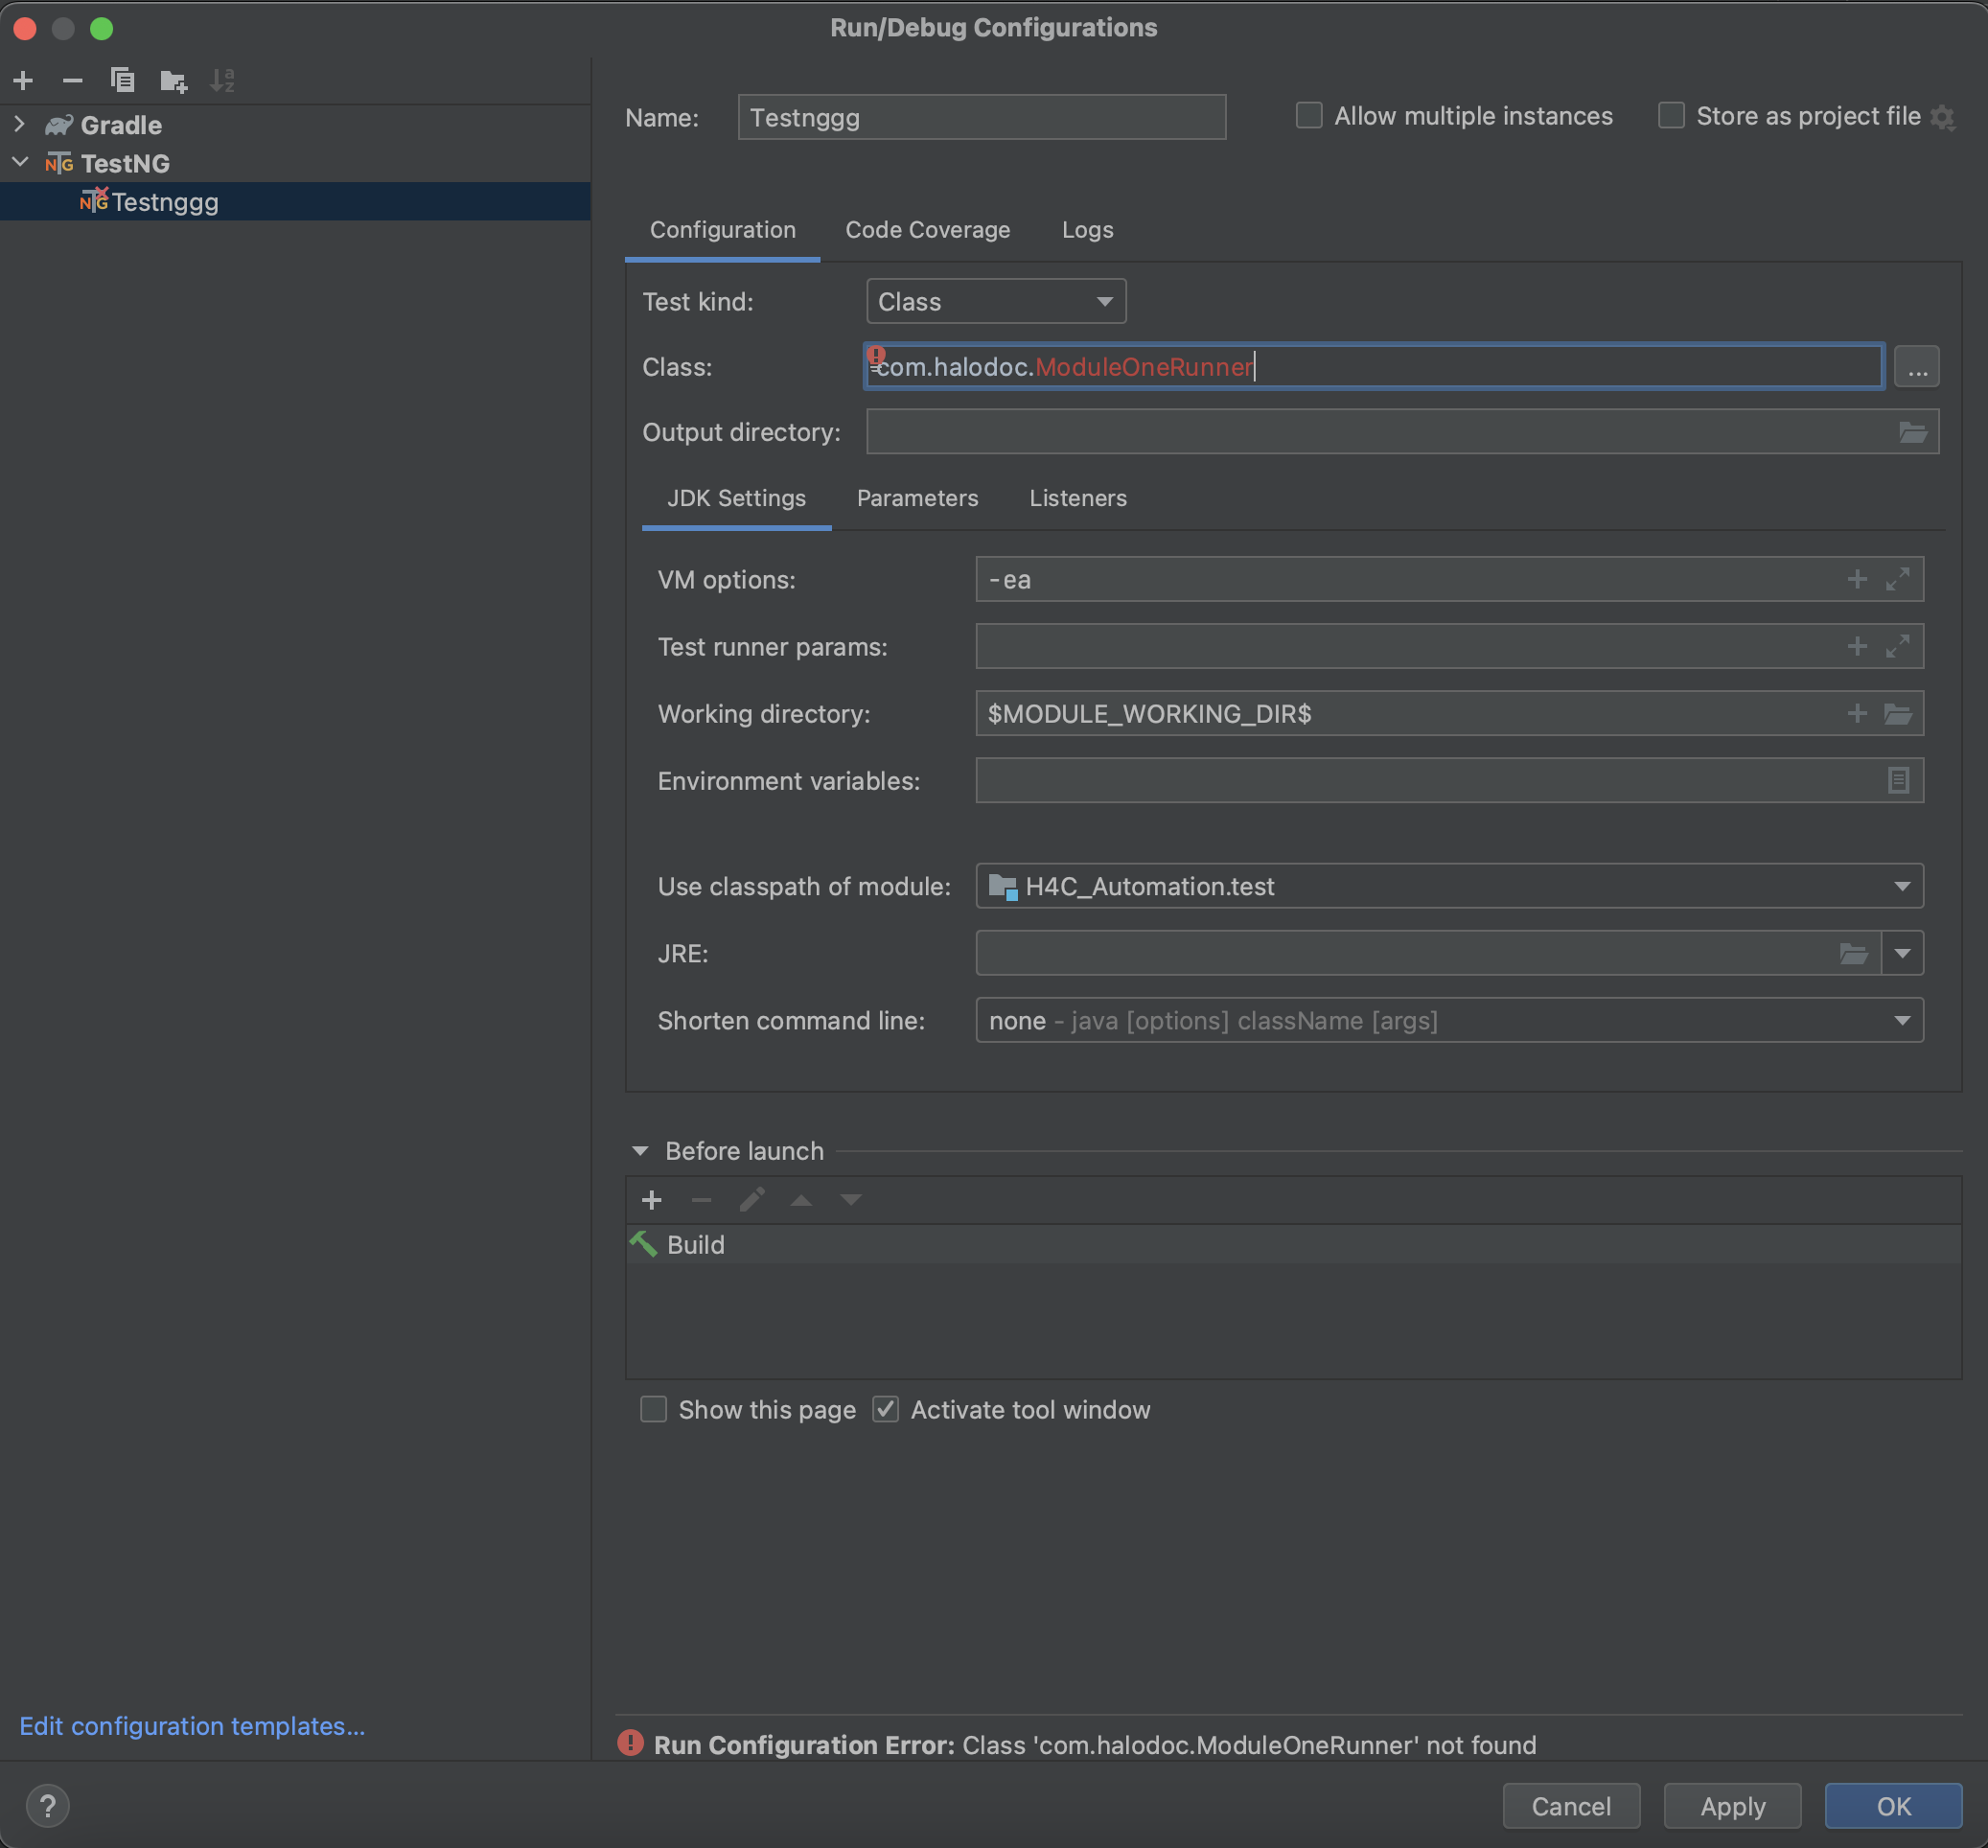
Create a new run configuration:
Go to Run | Edit Configurations. On the toolbar on the left, click + and select TestNG from the list. After that, you can complete the configuration using the options on the right as shown in the following image, and apply the changes. Now press the play icon on top to execute scenarios of the features defined in the runner file.
Gradle command
Open the terminal, traverse to the project location type the following Gradle command with necessary options if required and press enter.
./gradlew test -PmoduleOneSuite
You will observe that the scenarios are being executed and the report will be generated upon completion.
Step 8: CI/CD (Jenkins)
Jenkins is a popular Continuous Integration/Continuous Deployment tool. It provides numerous plugins for integration with multiple test automation into the test pipeline. When it comes to Test Automation, Jenkins provides plugins that help run test suites, gather dashboard results, and provide details on failures.
Runs Automated Test Suites:
Jenkins provides plugins for various test frameworks like Selenium, Cucumber, Appium, etc. These can be integrated into CI pipelines to run automated tests for every build.
Summarizes the results:
Test results are efficiently summarized and presented through a straightforward HTML page. This page provides a quick overview, clearly indicating the number of test cases that passed, were skipped, or encountered failures in the report.
Display details on Test Failures:
Our testing methodology guarantees thorough result tabulation, seamlessly integrating detailed failure logs alongside test outcomes. For enhanced clarity, we supplement these logs with screenshots capturing the exact moment of failure. This comprehensive approach accelerates issue identification and resolution, fostering a streamlined and efficient debugging process.
Parallel execution generates reports for each module. You can monitor suite health for each module which helps to get the detailed report.
Automation Result Pie Charts:

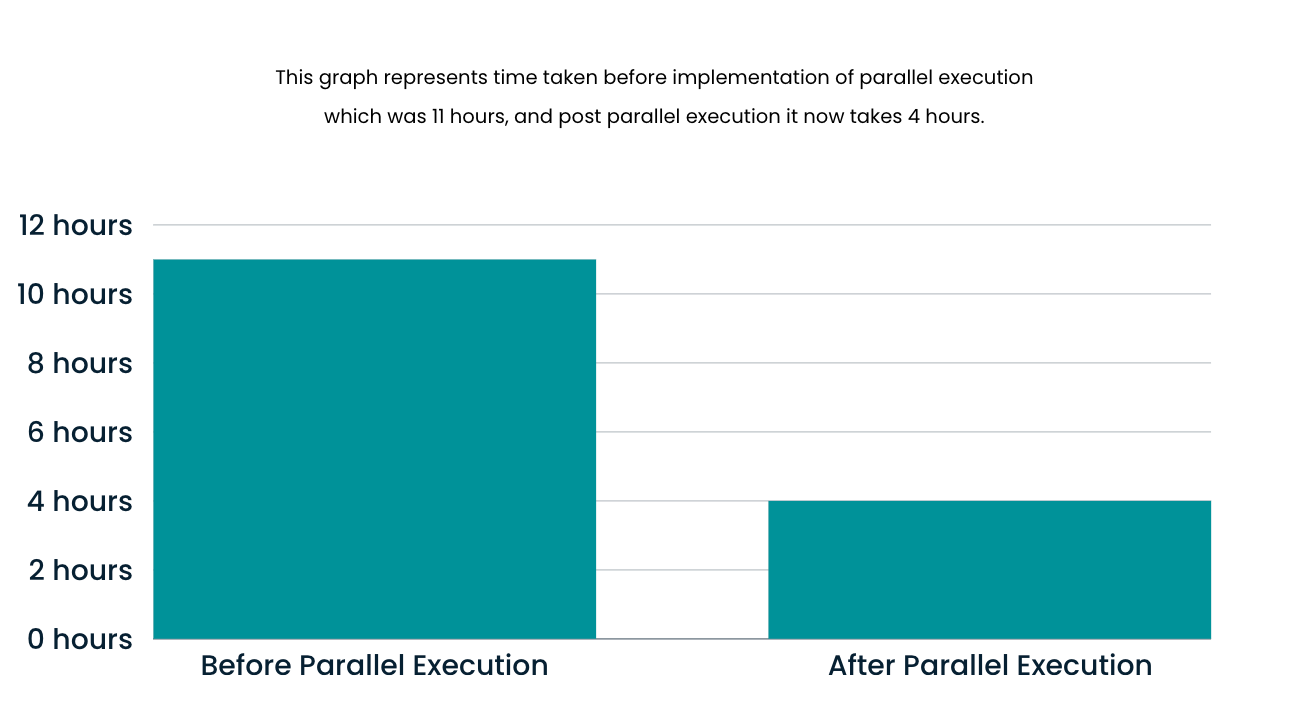
Result:
Prior to implementing parallel execution, the automation process required around ~11 hours to complete. However, with the introduction of parallel execution, the time has significantly reduced, and the process now takes approximately less than 4 hours. This enhancement in efficiency underscores the substantial time-saving benefits achieved through the parallelisation of test execution.
Conclusion
Implementing parallel execution in your BDD framework is a powerful way to optimize your testing process and save time. The key is to plan your parallel execution strategy thoughtfully, consider your test suite's specific needs, and implement the necessary changes gradually to ensure that parallel execution is a smooth and reliable part of your testing process. By grouping and tagging your scenarios, configuring your test runners, and setting up the right environment, you can achieve faster and more efficient test runs. With parallel execution, you'll be well on your way to maintaining a reliable and efficient BDD test suite.
References:
- https://cucumber.io/docs/guides/parallel-execution/?lang=java
- https://blogs.halodoc.io/mobile-app-automation-speed-optimization/
- https://www.browserstack.com/guide/parallel-test-execution-appium
Join Us
Scalability, reliability and maintainability are the three pillars that govern what we build at Halodoc Tech. We are actively looking for engineers at all levels and if solving hard problems with challenging requirements is your forte, please reach out to us with your resume at careers.india@halodoc.com.
About Halodoc
Halodoc is the number 1 all around Healthcare application in Indonesia. Our mission is to simplify and bring quality healthcare across Indonesia, from Sabang to Merauke. We connect 20,000+ doctors with patients in need through our Tele-consultation service. We partner with 3500+ pharmacies in 100+ cities to bring medicine to your doorstep. We've also partnered with Indonesia's largest lab provider to provide lab home services, and to top it off we have recently launched a premium appointment service that partners with 500+ hospitals that allow patients to book a doctor appointment inside our application. We are extremely fortunate to be trusted by our investors, such as the Bill & Melinda Gates Foundation, Singtel, UOB Ventures, Allianz, GoJek, Astra, Temasek, and many more. We recently closed our Series D round and in total have raised around USD$100+ million for our mission. Our team works tirelessly to make sure that we create the best healthcare solution personalised for all of our patient's needs, and are continuously on a path to simplify healthcare for Indonesia.